Design with iPhone Project 8: Networking
Warning:
Content of this website may change at any time up until class meeting.
Project Topics
- Remain in the same groups of 2.
- Members of any group must be all graduate or all undergrad.
- It would be a good idea to back up your work on a USB drive.
- Text: N/A
Preparation
- Download and open the project template below, so that you can cut and paste answers into the report as you complete the project.
- Create a new directory "Project8" for this project in your Documents directory, if you have not already done so.
Create a new iOS app in Xcode
- Run Xcode from the /Developer/Applications directory, and click "Create new Xcode project"
- Create an iOS "view-based application" as shown below (see green and red arrows below):
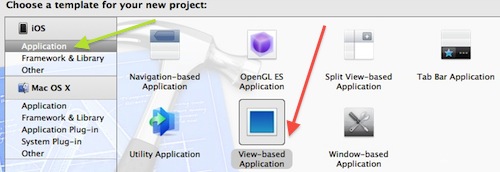
Fig. 1
- In the next pop-up, enter ProductName "project8xyz" where xyz is
your initials. Add company identifier "edu.uncc" (shown in the
red circle below) and device family "iPhone"
- In the next pop-up, select your project directory for your project
- Your new project should appear in the Xcode workspace window as below:
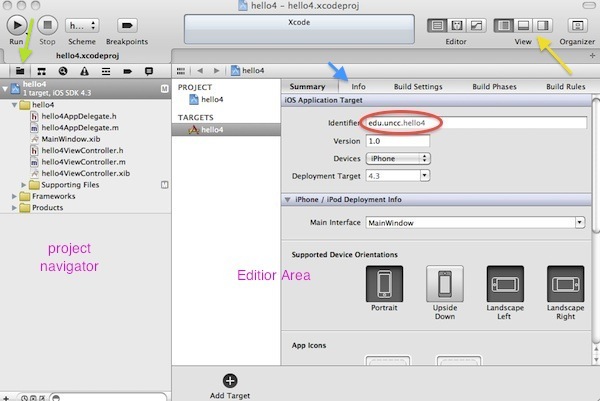
Fig. 2 Xcode Workspace Window
Bluetooth Networking
- We will use the GameKit framework to implement Bluetooth peer-to-peer connectivity
- Note: Bluetooth networking is not supported in the iOS Simulator.
- Bluetooth is a 2.4
GHz short-range low-power wireless link with a data rate of about 1
Mbit/s. (Enhanced Data Rate (EDR) is used to can achieve 2 - 3
Mbit/s.) A master Bluetooth device may control 7 other devices in
a piconet. Data packets have 1250 microsecond time slots and may
be 1, 3, or 5 slots long.
- A peer-to-peer network
(or ad-hoc network) can be thought of as a direct communication link
between two (or more) local computers that does not require other
infrastructure, such as routers or wireless access points
- Each iOS device would be a peer, and would be running a GKSession object that handles the bluetooth connection
- See also: Peer-to-Peer Connectivity in the GameKit Programming Guide
- First, begin by building the interface below in your project8tpwViewController.xib nib file:
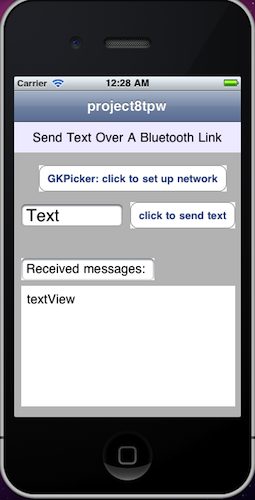
Fig. 3
- Attach outlets and actions similar to the following:
@interface project8tpwViewController : UIViewController {
UITextField *myTextField;
UITextView *myTextView;
}
@property (nonatomic, retain) IBOutlet UITextField *myTextField;
@property (nonatomic, retain) IBOutlet UITextView *myTextView;
- (IBAction)myGkPickButton:(id)sender;
- (IBAction)mySendButton:(id)sender;
- (IBAction)resignTextFieldKeyboard:(id)sender;
@end
- Edit your resignTextField as in earlier projects:
- (IBAction)resignTextFieldKeyboard:(id)sender {
[myTextField resignFirstResponder];
}
- Run the app
- Take a snapshot of your app as in Fig. 3 above (Make sure to include the NavigationBar with your initials, and the 2 buttons, textField, TextView, and labels), and paste it into your report as Fig. P1. (
Use the application Grab.app in the Applications/Utilities folder)
The PeerPicker
- The GameKit provides the GKPeerPickerController for the discovery of peers and connection to peers.
- The GKPeerPickerController will create a GKSession that connects the two peers.
- The main parameters of a GKSession are:
- peerID
property: Each peer must create a unique peer identification to
identify itself on the network. Interactions with other peers on the
network are done using peer IDs.
- displayName property: human-readable
name (nickname) for that peer such as "myIpod." This is accessible
using the displayNameForPeer method (If nil, it defaults to your iPhone
name)
- sessionID
property: A read-only string used to filter the list of peers who
are allowed to see your session, and used to advertise itself to other peers
and to search for compatible peers. Created with the
GKSessioninitWithSessionID method. The session ID should be the
short name of an approved Bonjour service type. If nil, the
application’s bundle identifier is used to create a sessionID.
- sessionMode property: has three possible states:
- GKSessionModeServer session advertises itself to local devices using its session ID
- GKSessionModeClient session searches for local devices
advertising the same session ID. When it discovers compatible
peers, it calls the peer:didChangeState method
- A GKSessionModePeer session both advertises as a server and searches as a client.
- available property: Boolean value YES/NO whether or not the session will connect to new peers.
- It will take a number of steps to implement the peer picker
- First, edit your project8tpwViewController.h header, especially noting the items in red below:
#import <UIKit/UIKit.h>
#import <GameKit/GameKit.h>
//tpw gkpick
@interface project8tpwViewController : UIViewController
<GKPeerPickerControllerDelegate, GKSessionDelegate, UIAlertViewDelegate> //tpw gkpick
{
UITextField *myTextField;
UITextView *myTextView;
GKSession *gameSession;
//tpw gkpick
NSString *gamePeerId;
//tpw gkpick
UIAlertView *connectionAlert;
//tpw gkpick
}
@property (nonatomic, retain) IBOutlet UITextField *myTextField;
@property (nonatomic, retain) IBOutlet UITextView *myTextView;
- (IBAction)myGkPickButton:(id)sender;
- (IBAction)mySendButton:(id)sender;
- (IBAction)resignTextFieldKeyboard:(id)sender;
@property(nonatomic, retain) GKSession *gameSession; //tpw gkpick
@property(nonatomic, copy) NSString *gamePeerId; //tpw gkpick
@property(nonatomic, retain) UIAlertView *connectionAlert; //tpw gkpick
- (void)endSession:(GKSession *)session;
//tpw gkpick
- (void) mySendDataToPeers: (NSData *) data;
//tpw gkpick
@end
- Next, add corresponding synthesis statements in your project8tpwViewController.m file:
@synthesize gameSession; //tpw gkpick
@synthesize
gamePeerId;
//tpw gkpick
@synthesize connectionAlert; //tpw gkpick
- Implement your peer-picker button method:
- (IBAction)myGkPickButton:(id)sender
{
//tpw gkpick
GKPeerPickerController* picker;
picker = [[GKPeerPickerController alloc] init]; picker.delegate = self;
picker.connectionTypesMask = GKPeerPickerConnectionTypeNearby ;
[picker show];
}
- Add the GameKit framework:
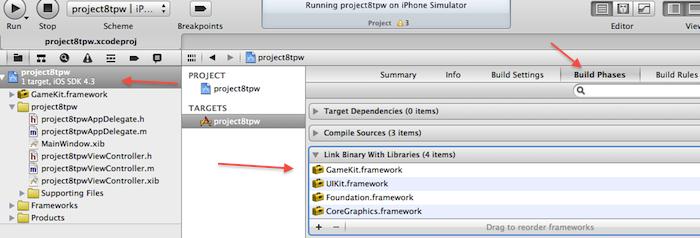
Fig. 4
- Run your app at this stage
- You should see the PeerPicker as follows:
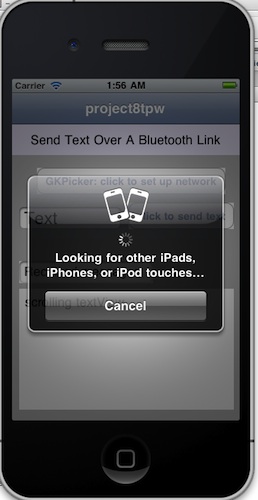
Fig. 5
- Take a snapshot of your app as in Fig. 5 above (Make sure to include the NavigationBar with your initials, and the "looking for other iPods"), and paste it into your report as Fig. P2.
- Next, implement the PeerPicker delegate functions:
- (void)peerPickerController:(GKPeerPickerController *)picker didSelectConnectionType:(GKPeerPickerConnectionType)type {
if (type == GKPeerPickerConnectionTypeOnline) {
picker.delegate = nil;
[picker dismiss];
[picker autorelease];
// Implement your internet interface here.
}
}
- (GKSession *)peerPickerController:(GKPeerPickerController *)picker sessionForConnectionType:(GKPeerPickerConnectionType)type
{
GKSession* session = [[GKSession alloc]
initWithSessionID:@"tpwNet" displayName:nil
sessionMode:GKSessionModePeer];
return [session autorelease];
}
- (void)peerPickerController:(GKPeerPickerController *)picker
didConnectPeer:(NSString *)peerID toSession: (GKSession *) session {
self.gamePeerId = peerID;
self.gameSession = session;
self.gameSession.delegate = self;
[self.gameSession setDataReceiveHandler:self withContext:nil];
picker.delegate = nil;
[picker dismiss];
[picker autorelease];
}
- (void)session:(GKSession *)session peer:(NSString *)peerID didChangeState:(GKPeerConnectionState)state {
NSString *message;
switch (state) {
case GKPeerStateConnected:
self.gamePeerId = peerID;
break;
case GKPeerStateDisconnected:
message = [[NSString alloc ]stringWithFormat:@"Could not reconnect with
%@.", [session displayNameForPeer:peerID]];
if(
self.connectionAlert && self.connectionAlert.visible) {
self.connectionAlert.message = message;
}
else {
UIAlertView *alert = [[UIAlertView alloc] initWithTitle:@"Lost
Connection" message:message delegate:self cancelButtonTitle:@"End"
otherButtonTitles:nil];
self.connectionAlert = alert;
[alert show];
[alert release];
}
break;
case GKPeerStateAvailable:
break;
caseGKPeerStateUnavailable:
break;
case GKPeerStateConnecting:
break;
default:
break;
}
}
- (void)peerPickerControllerDidCancel:(GKPeerPickerController *)picker
{
picker.delegate = nil;
[picker autorelease];
if(self.gameSession != nil) {
[self endSession:self.gameSession];
self.gameSession = nil;
}
}
- (void)endSession:(GKSession *)session {
if(session != nil) {
[session disconnectFromAllPeers];
session.available = NO;
[session setDataReceiveHandler: nil withContext: nil];
session.delegate = nil;
}
}
- (void)dealloc
{
if(self.connectionAlert.visible) {
[self.connectionAlert dismissWithClickedButtonIndex:-1 animated:NO];
}
self.connectionAlert = nil;
[self endSession:self.gameSession];
self.gameSession = nil;
self.gamePeerId = nil;
[myTextField release];
[myTextView release];
[super dealloc];
}
- Make sure that you do not change the "initWithSessionID:@"tpwNet"statement
otherwise you will not be able to see other iPods in the classroom on
your list of other bluetooth devices
- Run your app on your iPod
- You should now be able to observe other nearby iPods as below:
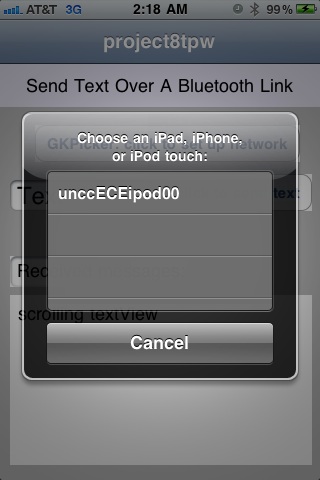
Fig. 6
- Simultaneously press both buttons on your iPod to take a snapshot of your app on your iPod as in Fig. 6 above (Make sure to include the NavigationBar with your initials, and the "choose an ipad"), and paste it into your report as Fig. P3.
- Finally, implement the methods to send and receive text:
-(IBAction)mySendButton:(id)sender {
NSData* data;
NSString *str = [NSString stringWithString:myTextField.text];
data = [str dataUsingEncoding: NSASCIIStringEncoding];
if ([data length]>0)
[self mySendDataToPeers:data];
}
- (void) mySendDataToPeers: (NSData *) data
{
if((self.gameSession != nil) && ([data length] >0) )
{
[self.gameSession
sendDataToAllPeers: data withDataMode: GKSendDataReliable error: nil];
}
else
{
UIAlertView *alert =
[[UIAlertView alloc] initWithTitle:@"Send Error" message:@"Cant send
until a network is established." delegate:self
cancelButtonTitle:@"Cancel" otherButtonTitles:nil];
self.connectionAlert = alert;
[alert show];
[alert release];
}
}
- (void) receiveData:(NSData *)data fromPeer:(NSString *)peer inSession: (GKSession *)session context:(void *)context {
if([data length] >0)
{
NSString* str1;
NSString* str2;
str1 = [[NSString alloc] initWithData:data encoding:NSASCIIStringEncoding];
str2 = [[NSString alloc] initWithFormat:@"%@: %@ \n", session.displayName,str1] ;
NSLog(@"%@: %@ \n", session.displayName, str1);
myTextView.text=[ str2 stringByAppendingString: myTextView.text];
[str1 release];
[str2 release];
}
}
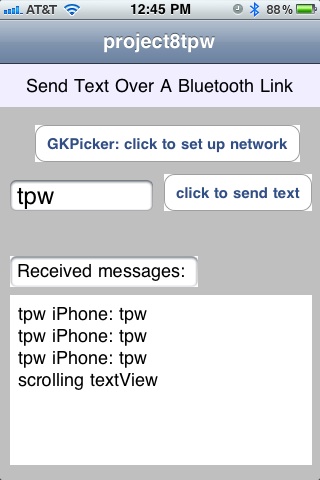
Fig. 7
- Simultaneously press both buttons on your iPod to take a snapshot of your app on your iPod as in Fig. 7 above (Make sure to include the NavigationBar with your initials, and the "someIpod: your-initials" in the text view area showing that your link functioned properly), and paste it into your report as Fig. P4.
- Finally, edit your code at the appropriate line to allow the Online option in peer-picker as follows:
picker.connectionTypesMask = GKPeerPickerConnectionTypeNearby | GKPeerPickerConnectionTypeOnline;

Fig. 8
- Simultaneously press both buttons on your iPod to take a snapshot of your app on your iPod as in Fig. 8 above (Make sure to include the NavigationBar with your initials, and the "Online/Nearby" pop-up), and paste it into your report as Fig. P5.
Other Networking Resources
- For further iOS networking information, please see:
Demonstration
- Demonstrate the complete project (all apps) on your iPod and have the instructor sign the cover sheet of your report. (Worth 20% of project) (Q)
Report
- Include the plot/picture/snapshot numbers P1, P2, etc. in captions, along with a short description!
- Place answers to all questions on one or more consecutive sheets of paper at the front of the report!
- Include the question numbers Q1, Q2, etc in answers, along with the question!
- Do NOT scatter the question answers throughout the report, keep them together
- Write a cover sheet + 1 page executive summary ONLY!!! Describe any unresolved issues.
- Make sure that you include question numbers and plot numbers on all sheets!
- Instructor will only look on the question answer-sheets for any discussion.
- All extraneous material WILL BE IGNORED!
- Do not write any discussion, except directly on the question answer-sheets or 1 page summary.
- Do not add extraneous pages.
- Do not put explanations on plots unless specifically directed to do so.
- Include any problems or unresolved issues in the summary.
- ONLY turn in the specific snippets of source code as requested (NOT ANYTHING ELSE!!")
- Include any problems or unresolved issues in the summary.
Copyright 2011 by T.P. Weldon
Apple, iPhone, iPad, and Xcode are registered trademarks of Apple Inc.