Design with iPhone Project 7: Rotatable/resizable apps,
gestures/swipes, motion
Warning:
Content of this website may change at
any time up until class meeting.
Project Topics
- Remain in the same groups of 2.
- Members of any group must be all
graduate or all undergrad.
- It would be
a good idea to back up your work on a USB drive.
- Text: Chapters 15,16,17
Preparation
- Download and open the project template
below, so that you can cut and paste answers into the report as
you complete the project.
- Create a new directory "Project7" for this project in your
Documents directory, if you have not already done so.
Create a new iOS app in Xcode
- Run Xcode from the /Developer/Applications directory, and click
"Create new Xcode project"
- Create a new iOS "Tab Bar
application" in Xcode (red arrow below), and call it
"project7xyz" where xyz is your initials
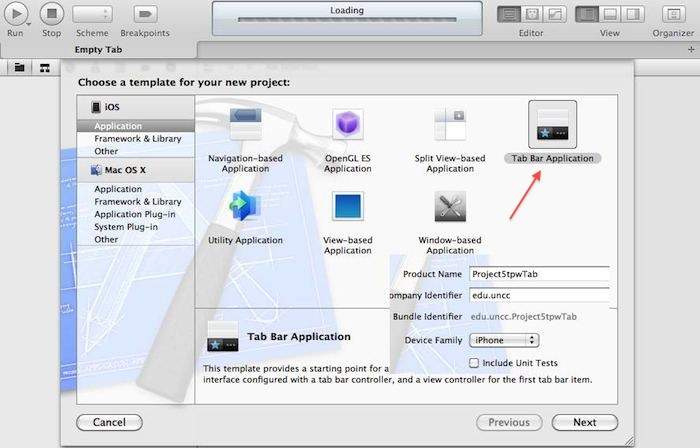
Fig. 1
- In the
ProjectNavigator pane on the left side of Xcode, notice that you
already have two controllers FirstViewController.xib and
SecondViewController.xib.
<>As in project5, right-click
the Project7tpw folder (blue arrow below) and
NewFile::UIViewControllerSubclass::WithXib to add one new view to
your
app called ThirdViewController.m, as illustrated below:
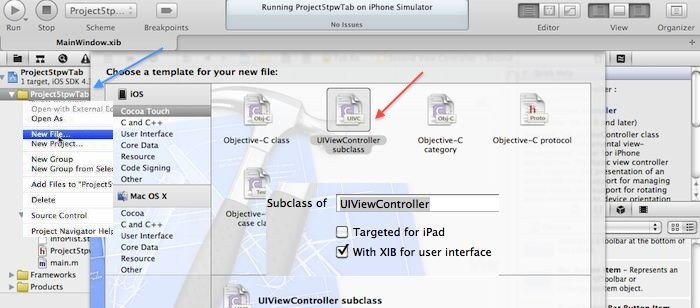
Fig. 2
- Next, select the MainWindow.xib file as shown below (upper
left red arrow), select the TabBarController (black arrow), and add a
third TabBarItem (lower right red arrow) to the TabBar (yellow arrow)
- Add three tab buttons "Rotate," "Gestures," "Motion, as below
- Add navigation bars with titles "Rotate," "Gestures," "Motion, as
below
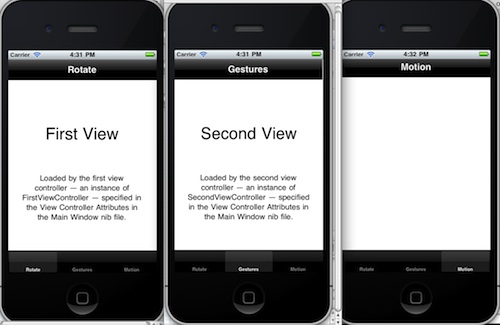
Fig. 3
Supporting Rotated Views
- Make sure that your build includes the options supporting
orientations as shown below in the arrows in red below
- Run your app, rotate it right
(iOSsimulator::Hardware::RotateRight), and you should see that your app
does not "rotate properly." It remains "stuck" and the view
rotates with the phone as shown below.
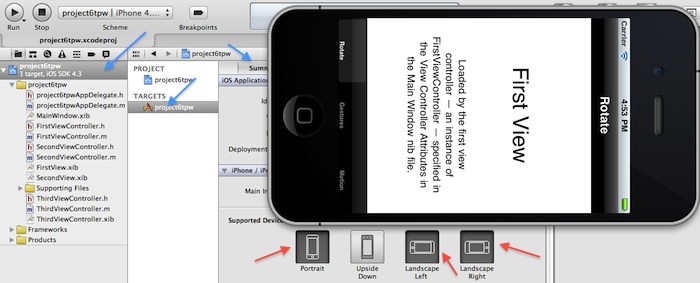
Fig. 4
- Take a snapshot of your window as in Fig. 4 above (Make sure to
include the "First
View," the "stuck" rotated view, the three TabBar
buttons, and
the xcode background showing the three supported device orientation
buttons selected as shown), and paste it into your report as Fig. P1. (
Use the application Grab.app in the Applications/Utilities folder)
- Next, edit the following to method in all three view controllers,
FirstViewController.m, SecondViewController.m, ThirdViewController.m
-
(BOOL)shouldAutorotateToInterfaceOrientation:(UIInterfaceOrientation)interfaceOrientation
{
return (interfaceOrientation ==
UIInterfaceOrientationPortrait
||
interfaceOrientation == UIInterfaceOrientationLandscapeLeft ||
interfaceOrientation == UIInterfaceOrientationLandscapeRight);
}
- Make sure to set the ThirdViewControlerClass on the new
tabBarButton as follows
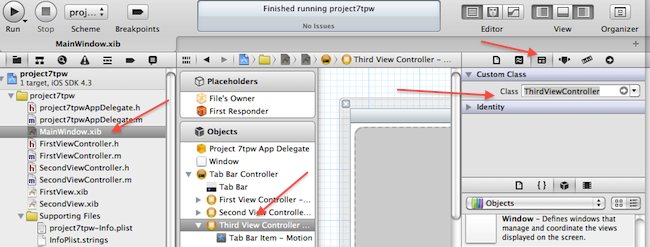
Fig. 5
- Re-run the app
- Now, when you rotate the device right, you should see
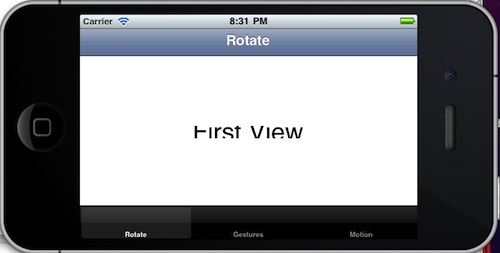
Fig. 6
- Take a snapshot of your window as in Fig. 6 above (Make sure to
include the "First View,"
the "Rotate" navigation
bar, and the three TabBar buttons as shown), and paste it into
your report as Fig. P2.
- Although the above example now rotates properly, the items are
cropped and/or off-screen
Resizing
- We will use size inspector to manually set constraints.
(Newer tools have autolayout option under file inspector).
- Select the FirstView.xib nib file, one of the text areas, and the
size inspector as shown
by the red arrows below.
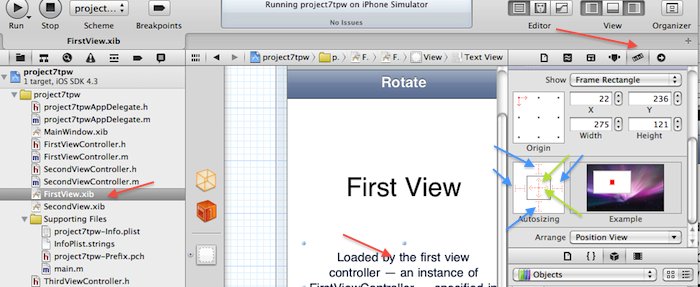
Fig. 7
- Turn off all the struts
(blue arrows)
- Turn off all the springs
(green arrows)
- Repeat this for both text areas in the view.
- (Experiment with other settings if you wish)
- Re-run your project
- When you rotate right, the first view should now appear as below.
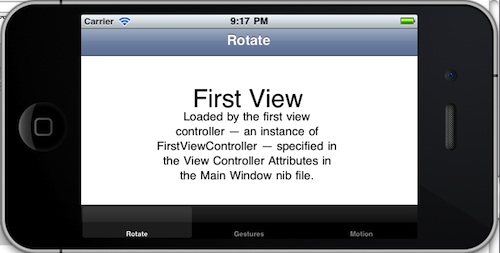
Fig. 8
- Take a snapshot of your window as in Fig. 8 above (Make sure to
include the "First View,"
the text below it, the "Rotate" navigation
bar, and the three TabBar buttons as shown), and paste it into
your report as Fig. P3.
Reframing
- Another method for handling rotation is reframing
- Implement reframing to obtain the rotated view below
- Hint: use code such as:
-(void)willRotateToInterfaceOrientation:
(UIInterfaceOrientation)toInterfaceOrientation
duration:(NSTimeInterval)duration
{
[super
willRotateToInterfaceOrientation:toInterfaceOrientation
duration:duration];
if (toInterfaceOrientation ==
UIInterfaceOrientationLandscapeRight ||
toInterfaceOrientation ==
UIInterfaceOrientationLandscapeLeft) {
myLabel1.frame=CGRectMake(20.0,50.0,100.0,50.0);
myNavBar1.frame=CGRectMake(-1.0,-1.0,481.0,44.0);
myTextView1.frame=CGRectMake(150.0,50.0,300.0,250.0);
} else {
myLabel1.frame=CGRectMake(55.0,140.0,210.0,45.0);
myNavBar1.frame=CGRectMake(-1.0,-1.0,320.0,44.0);
myTextView1.frame=CGRectMake(20.0,240.0,280.0,120.0);
}
}
- Re-run your app to
- You should get output as follows for RotateRight view 1:
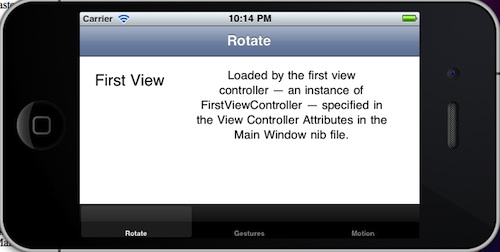
Fig. 9
- Take a snapshot of your window as in Fig. 9 above (Make sure to
include the "First View,"
the text below it, the "Rotate" navigation
bar, and the three TabBar buttons as shown), and paste it into
your report as Fig. P4.
Gesture recognition
- One of the main features of iPhone is the ability to recognize gestures on the screen
- To demonstrate recognition, add a Label and ImageView to the
SecondViewxib interface created above.
- The interface should appear as below:
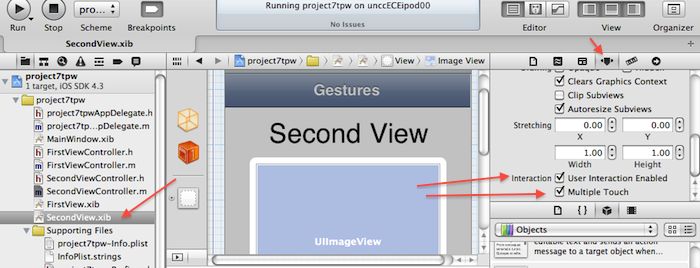
Fig. 10
- Make sure to check the "User Interaction Enabled" and "Multiple
Touch" for the UIImageView as shown at the red arrows above
- Set the image background to a bright color
- Add outlets for the ImageView and Label using ctrl-drag as usual,
with outlets named such as:
@property (nonatomic, retain) IBOutlet
UILabel *myLabel2;
@property (nonatomic, retain) IBOutlet UIImageView *myImageView2;
- To add the multi-touch gesture recognition, add code to
SecondViewController.m such as:
- (void)viewDidLoad
{ [super viewDidLoad];
UITapGestureRecognizer *mytap1;
mytap1=[[UITapGestureRecognizer alloc]
initWithTarget:self
action:@selector(foundTap1:)];
mytap1.numberOfTapsRequired=1;
mytap1.numberOfTouchesRequired=1;
[myImageView2 addGestureRecognizer:mytap1];
[mytap1 release];
UISwipeGestureRecognizer *myswiper;
myswiper=[[UISwipeGestureRecognizer alloc]
initWithTarget:self
action:@selector(foundSwiper:)];
myswiper.direction=UISwipeGestureRecognizerDirectionRight;
myswiper.numberOfTouchesRequired=1;
[myImageView2 addGestureRecognizer:myswiper];
[myswiper release];
}
- (void)foundTap1:(UITapGestureRecognizer *)recognizer {
myLabel2.text=@"Single-Tap";
}
- (void)foundSwiper:(UISwipeGestureRecognizer *)recognizer {
myLabel2.text=@"Swipe-Right";
}
- Add your own code so that you recognize 4 total gestures: tap,
double-tap, swipe-left, swipe-right
- For each gesture, the corresponding action should be printed in
the label location as follows:
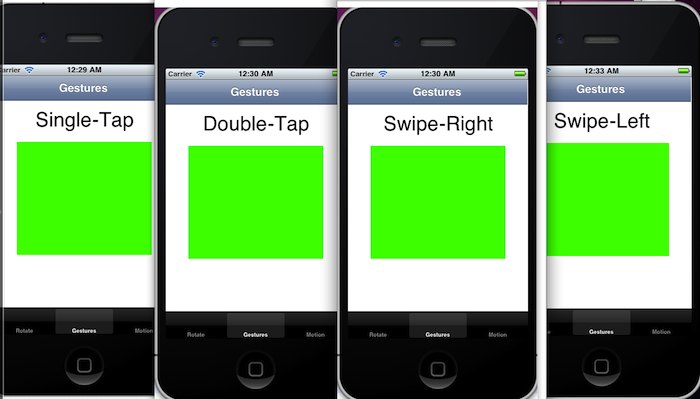
Fig. 11
- Take a snapshot of your 4 windows mergedtogether as in Fig. 11
above (Make sure to include the "Single-tap,"
the "Double-tap," the "Swipe-right," and the "Swipe-Left" outputs, the
"Gestures" navigation bar,
and the three TabBar buttons as shown), and paste it into your
report as Fig. P5.
- Note: your gestures
should only work within the ImageView
Accelerometer & Gyro
- iPhone has accelerometers
on all 3 axes
- These measure orientation of the iPhone by sensing the effect of
gravity on all 3 axes
- In the third view of your TabBar controller, create a view that
reads the accelerometers and displays them as shown below.

Fig. 12
- See the book for details
- Hint:
#import <UIKit/UIKit.h>
#import <CoreMotion/CoreMotion.h>
@interface ThirdViewController : UIViewController {
UILabel *myXlabel;
UILabel *myYlabel;
UILabel *myZlabel;
UILabel *myXlabel2;
UILabel *myYlabel2;
UILabel *myZlabel2;
CMMotionManager *motionManager;
}
@property (nonatomic, retain) IBOutlet UILabel *myXlabel;
@property (nonatomic, retain) IBOutlet UILabel *myYlabel;
@property (nonatomic, retain) IBOutlet UILabel *myZlabel;
@property (nonatomic, retain) IBOutlet UILabel *myXlabel2;
@property (nonatomic, retain) IBOutlet UILabel *myYlabel2;
@property (nonatomic, retain) IBOutlet UILabel *myZlabel2;
- (void)printAcceleration:(CMAcceleration)acceleration ;
- (void)printGyros:(CMRotationRate)rotation ;
@end
- (void)viewDidLoad
{
motionManager = [[CMMotionManager alloc] init];
motionManager.accelerometerUpdateInterval =
.1;
[motionManager
startAccelerometerUpdatesToQueue:[NSOperationQueue currentQueue]
withHandler:^(CMAccelerometerData *accelData,
NSError *error) {
[self
printAcceleration:accelData.acceleration];
}];
[super viewDidLoad];
}
- Display the values at 1
digit precision beyond the decimal point, and at an update rate
of accelerometerUpdateInterval = .1
- Take a snapshot of your window as in Fig. 12 above (Make sure to
include the "Accelerometer,"
the "x=," the "y=," and the "z=" outputs, and the three
TabBar buttons as shown), and paste it into your report as Fig. P6.
- Hint: your view controlloer may resemble
- Later models of iPhone/iPod also have gyros on all 3 axes
- These measure angular acceleration of the iPhone
- Add a second set of readouts to show gyro data as below:

Fig. 13
- Display the values at 1
digit precision beyond the decimal point, and at an update rate
of accelerometerUpdateInterval = .1
- Take a snapshot of your window as in Fig. 13 above (Make sure to
include the "Accelerometer,"
the "Gyros," the two sets
of "x=," the "y=," and the "z=" outputs, and the three
TabBar buttons as shown), and paste it into your report as Fig. P7.
- Finally, arrange your new accelerometer/gyro view so that when
the iPod is rotated, all data remain nicely on screen as follows:
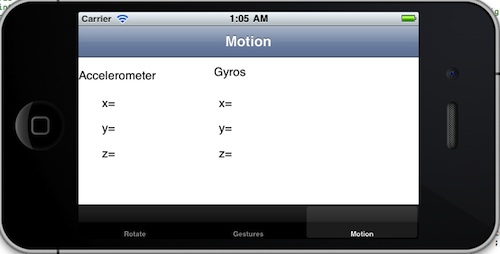
Fig. 14
- Take a snapshot of your window as in Fig. 14 above (Make sure to
include the "Accelerometer,"
the "Gyros," the two sets
of "x=," the "y=," and the "z=" outputs, and the three
TabBar buttons as shown), and paste it into your report as Fig. P8.
Demonstration
- Demonstrate
the complete project (all apps) on your iPod and have the
instructor sign the cover sheet of your report. (Worth 20% of project) (Q)
Report
- Include the plot/picture/snapshot numbers P1, P2, etc. in
captions, along with a short description!
- Place answers to all questions on one or more consecutive sheets
of paper at the front of the report!
- Include the question numbers Q1, Q2, etc in answers, along with
the question!
- Do NOT scatter the question answers throughout the report, keep
them together
- Write a cover sheet + 1 page executive summary ONLY!!!
Describe any unresolved issues.
- Make sure that you include question numbers and plot numbers on
all sheets!
- Instructor will only look on the question answer-sheets for any
discussion.
- All extraneous material WILL BE IGNORED!
- Do not write any discussion, except directly on the question
answer-sheets or 1 page summary.
- Do not add extraneous pages.
- Do not put explanations on plots unless specifically directed to
do so.
- Include any problems or unresolved issues in the summary.
- ONLY turn in the specific snippets of source code as requested
(NOT ANYTHING ELSE!!")
- Include any problems or unresolved issues in the summary.
Copyright 2011 by T.P. Weldon
Apple, iPhone, iPad, and Xcode are registered trademarks of Apple
Inc.