Design with iPhone Project 6: Table view, app preferences, sandbox, file storage
Warning:
Content of this website may change at any time up until class meeting.
Project Topics
- Remain in the same groups of 2.
- Members of any group must be all graduate or all undergrad.
- It would be a good idea to back up your work on a USB drive.
- Text: Chapters 13,14
Preparation
- Download and open the project template below, so that you can cut and paste answers into the report as you complete the project.
- Create a new directory "Project5" for this project in your Documents directory, if you have not already done so.
Create a new iOS app in Xcode
- Run Xcode from the /Developer/Applications directory, and click "Create new Xcode project"
- Create an iOS "Navigation-based Application" as shown below (see green and red arrows below):
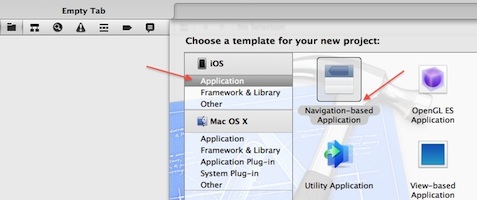
Fig. 1
- In the next pop-up, enter ProductName "project6xyz" where xyz is
your initials. Add company identifier "edu.uncc" (shown in the
red circle below) and device family "iPhone"
- In the next pop-up, select your project directory for your project
- Your new project should appear in the Xcode workspace window as below:
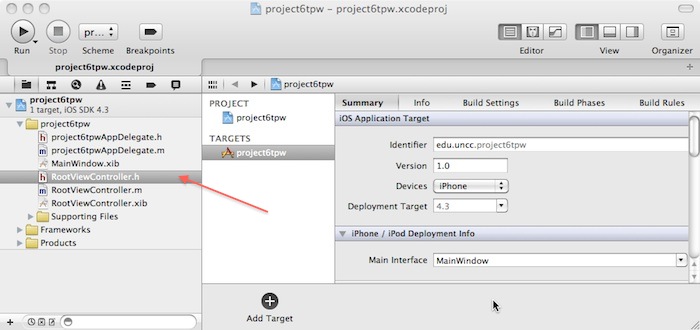
Fig. 2 Xcode Workspace Window
Table Views
- TableViews are functionally similar to pickers, except that a tabular format is used in the interface.
- For simple apps, a table may suffice.
- We will proceed by using a Navigation-Based app to implement our TableView app. This is a bit of overkill, since our TableView app might be considered as a single-level Navigation-based app.
- The navigation-based app uses a new type of controller, the UITableViewController, instead of the UIViewController we commonly use
- The UITableViewController uses the UITableViewDataSource protocol and UITableViewDelegate for data and display.
- Open the RootViewController.h header file (red arrow above) and
note that you have a parent class of type UITableViewController
as shown at the red arrow below
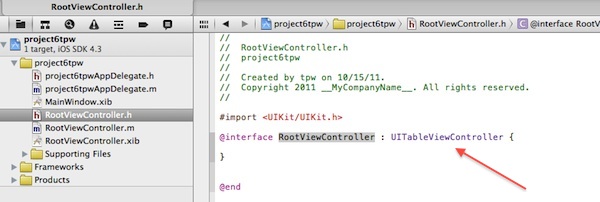
Fig. 3
- Take a snapshot of your window as in Fig. 3 above (Make sure to include the "@interface RootViewController : UITableViewController" statement, and the Comments at the top of the header file with your initials), and paste it into your report as Fig. P1. (
Use the application Grab.app in the Applications/Utilities folder)
- Note:
you could have also created the TableView app by creating a view-based
app and dragging the TableView widget onto the view. Or by
creating a window-based app and adding a TableViewController as
described in the book. However, use the Navigation-based app
template as described above for this project, since we will build upon
it later.
- Next, run the app and you should see an "unpopulated" blank table view as below:
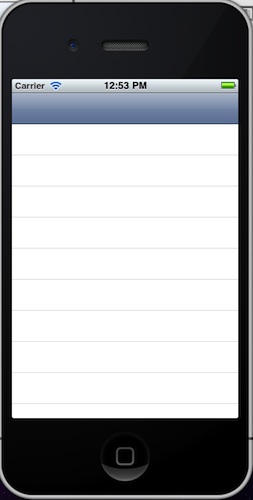
Fig. 4
- Take a snapshot of your app as in Fig. 4 above (Make sure to include the full view as above and the Time ), and paste it into your report as Fig. P2.
- Next, the code will be modified to populate the table.
- Open the RootViewController.h header file, and add 2 data arrays for the table data as follows:
NSMutableArray *myTableData1;
NSMutableArray *myTableData2;
- Then, add some example data in the RootViewController.m
imlementation file. For expedience, use the viewDidLoad method
(replace tpw with your initials below):
- (void)viewDidLoad
{
[super viewDidLoad];
self.title=@"tpw Table";
myTableData1 = [[NSMutableArray alloc] initWithObjects:@"one",@"two",@"three",nil];
myTableData2 = [[NSMutableArray alloc] initWithObjects:@"four",@"five",nil];
}
- And make sure to prevent memory leaks by editing the RootViewController.m dealloc method as follows:
- (void)dealloc
{
[myTableData1 release];
[myTableData2 release];
[super dealloc];
}
- Then, edit the number of TableSections in the RootViewController.m imlementation file, in the numberOfSectionsInTableView method:
- (NSInteger)numberOfSectionsInTableView:(UITableView *)tableView
{
return 2;
}
- Add a switch statement to the the numberOfRowsInSection
method in RootViewController.m to properly set the number of
rows. (Since there are 2 TableSections, we must count the number
of rows needed for each section.)
- (NSInteger)tableView:(UITableView *)tableView numberOfRowsInSection:(NSInteger)section
{
switch (section) {
case 0:
return [myTableData1 count];
break;
case 1:
return [myTableData2 count];
break;
default:
return 0;
break;
}
}
- A template placeholder for method titleForHeaderInSection may not exist in RootViewController.m, and
so you will probably need to enter this next part in its
entirety. Add a switch statement to the titleForHeaderInSection method in RootViewController.m to properly set the number of rows as follows:
- (NSString *)tableView:(UITableView *)tableView titleForHeaderInSection:(NSInteger)section {
switch (section) {
case 0:
return @"Section 1";
break;
case 1:
return @"Section 2";
break;
default:
return @"title error";
break;
}
}
- Add a switch statement to the cellForRowAtIndexPath method in RootViewController.m to properly set the number of rows as follows:
- (UITableViewCell *)tableView:(UITableView *)tableView cellForRowAtIndexPath:(NSIndexPath *)indexPath
{
static NSString *CellIdentifier = @"Cell";
UITableViewCell *cell = [tableView dequeueReusableCellWithIdentifier:CellIdentifier];
if (cell == nil) {
cell = [[[UITableViewCell
alloc] initWithStyle:UITableViewCellStyleDefault
reuseIdentifier:CellIdentifier] autorelease];
}
// Configure the cell.
switch (indexPath.section) {
case 0:
[[cell textLabel]
setText:[myTableData1 objectAtIndex:indexPath.row]];
break;
case 1:
[[cell textLabel]
setText:[myTableData2 objectAtIndex:indexPath.row]];
break;
default:
[[cell textLabel]
setText:@"cell error"];
break;
}
return cell;
}
- Select the TableView in the RootViewController.xib nib file, and
set the attribute "Style" to "Grouped" as shown at the red arrows below:
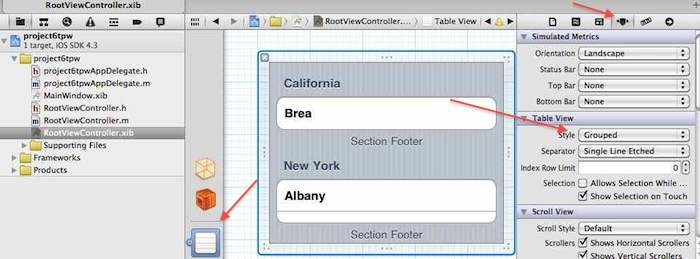
Fig. 5
- Run your app, and it should appear as follows:
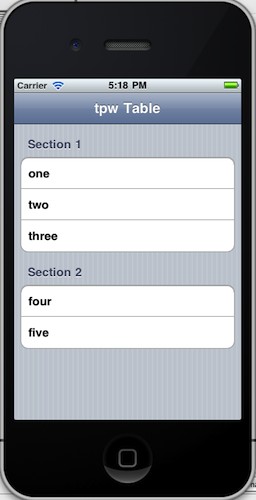
Fig. 6
- Take a snapshot of your window as in Fig. 6 above (Make sure to include the "tpw Table" replacing tpw with your initials, and the two sections, the rounded corners, and the 5 cells), and paste it into your report as Fig. P3.
- Finally, you must add the actions to the tableView.
However, TableView actions are "built-in," so you dont need to add
actions using the InterfaceBuilder. To demonstrate the actions,
we will add a simple alert to each item in the table. Just add
your code for the appropriate actions to the didSelectRowAtIndexPath method in RootViewController.m as follows:
- (void)tableView:(UITableView *)tableView didSelectRowAtIndexPath:(NSIndexPath *)indexPath
{
UIAlertView *myAlert;
NSString *myAlertText;
switch (indexPath.section) {
case 0:
myAlertText=[[NSString alloc]
initWithFormat:
@"You chose section %i row %i named %@",
indexPath.section, indexPath.row,
[myTableData1 objectAtIndex: indexPath.row]];
break;
case 1:
myAlertText=[[NSString alloc]
initWithFormat:
@"You chose section %i row %i named %@",
indexPath.section, indexPath.row,
[myTableData2 objectAtIndex: indexPath.row]];
break;
default:
myAlertText=[[NSString alloc]
initWithFormat:
@"Unknown choice?"];
break;
}
myAlert = [[UIAlertView alloc]
initWithTitle: @"Item
Selected"
message: myAlertText
delegate: nil
cancelButtonTitle:
@"Cancel"
otherButtonTitles: nil];
[myAlert show];
[myAlert release];
[myAlertText release];
}
- Build and run the app
- Press the "four" item to get the output below:
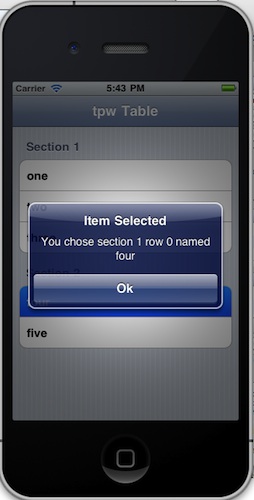
Fig. 7
- Take a snapshot of your app as in Fig. 7 above (Make sure to include the "tpw Table" replacing tpw with your initials, the Alert, and the "You chose section 1 row 0 named four"), and paste it into your report as Fig. P4.
Navigation Application
- In the previous section, we used a Navigation-based app to create our TableView app. This gives us a head start on a the following example of a navigation-based app.
- The TableView app can be considered as a single-level navigation-based app.
- A Navigation-based app
can add multiple levels of tables, where you may descend or ascend
through a TableView-hierarchy of tables. A key feature of such
apps is the "BackButton" that will appear in the navigator bar, allowing users to backtrace their way through the TableView-hierarchy.
- The book asks you to observe the structure of the
Navigator-based app. Xcode 4 is a bit different from earlier
versions, so to see the file structure of your project as in the book,
you would need to open the
MainWindow.xib and expand thedock as shown below (blue arrow below to
expand the dock):
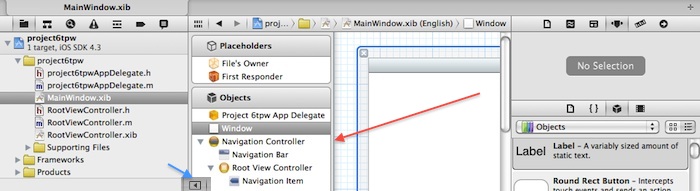
Fig. 8
- Take a snapshot of your app structure as in Fig. 8 above (Make sure to include the "Navigation Item," MainWindow.xib, the Alert, andyour project name "project6xyz" using your initials), and paste it into your report as Fig. P5.
- To illustrate navigation-based apps, we will make use of the second TableSection of our previous app navigate to lower levels.
- To begin, add p6fig-49rs-icon.png and p6fig-49r-football-icon.png to your project directory that will be added as visual icons in your table.
- With your Xcode window open and a finder window open, drag the png files into your Xcode window's SupportingFiles folder, and
the following pop-up will appear:
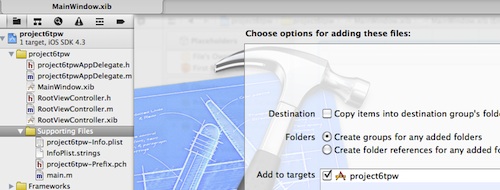
Fig. 9
- Next, update the code to handle the new cells with icons. In RootViewController.m, update the method cellForRowAtIndexPath as follows:
- (UITableViewCell *)tableView:(UITableView *)tableView cellForRowAtIndexPath:(NSIndexPath *)indexPath
{
static NSString *CellIdentifier = @"Cell";
UITableViewCell *cell = [tableView dequeueReusableCellWithIdentifier:CellIdentifier];
if (cell == nil) {
cell = [[[UITableViewCell
alloc] initWithStyle:UITableViewCellStyleDefault
reuseIdentifier:CellIdentifier] autorelease];
}
// Configure the cell.
switch (indexPath.section) {
case 0:
[[cell textLabel]
setText:[myTableData1 objectAtIndex:indexPath.row]];
break;
case 1:
[[cell textLabel] setText:[[myTableData2 objectAtIndex:
indexPath.row] objectForKey:@"name"]];
[[cell imageView] setImage:[UIImage imageNamed:[[myTableData2
objectAtIndex: indexPath.row] objectForKey:@"picture"]]];
cell.accessoryType=UITableViewCellAccessoryDisclosureIndicator;
break;
default:
[[cell textLabel]
setText:@"cell error"];
break;
}
return cell;
}
- Next, add the code to populate the cells. Fore
expedience, we will just use viewDidLoad. In RootViewController.m
update method viewDidLoad as follows
-- (void)viewDidLoad
{
[super viewDidLoad];
self.title=@"tpw Table";
myTableData1 = [[NSMutableArray alloc] initWithObjects:@"one",@"two",@"three",nil];
myTableData2=[[NSMutableArray alloc] init];
[myTableData2 addObject:[[NSMutableDictionary alloc]
initWithObjectsAndKeys:@"UNCC Sports",@"name",
@"p6fig-49rs-icon.png",@"picture",
@"http://www.charlotte49ers.com/",@"url",nil]];
[myTableData2 addObject:[[NSMutableDictionary alloc]
initWithObjectsAndKeys:@"49er Football",@"name",
@"p6fig-49r-football-icon.png",@"picture",
@"http://www.charlotte49erfootball.com/",@"url",nil]];
}
- Next, we need to add a new view that will be presented when
we select an item in our table. This view will correspond to the
next level down in our TableView-hierarchy (the bottom detail-view
level in our simple 2-level example... detail view in that it provides
the details of the particular item).
- Create a new view controller itemDetailViewController.m to view the items by right-clicking the project6tpw folder and adding a new file as shown below (check the "with Xib" option):
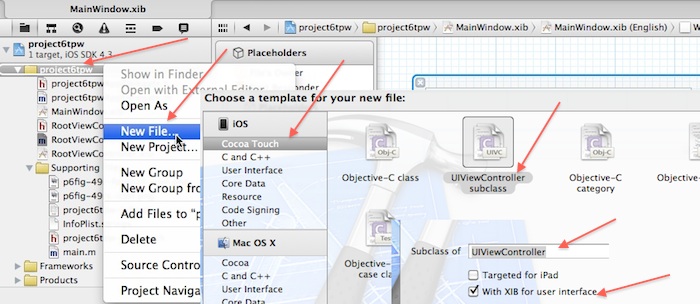
Fig. 10
- Add the WebView and a label to display the web address to itemDetailViewController.xib as follows
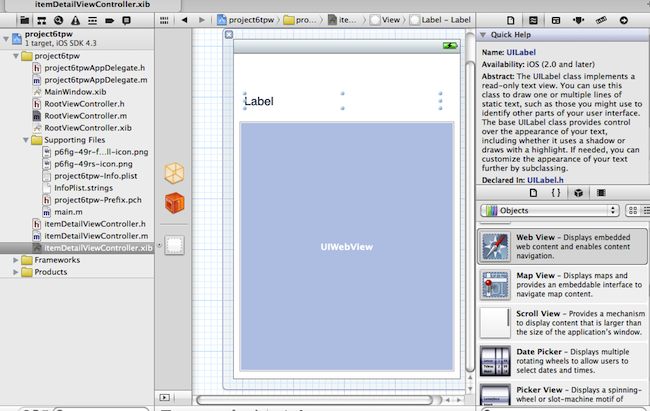
Fig. 11
- Add two outlets (by ctrl-drag as illustrated by the blue arrows),
one for the Label (myItemLabel), and one for the WebView
(myItemWebView):
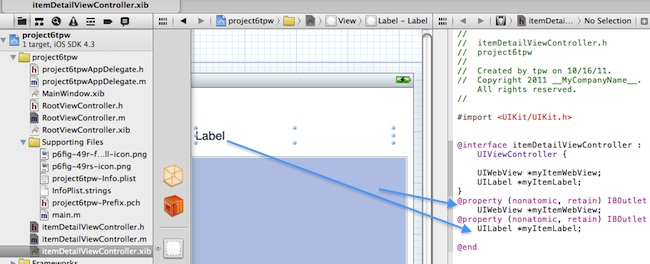
Fig. 12
- Add the statement "#import itemDetailViewController.h" to the top of your RootViewController.h header file
- In
itemDetailViewController.m, add a variable "myWebsite" to be used to
pass the website name to the new view (dont forget to add "@synthesize
myWebsite; "to the implementation file
itemDetailViewController.m). When complete, theitemDetailViewController.h header should be:
@interface itemDetailViewController : UIViewController {
UIWebView *myItemWebView;
UILabel *myItemLabel;
NSString *myWebsite;
}
@property (nonatomic, retain) IBOutlet UIWebView *myItemWebView;
@property (nonatomic, retain) IBOutlet UILabel *myItemLabel;
@property (nonatomic, retain) NSString *myWebsite;
@end
- In itemDetailViewController.m, edit method viewDidLoad
to set the label text and set the WebView URL. Also, edit dealloc
to prevent memory leaks. The two methods should become:
- (void)viewDidLoad
{
// Do any additional setup after loading the view from its nib.
NSURL * baseURL;
baseURL=[[NSURL alloc] initWithString:self.myWebsite];
self.myItemLabel.text=self.myWebsite;
[myItemWebView loadRequest:[NSURLRequest requestWithURL:baseURL]];
[super viewDidLoad];
}
- (void)dealloc
{
[myItemWebView release];
[myItemLabel release];
[super dealloc];
}
- Next, update the actions for the items in the upper and
lower TableSections so that the lower TableSection now navigates to the
new detail view. In RootViewController.m, update method
didSelectRowAtIndexPath as follows
- (void)tableView:(UITableView *)tableView didSelectRowAtIndexPath:(NSIndexPath *)indexPath
{
UIAlertView *myAlert;
NSString *myAlertText;
itemDetailViewController *myItemDetailView;
switch (indexPath.section) {
case 0:
myAlertText=[[NSString alloc]
initWithFormat:
@"You chose section %i row %i named %@",
indexPath.section, indexPath.row,
[myTableData1 objectAtIndex: indexPath.row]];
myAlert = [[UIAlertView alloc]
initWithTitle: @"Item Selected"
message: myAlertText
delegate: nil
cancelButtonTitle: @"Cancel"
otherButtonTitles: nil];
[myAlert show];
[myAlert release];
[myAlertText release];
break;
case 1:
myItemDetailView=[[itemDetailViewController alloc] initWithNibName:
@"itemDetailViewController" bundle:nil];
myItemDetailView.myWebsite=[[myTableData2 objectAtIndex: indexPath.row]
objectForKey:@"url"];
myItemDetailView.title= [[myTableData2 objectAtIndex: indexPath.row]
objectForKey:@"name"];
[self.navigationController pushViewController:
myItemDetailView animated:YES];
[myItemDetailView release];
break;
default:
myAlertText=[[NSString alloc]
initWithFormat:
@"Unknown choice?"];
break;
}
}
- Run your app, and the top-level should be as follows:
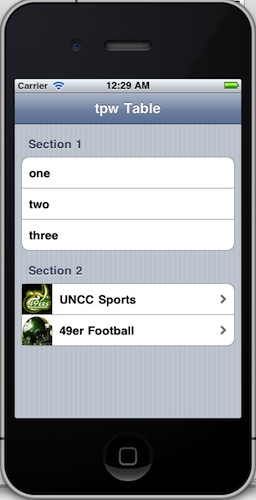
Fig. 13
- Take a snapshot of your app as in Fig. 13 above (Make sure to include the "tpw Table" replacing tpw with your initials, and the UNCC Sports and 49-er football icons), and paste it into your report as Fig. P5.
- Note that the Section1 items should still pop-up the alerts.
- Run your app, and the second-level for "UNCC Sports" should be as follows:

Fig. 14
- Take a snapshot of your app as in Fig. 13 above (Make sure to include the "UNCC Sports," the "tpw Table" BackButton replacing tpw with your initials, the www.charlotte49ers.com label, and the UNCC webpage), and paste it into your report as Fig. P5.
- Make sure that the "Back" button in the navigation bar works!
Saving Application Data & Preferences
- Up until this point, all of the data in your apps dissappears when the app is turned off.
- One common type of data that needs to be saved when anapp closes is preferences. These can be saved explicitly in the usual iPhone settings app that is a component on all iPhones.
- However, a more elegant approach is to implicitly save the settings/preferences
by saving the state of the app whenever it closes. Then, the user
always returns to the app in the same stae as the last time it was used.
- To do this, first modify your app to add another new view with a
slider and a label indicating the slider value. Attach this
as an new second-level navigator o the first item renamed "slider" as
illustrated below (see the code further below for ideas):
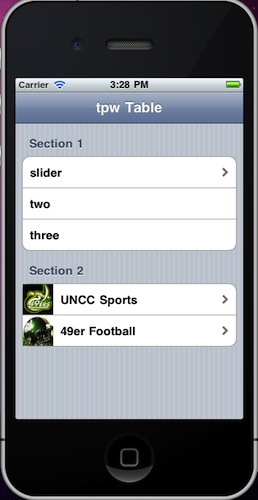
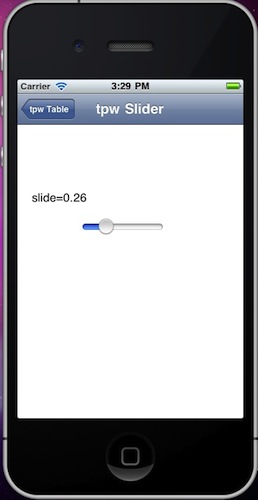
Fig.
15
Fig.16
- Take a snapshot of your app as in Fig. 15 above (Make sure to include the "tpw Table" replacing tpw with your initials, the new "slider" item in section1, and the UNCC Sports and 49-er football icons), and paste it into your report as Fig. P6.
- Take a snapshot of your app as in Fig. 16 above (Make sure to include the "tpw Slider" replacing tpw with your initials, the "BackButton," and the slider with the slider value in the label ), and paste it into your report as Fig. P7.
- Next, modify your new slider view to make retain the slider value after
the app closes and/or iPod is powered off, as an illustration of how
implicit preferences could be saved. In this, we will
retain theslider value using the NSUserDefaults mechanism to store data.
- In your new ViewController.m file, consider changing the following methods:
- (void)viewDidLoad
{
NSUserDefaults *userDefaults=[NSUserDefaults standardUserDefaults];
if([userDefaults floatForKey:@"sliderVal"])
{
myDetailSlider.value =[userDefaults floatForKey:@"sliderVal"];
mySliderLabel.text=
[[NSString alloc] initWithFormat:@"slide=%1.2f",
myDetailSlider.value];
}
[super viewDidLoad];
}
- (IBAction)mySliderAction:(id)sender {
mySliderLabel.text=
[[NSString alloc] initWithFormat:@"slide=%1.2f",
myDetailSlider.value];
NSUserDefaults *userDefaults=[NSUserDefaults standardUserDefaults];
[userDefaults setFloat:myDetailSlider.value forKey:@"sliderVal"];
}
- The book describes other methods to store/retain data, including object archiving and the sandbox.
- What are the four directories in an application's sandbox, and what is the role of each of these 4 locations? (Q1)
Demonstration
- Demonstrate the complete project (all apps) on your iPod and have the instructor sign the cover sheet of your report. (Worth 20% of project) (Q)
Report
- Include the plot/picture/snapshot numbers P1, P2, etc. in captions, along with a short description!
- Place answers to all questions on one or more consecutive sheets of paper at the front of the report!
- Include the question numbers Q1, Q2, etc in answers, along with the question!
- Do NOT scatter the question answers throughout the report, keep them together
- Write a cover sheet + 1 page executive summary ONLY!!! Describe any unresolved issues.
- Make sure that you include question numbers and plot numbers on all sheets!
- Instructor will only look on the question answer-sheets for any discussion.
- All extraneous material WILL BE IGNORED!
- Do not write any discussion, except directly on the question answer-sheets or 1 page summary.
- Do not add extraneous pages.
- Do not put explanations on plots unless specifically directed to do so.
- Include any problems or unresolved issues in the summary.
- ONLY turn in the specific snippets of source code as requested (NOT ANYTHING ELSE!!")
- Include any problems or unresolved issues in the summary.
Copyright 2011 by T.P. Weldon
Apple, iPhone, iPad, and Xcode are registered trademarks of Apple Inc.