Design with iPhone Project 5: Alerts, sound, vibrate, pickers, multiview
Warning:
Content of this website may change at
any time up until class meeting.
Project Topics
- Remain in the same groups of 2.
- Members of any group must be all
graduate or all undergrad.
- It would be
a good idea to back up your work on a USB drive.
- Text: Chapters 10, 11, 12
Preparation
- Download and open the project template
below, so that you can cut and paste answers into the report as
you complete the project.
- Create a new directory "Project5" for this project in your
Documents directory, if you have not already done so.
Create a new iOS app in Xcode
- Run Xcode from the /Developer/Applications directory, and click
"Create new Xcode project"
- Create an iOS "view-based
application" as shown below (see green and red arrows below):
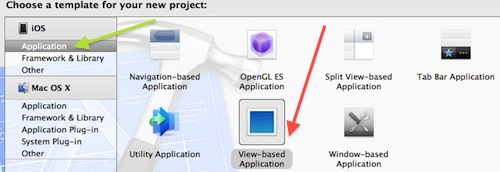
Fig. 1
- In the next pop-up, enter ProductName "project5xyz" where xyz is
your initials. Add company identifier "edu.uncc" (shown in the
red circle below) and device family "iPhone"
- In the next pop-up, select your project directory for your project
- Your new project should appear in the Xcode workspace window as
below:
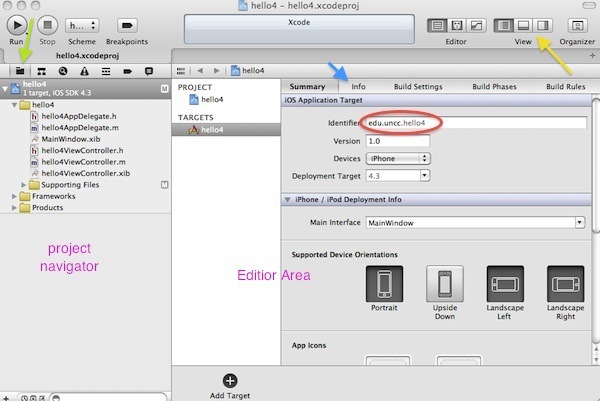
Fig. 2 Xcode Workspace Window
Alerts
- Modal widgets
require the user to perform some action before the user can do anything
else in an app
- The modal alert
UIAlertView is a pop-up alert requiring some user action
- Modify your new app:
- Add a NavigationBar to your app with your app name
"project5xyz" where xyz is
your initials.
- Add a Label to the interface to allow dsplay of messages
- Add 3 Buttons as shown below
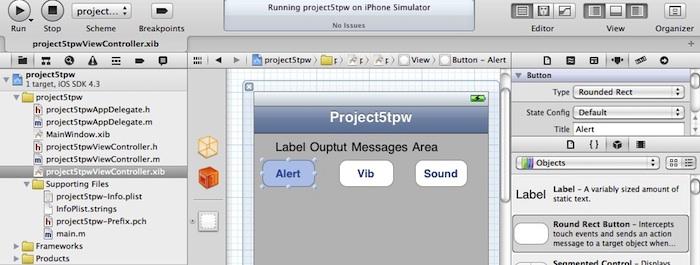
Fig. 3
- Add the following outlets:
- IBOutlet UILabel *myLabel
- To
add the outlets, use control-drag from the various
items to the
bottom of project5xyzViewController.h just before @end, as shown in the
green circle below in Fig. 4. In the pop-up that appears, select
the approriate options as in the yellow circle below, naming the outlet
appropriately.
- Add the following actions
to the buttons:
- - (IBAction)myAlert:(id)sender
- - (IBAction)myVib:(id)sender
- - (IBAction)mySound:(id)sender
To add the action, use control-drag from the items to the
bottom of project5xyzViewController.h just before @end, as shown in the
green circle in Fig. 4. In the pop-up that appears, select
the approriate options as in the yellow circle.
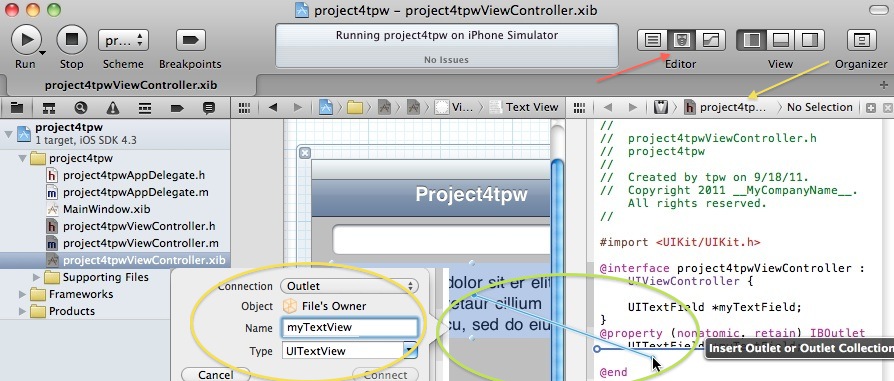
Fig. 4
- To build a simple alert, add the following code to your myAlert
action in project5xyzViewController.m
- (IBAction)myAlert:(id)sender
{
myLabel.text=@"Alert Pressed";
[self.view setNeedsDisplay];
UIAlertView *alertv;
alertv=[[UIAlertView alloc]
initWithTitle:@"tpw Alert"
message:@"message here"
delegate:nil
cancelButtonTitle:@"Cancel"
otherButtonTitles: nil];
[alertv show];
[alertv release];
}
- Build and run the app
- Press the alert button to get the following output
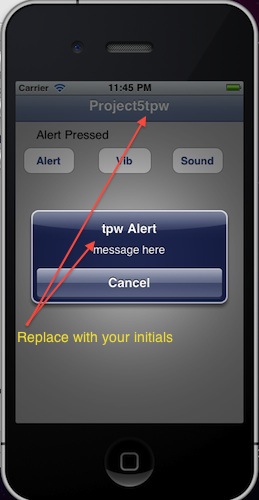
Fig. 5
- Take a snapshot of your window as in Fig. 5 above (Make sure to
include the NavigationBar, the Alert
with your initials, and
the buttons and labels), and paste it into your report as Fig. P1. (
Use the application Grab.app in the Applications/Utilities folder)
Adding the UIAlertViewDelegate Protocol
- To respond to the alert button, you must add the UIAlertViewDelegate Protocol
to the project5xyzViewController class
- A delegate is an
object that acts on behalf of another object.
- A protocol is the
declaration of a group of methods not associated with a class. A
protocol can be thought of as a collection of methods to provide some
useful function. Protocols provide a way to define collections of
useful methods that can be implemented by other classes. A class conforms
to a formal protocol if it implements all the required methods declared
in the protocols it adopts. Methods in a protocol can be declared
to be optional by using the @optional directive. To check
whether an object conforms to a protocol, send it a conformsToProtocol:
message.
- Some classes require you to implement methods in a protocol (some
methods may be required, others optional in a protocol)
- For
the UIAlertView class, the UIAlertViewDelegate Protocol must be
implemented in order to respond to actions associated with the buttons
on the alert. If you add buttons or customize an alert view, you
must implement a delegate conforming to this protocol to handle the
corresponding delegate messages, use the delegate property of an alert
view to specify an object as the delegate. For added buttons,
the delegate must implement alertView:clickedButtonAtIndex: to respond
to those buttons.
- To add the protocol, first edit the beginning of the class
declaration in project5xyzViewController.h by adding
"<UIAlertViewDelegate>" as follows
@interface project5tpwViewController :
UIViewController <UIAlertViewDelegate> {
- In project5xyzViewController.m, change the alert to add
another button, and also change in the delagate to "delegate:self"
as below.
-
(IBAction)myAlert:(id)sender {
myLabel.text=@"Alert Pressed";
[self.view setNeedsDisplay];
UIAlertView *alertv;
alertv=[[UIAlertView alloc]
initWithTitle:@"tpw Alert"
message:@"message here \n \n"
delegate:self
cancelButtonTitle:@"Cancel"
otherButtonTitles:@"Cancel2" , nil];
[alertv show];
[alertv release];
}
- Finally, add the protocol method to project5xyzViewController.m,
- (void)alertView:(UIAlertView
*)alertView clickedButtonAtIndex:(NSInteger)buttonIndex{
switch (buttonIndex)
{
case 0:
myLabel.text=@"AlertButton 0 Pressed";
break;
case 1:
myLabel.text=@"AlertButton 1 Pressed";
break;
}
}
- Build and run your app
- Test the "Alert Cancel2 button," and see that the Label message
changes as follows:
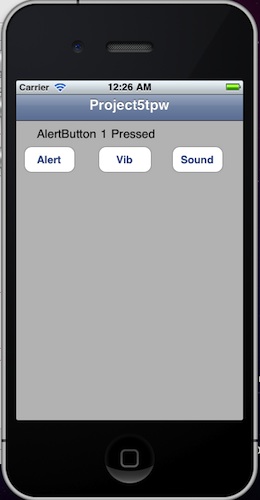
Fig. 6
- Take a snapshot of your window as in Fig. 6 above (Make sure to
include the NavigationBar, the "AlertButton
1 Pressed", and the buttons and labels), and paste it into your
report as Fig. P2.
- Finally, add a UITextField to your alert as shown below:
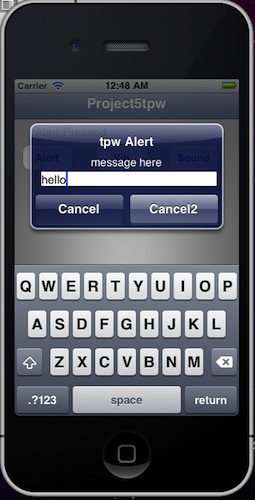
Fig. 7
- Take a snapshot of your window as in Fig. 7 above (Make sure to
include the NavigationBar, the "hello"
in the text entry area, the keyboard, and the buttons and labels), and
paste it into your report as Fig. P3.
Action Sheets
- We will next use action
sheets to implement the sound button and choose from 2 sound
files
- (Also, see below for adding AudioToolboxFramework
to handle audio/sound)
- For the UIActionSheet class, the UIActionSheetDelegate protocol
must be implemented in order to respond to actions associated with the
buttons on the alert.
- To add the protocol in addition to the previous one, first edit
the beginning of the class declaration in project5xyzViewController.h
by adding "UIActionSheetDelegate" as follows
@interface project5tpwViewController :
UIViewController <UIAlertViewDelegate, UIActionSheetDelegate> {
- In project5xyzViewController.m, change the actionSheet to add
another
button, and also change in the delagate to "delegate:self" below.
-
(IBAction)mySound:(id)sender {
UIActionSheet *actionsheet;
actionsheet=[[UIActionSheet alloc]
initWithTitle:@"Available Actions"
delegate:self
cancelButtonTitle:@"Cancel1"
destructiveButtonTitle:nil
otherButtonTitles:@"Sound1",@"Sound2",nil];
actionsheet.actionSheetStyle=UIActionSheetStyleDefault;
[actionsheet showInView:self.view];
}
- Finally, add the actionSheet protocol method
"clickedButtonAtIndex" to project5xyzViewController.m,
- (void)actionSheet:(UIActionSheet
*)actionSheet clickedButtonAtIndex:(NSInteger)buttonIndex {
switch (buttonIndex)
{
case 0:
{myLabel.text=@"actionSheet 0 Pressed";
SystemSoundID mysound;
NSString *audiofile = [[NSBundle mainBundle]
pathForResource:@"tpwSound1" ofType:@"wav"];
AudioServicesCreateSystemSoundID((CFURLRef)
[NSURL fileURLWithPath:audiofile]
, &mysound);
AudioServicesPlaySystemSound(mysound);
[audiofile release];}
break;
case 1:
{myLabel.text=@"actionSheet 1 Pressed";
SystemSoundID mysound;
NSString *audiofile = [[NSBundle mainBundle]
pathForResource:@"tpwSound2" ofType:@"wav"];
AudioServicesCreateSystemSoundID((CFURLRef)
[NSURL fileURLWithPath:audiofile]
, &mysound);
AudioServicesPlaySystemSound(mysound);
[audiofile release];
}
break;
case 2:
myLabel.text=@"actionSheet 2 Pressed";
break;
}
}
- Also, see below for adding AudioToolboxFramework
to handle audio/sound
Audio and Sound
- We will use the AudioToolboxFramework
for playing sounds.
- A framework is a
collection of classes, protocols, and functions to perform some useful
functionality, such as audio functions.
- Warning:
your Mac iOS simulator may not play the sounds.
- Make sure that you set your Macbook
AppleMenu::SystemPreferences::Sound::Sound Effects and enable "Play
user interface sound effects" as follows:
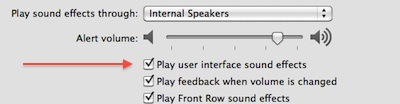
Fig. 8
- The AudioToolboxFramework sound files must
adhere to the following requirements:
- Must be .caf, .aif, or .wav files. (The recent AppKit
version seems to also support mp3)
- The audio file must be in PCM or IMA/ADPCM (IMA4) format.
- The audio duration must be less than 30 seconds.
- First, add the sound files to your project:
- First, download sound files tpwSound1.wav
and tpwSound2.wav to your project
directory "Project5/project5xyz/project5xyz"
- Then, add the file to your project by right-clicking the
supportingFiles folder as below:
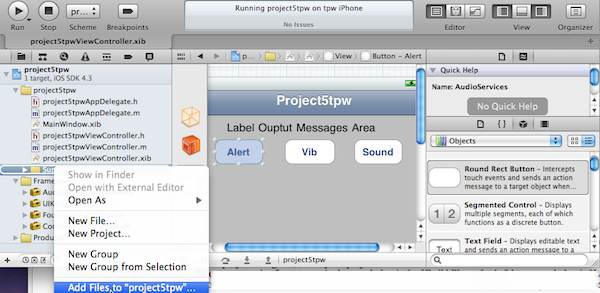
Fig. 9
- Next, add the AudioToolboxFramework.
- In the project navigator, select your project
Select your project5xyz target (red arrow below), the "Build Phases"
tab (blue arrow below), "Link Binaries With Libraries" (yellow arrow
below), and click the '+' button, and select the AudioToolbox
framework (green arrow below) as shown below
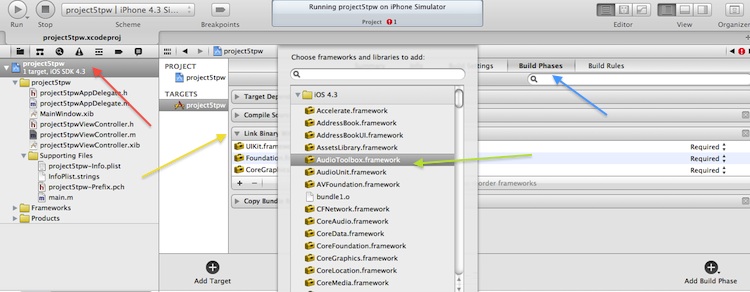
Fig. 10
- If the framework is located in your main folder after installing
it, you may wish to move it to your Framework folder
- In your project5xyzViewController.h add:
#import
<AudioToolBox/AudioToolBox.h>
- To make an iPhone vibrate (the current iPods do not vibrate):
-
(IBAction)myVib:(id)sender {
AudioServicesPlaySystemSound(kSystemSoundID_Vibrate);
}
- Build and run your app
- Test the app to see that the two different sounds can be played
as follows:
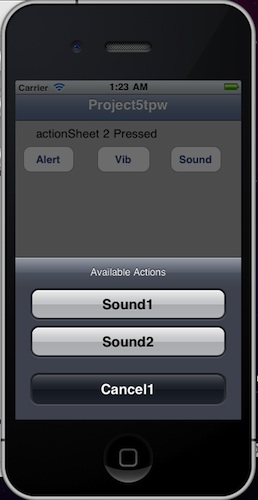
Fig. 11
- Take a snapshot of your window as in Fig. 11 above (Make sure to
include the NavigationBar, the "actionSheet
2 pressed" in the message area, and the buttons and labels), and
paste it into your report as Fig. P4.
Pickers
- A common interface on iPhone is a picker, a thumb-wheel rolling
interface that allows users to select multiple options, as illustrated
by the date-picker below:
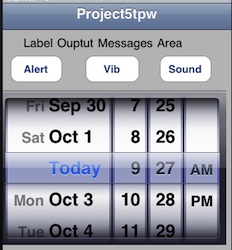
Fig. 12
- Multi-value pickers such as the date picker above can return
multiple values to your Objective-C program, such as returnng month,
date, and year for a date. This greatly simplifies user interface
for multiple-value entries.
- To demonstrate the use of the date picker, add a datePicker and
WebView to your app as shown below:
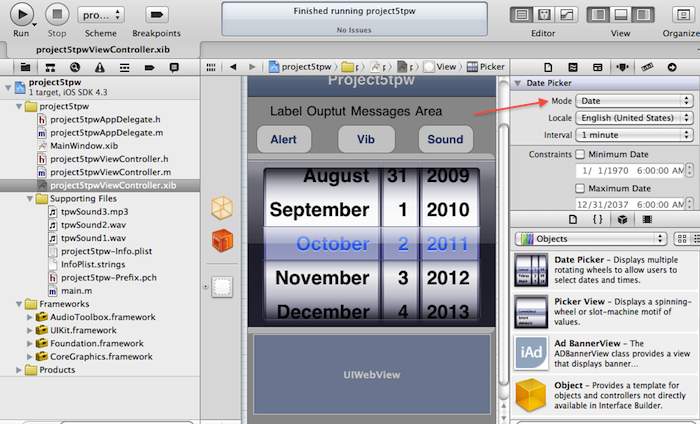
Fig. 13
- Set the mode of the datepicker to "Date" as shown by the red
arrow above
- As in previous examples, add outlets and actions such as:
@property (nonatomic, retain) IBOutlet
UIDatePicker
*myDate;
//outlet for datepicker
@property (nonatomic, retain) IBOutlet UIWebView
*myWebView; //outlet for webview
- (IBAction)myDateValueChanged:(id)sender;
//action added to date-picker
- Next, add code print out the date in the label, such as:
NSDateFormatter
*dateForm;
NSString * mydate;
dateForm = [[NSDateFormatter alloc] init];
[dateForm setDateFormat:@"yyyy-MM-dd"];
mydate = [dateForm stringFromDate:[sender date]];
myLabel.text= [[NSString alloc]
initWithFormat:@"date=%@", mydate];
[dateForm release];
NSURL * dateURL;
NSURL * baseURL;
NSDateFormatter *dateForm;
NSString * mydate;
baseURL=[[NSURL alloc]
initWithString:@"http://campusevents.uncc.edu/events/"];
dateForm = [[NSDateFormatter alloc] init];
[dateForm setDateFormat:@"yyyy-MM-dd"];
mydate = [dateForm stringFromDate:[sender date]];
dateURL=[[NSURL alloc] initWithString:mydate
relativeToURL:baseURL];
[myWebView loadRequest:[NSURLRequest
requestWithURL:dateURL]];
[dateURL release];
- After adding the code to your app, you should see the UNCC
calendar in your webview as follows:
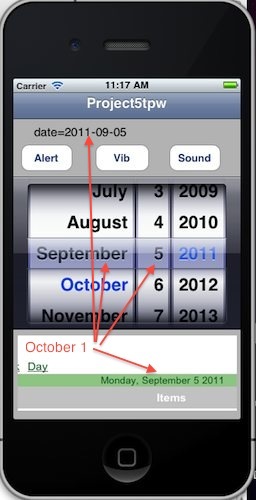
Fig. 14
- Scroll to the October 1
date in your app and take a snapshot of your window as in Fig. 14 above
(Make sure to include the NavigationBar, the "date=2011-10-01" in the message
area, "October 1, 2011" in
the webView,and the buttons and labels), and paste it into your report
as Fig. P5.
Multi-View Apps
- As can be seen in the foregoing examples, you apps quickly run
out of room on the iPhone screen
- One solution to these issues is to develop multi-view apps, where multiple
views effectively allow more screen space for apps
- DO NOT OVERWRITE THE APP YOU
CREATED ABOVE, save it for your demonstration
- Create a new iOS "Tab Bar
application" in Xcode (red arrow below), and call it
"project5xyzTab" where xyz is your initials
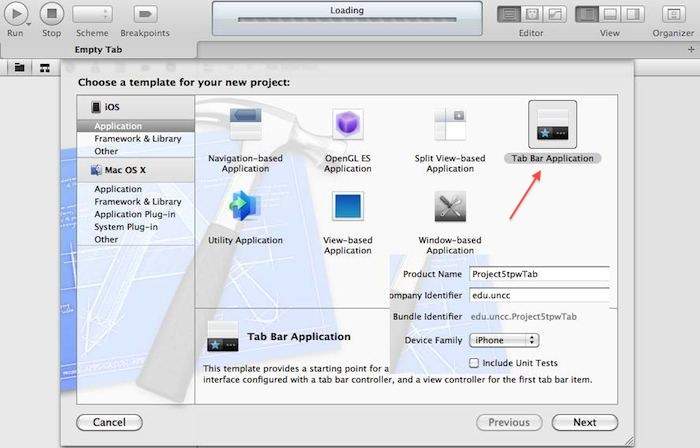
Fig. 15
- In the
ProjectNavigator pane on the left side of Xcode, notice that you
already have two controllers FirstViewController.xib and
SecondViewController.xib.
- Rright-click
the Project5tpwTab folder (blue arrow below) and
NewFile::UIViewControllerSubclass::WithXib to add onew new view
to your
app called myThirdViewController.m, as illustrated below:
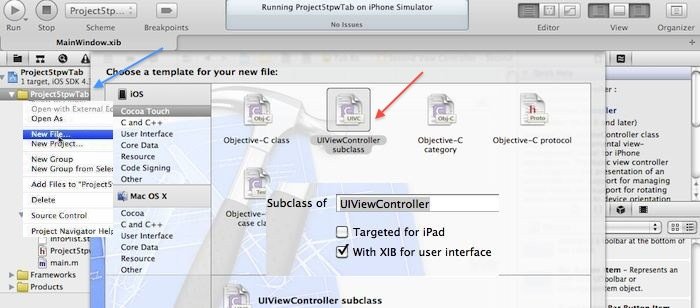
Fig. 16
- Next, select the MainWindow.xib file as shown below (upper
left red arrow), select the TabBarController (black arrow), and add s
third TabBarItem (lower right red arrow) to the TabBar (yellow arrow).
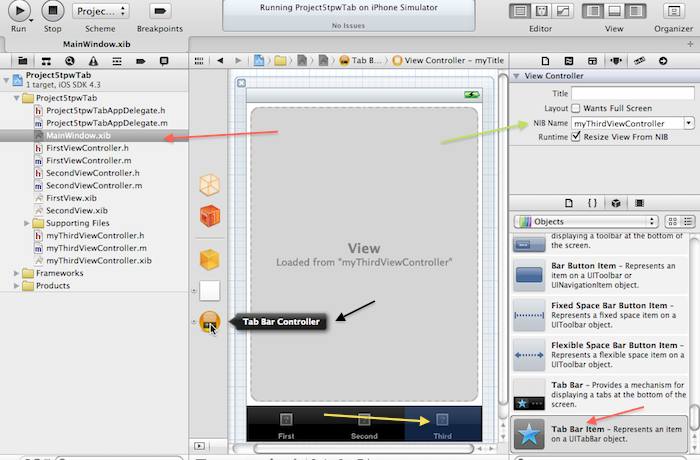
Fig. 17
- Double-click the new TabBarItem title and change the title to
"Third" as shown at the yellow arrow above
- Click
the larger button area around the TabBarItem and change the nib file to
myThirdViewController" as shown at the green arrow above
- Select the new myThirdViewController.xib
nib file and add a Label to the view with contents "myThirdView"
- It is helpful to mask off areas of the view that would be hidden
behind the tabBar, so add a simulated TabBar to the bottom of myThirdViewController view by selecting myThirdViewController.xib
nib file and its view (green arrows below), selecting the
AttributeInspector (yellow arrow), and setting the SimulateMetrics
BottomBar to TabBar (red arrow).
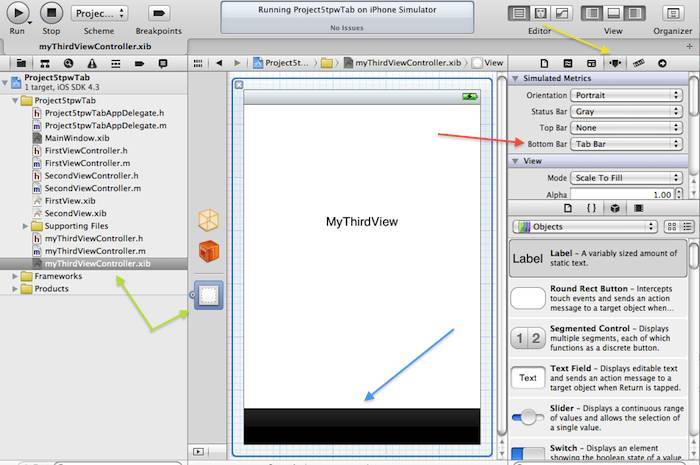
Fig. 18
- Take a snapshot of your window as in Fig. 18 above (Make sure to
include the full view of myThirdViewController,
the "myThirdView" label in
the middle, the "Tab Bar"
in the SimulatedMetrics, and the black masked off bottom), and paste it
into your report as Fig. P6.
- Open
MainWindow.xib, expand the dock on the left-hand side of the Editor
Pane (blue arrows below), and expand the TabBarController to reach the
new button myThirdViewController (Blue arrows).
- Set the class to myThirdViewController (red arrow below) in the
IdentityInspector (yellow arrow), as shown below:
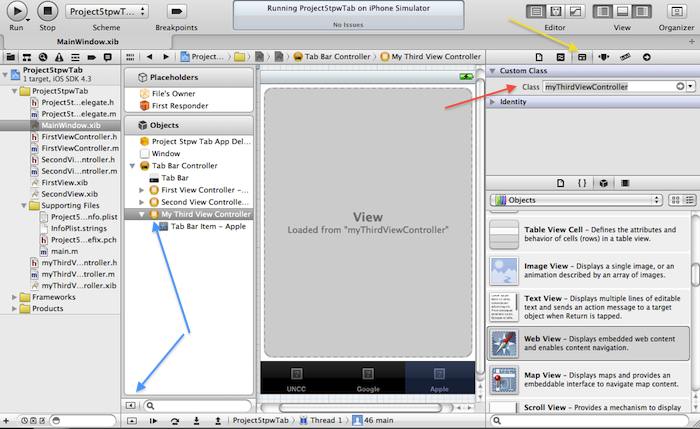
Fig. 19
- Run the app to make sure the basic
items are working.
- Press the "Third" menu button and
your new view should appear as below:
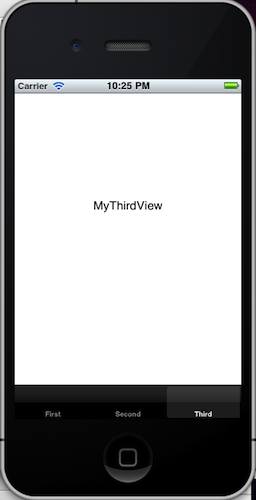
Fig. 19
- Take a snapshot of your window as in Fig. 19 above (Make sure to
include the full view of myThirdViewController,
the "myThirdView" label in
the middle, and the "First Second Third" Tab bar on the bottom), and
paste it into your report as Fig. P7.
- Inspect your code, and note that the
Project5xysTabAppDelegate.h has the UITabBarControllerDelegate protocol
added as illustrated below:
// Project5tpwTabAppDelegate.h
#import <UIKit/UIKit.h>
@interface Project5tpwTabAppDelegate : NSObject
<UIApplicationDelegate, UITabBarControllerDelegate> {
}
@property (nonatomic, retain) IBOutlet UIWindow *window;
@property (nonatomic, retain) IBOutlet UITabBarController
*tabBarController;
@end
- Add NavigatorBars to all 3 views with names views
"Project5xysTabView1," "Project5xysTabView2," "Project5xysTabView3," as
shown below
- Add WebViews to all 3 views "Project5xysTabView1,"
"Project5xysTabView2," "Project5xysTabView3," as shown below
- Change the labels on the TabBarItems to "UNCC," "google," and
"Apple" as shown beelow
- Add labels to all 3 views as shown below: "UNCC," "google," and
"Apple" as shown beelow
- Connect your project so that each view loads the corresponding
webpages for uncc.edu, google.com, apple.com, as shown below
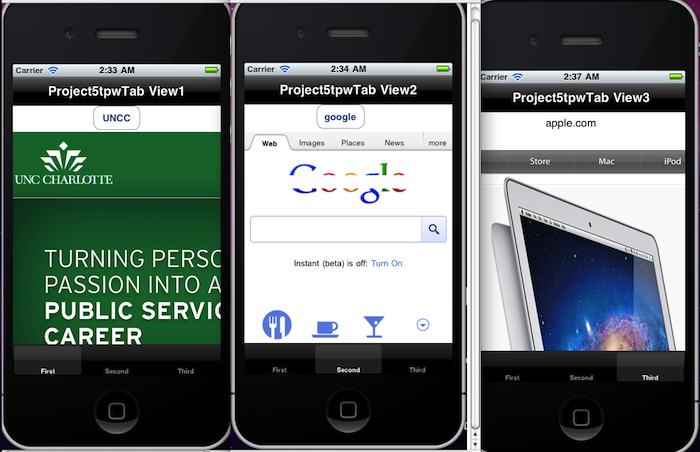
Fig. 20
- Take a snapshot of your three different app views as shown in
Fig. 20 above (Make sure to include the full view of myThirdViewController, the "myThirdView" label in the
middle, and the "First Second Third" Tab bar on the bottom), and paste
it into your report as three figures, Fig. P8,
Fig. P9., and Fig. P10.
Demonstration
- Demonstrate
the complete project (all apps) on your iPod and have the
instructor sign the cover sheet of your report. (Worth 20% of project) (Q)
Report
- Include the plot/picture/snapshot numbers P1, P2, etc. in
captions, along with a short description!
- Place answers to all questions on one or more consecutive sheets
of paper at the front of the report!
- Include the question numbers Q1, Q2, etc in answers, along with
the question!
- Do NOT scatter the question answers throughout the report, keep
them together
- Write a cover sheet + 1 page executive summary ONLY!!!
Describe any unresolved issues.
- Make sure that you include question numbers and plot numbers on
all sheets!
- Instructor will only look on the question answer-sheets for any
discussion.
- All extraneous material WILL BE IGNORED!
- Do not write any discussion, except directly on the question
answer-sheets or 1 page summary.
- Do not add extraneous pages.
- Do not put explanations on plots unless specifically directed to
do so.
- Include any problems or unresolved issues in the summary.
- ONLY turn in the specific snippets of source code as requested
(NOT ANYTHING ELSE!!")
- Include any problems or unresolved issues in the summary.
Copyright 2011 by T.P. Weldon
Apple, iPhone, iPad, and Xcode are registered trademarks of Apple
Inc.