Design with iPhone Project 4: Text, images, sliders, switches, web,
scrolling
Warning:
Content of this website may change at
any time up until class meeting.
Project Topics
- Remain in the same groups of 2.
- Members of any group must be all
graduate or all undergrad.
- It would be
a good idea to back up your work on a USB drive.
- Text: Chapters 7, 8, 9
Preparation
- Download and open the project template
below, so that you can cut and paste answers into the report as
you complete the project.
- Create a new directory "Project4" for this project in your
Documents directory, if you have not already done so.
Create a new iOS app in Xcode
- Run Xcode from the /Developer/Applications directory, and click
"Create new Xcode project"
- Create an iOS "view-based
application" as shown below (see green and red arrows below):
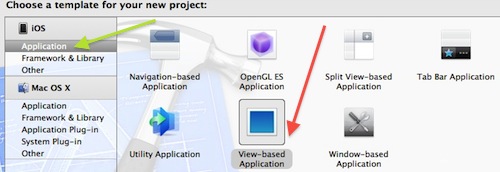
Fig. 1
- In the next pop-up, enter ProductName "project4xyz" where xyz is
your initials. Add company identifier "edu.uncc" (shown in the
red circle below) and device family "iPhone"
- In the next pop-up, select your project directory for your project
- Your new project should appear in the Xcode workspace window as
below:
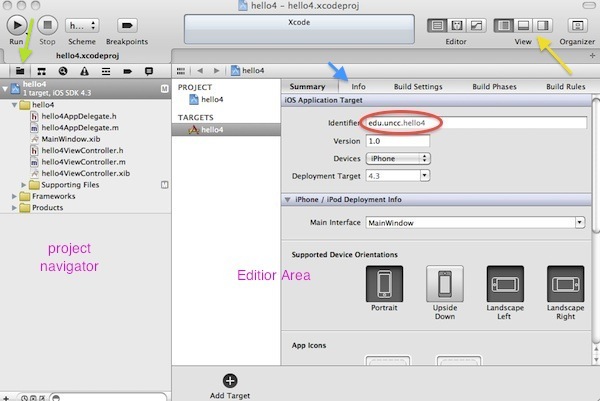
Fig. 2 Xcode Workspace Window
- Open the viewControler nib file in the InterfaceBuilder and add
the following items:
- Add a NavigationBar at the top with your project name
"project4xyz" where xyz is
your initials as shown in Fig. 3 below
- Add a TextField below the NavigationBar as shown in Fig. 3 below
- Add a TextView below the TextFieldas shown in Fig. 3 below
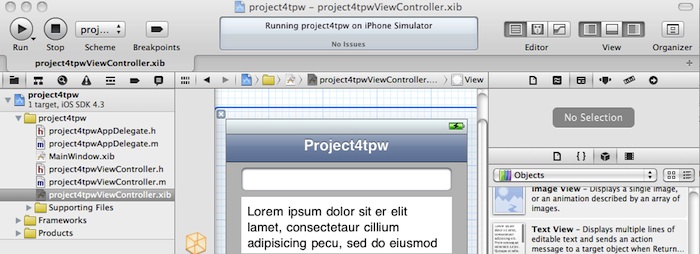
Fig. 3
- Take a snapshot of your window as above, and paste it into your
report as Fig. P1. (
Use the application Grab.app in the Applications/Utilities folder)
- Next, edit the project in Interface Builder to add 2 outlets
- Before reading the detailed instructions,
see the short tutorial video p3-tpw-connections.mov
- Select the assistant
editor as shown at the red arrow below, and use the jump bar (yellow arrow below in Fig. 4) to
select the header file, project4xyzViewController.h
- Add the following two outlets:
- IBOutlet UITextField
*myTextField
- IBOutlet UITextView
*myTextView
- To
add the two outlets, use control-drag from the TextField and TextView
items to the
bottom of project4xyzViewController.h just before @end, as shown in the
green circle below in Fig. 4. In the pop-up that appears, select
the appropriate options as in the yellow circle below, naming the
outlet
appropriately. (For the myTextField outlet, use
Connection:outlet, Name:myTextField, Type:UITextField)
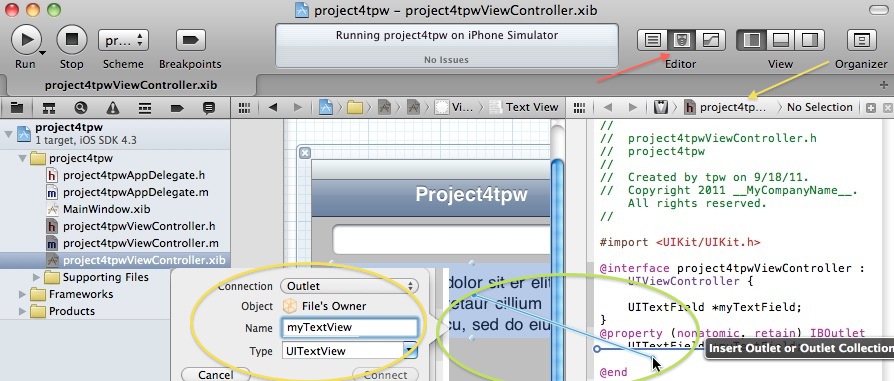
Fig. 4
- When you are finished, make sure that the
two outlets appear in the @property
statements at the bottom of the project4xyzViewController.h header file.
- Open the implementation file
project4xyzViewController.m in the assistant editor using the jump bar,
and verify that the two @synthesize
statements appear as in the red circle below:
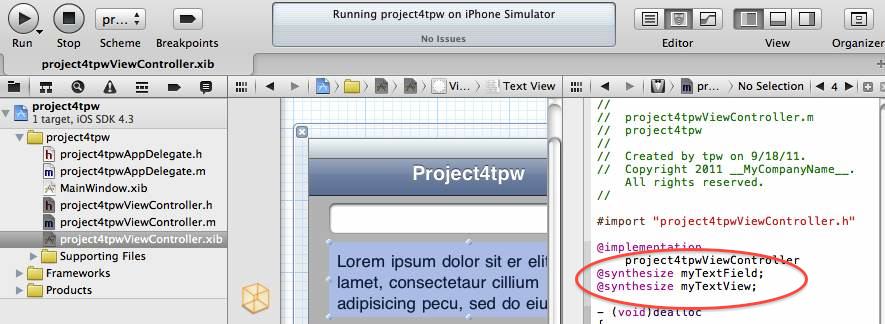
Fig. 5
- Take a snapshot of your window as in Fig. 5
above (make sure that the
two @synthesize directives are visible), and paste it into your report
as Fig. P2.
- Select the TextField, and in the
InspectorPane of the UtilityArea select the AttributeInspector (blue
arrow in Fig. 6 below)
- Add the placeholder option to
"enter text
here" as shown at the yellow arrow below. This placeholder will
prompt the user
when the app runs.
- Set ClearButton option to AlwaysVisible
- Set the TextColor to blue
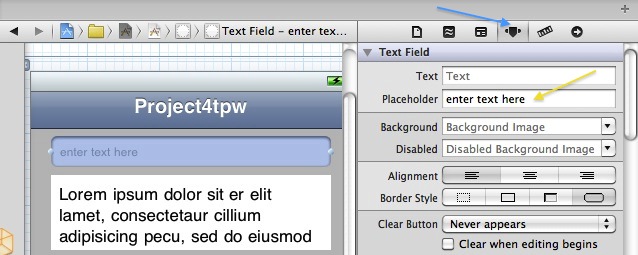
Fig. 6
- Select the TextView, and in the
InspectorPane of the UtilityArea select the AttributeInspector (blue
arrow in Fig. 6 above)
- Erase the "Lorem ipsum..." and set the
text to "Empty"
- Set the TextColor to green
- Uncheck the editable option
- Build and run the app in the simulator, and
it should look like the following:

Fig. 7
- Take a snapshot of your app as in Fig. 7
above (make sure that the
NavigationBar, "enter text
here," TextView, and TextFields are visible), and paste it into your
report as Fig. P3.
- Stop the app and paste the following
paragraph into the TextView in Xcode InterfaceBuilder:
At boundaries, the feature vector may
make a transition through a region of feature space that is incorrectly
assigned to a third class. To remove such errors, a morphological
operator is proposed. The overall effect of the proposed operator
resembles a morphological erosion followed by a dilation.
- If you rebuild and rerun the app with this
long bit of text, you will notice that if you place the trackpad cursor
in the textView you can scroll by
double-tap dragging, and a scroll bar
will appear to the right as you scroll. The scrollbar disappears
when you stop scrolling. It is easier to observe the scrolling if
you download your app to your iPod.
Working with the keyboard
- Run the app
- Try to type "hi" into the text field, and
notice that you cannot type "return" to close the keyboard, as
illustrated below
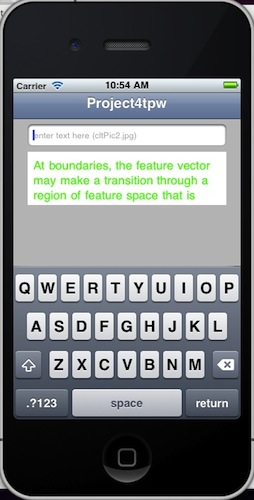
Fig. 8
- When the TextField gained control, it
became
the "FirstResponder," and so the Keyboard will remain on-screen
until the FirstResponder status is relinquished by somewhere adding the
statement "[myTextField resignFirstResponder];"
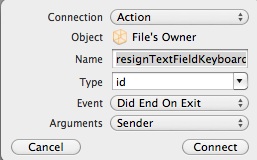
- To do this, add a new action resignTextFieldKeyboard
- Select the assistant
editor and use the jump bar
as in Fig. 4 to select the header file, project4xyzViewController.h
- Add the following action:
- IBAction resignTextFieldKeyboard
- To add the action, use control-drag
from
the TextField item to the
bottom of project4xyzViewController.h just before @end, as shown in the
green circle in Fig. 4. In the pop-up that appears, select
the appropriate options as in the yellow circle, naming the
action resignTextFieldKeyboard. (For the
resignTextFieldKeyboard
action, use Connection:action, Name:resignTextFieldKeyboard, Type:id,
Event:DidEndOnExit, Argument:Sender). As illustrated below:
- Open the implementation file
project4xyzViewController.m and edit the resignTextFieldKeyboard method
as follows:
-
(IBAction)resignTextFieldKeyboard:(id)sender {
[myTextField resignFirstResponder];
}
- Re-run the app
- Try to type "hi" into the text field, and
you should now be able to type "return" to close the
keyboard.
- Change the resignTextFieldKeyboard method
as follows to demonstrate how to access and change the data:
-
(IBAction)resignTextFieldKeyboard:(id)sender {
[myTextField resignFirstResponder];
myTextView.text=myTextField.text;
}
- Re-run the app
- Type "hello uncc" into the text field to
get the output below in the simulator
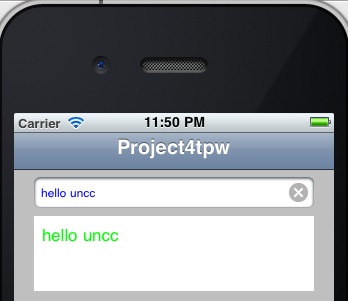
Fig. 9
- Take a snapshot of your app as in Fig. 9 above (make sure that the
NavigationBar, "hello uncc"
TextView, and TextFields are visible), and paste it into your report as
Fig. P4.
Viewing Images in iOS
- Download the files cltPic2.jpg and cltPic2.png to the folder containing main.m of
your project
- Add these files to the project in Xcode by selecting the
SupportingFiles folder, right-clicking and selecting your image files
Fig. 10
- Open the viewControler nib file in the InterfaceBuilder and add
an imageView as below:
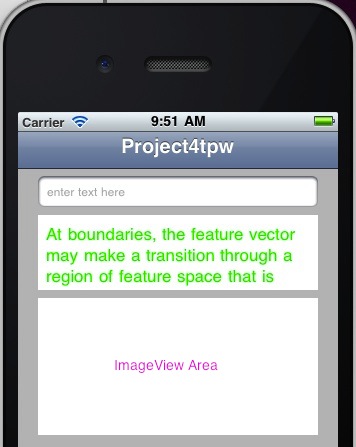
Fig. 11
- Select the imageView, and in the
InspectorPane of the UtilityArea select the AttributeInspector
- Set the background to white.
- Select the assistant
editor and use the jump bar to
select the header file, project4xyzViewController.h
- Add the following outlet:
- IBOutlet UIImageView *myImageView
- To
add the outlet, use control-drag from the ImageView
items to the
bottom of project4xyzViewController.h just before @end, as shown in the
green circle below in Fig. 4. In the pop-up that appears, select
the appropriate options as in the yellow circle below, naming the
outlet
appropriately. (For the myImageView outlet, use
Connection:outlet,
Name:myImageView, Type:UIImageView)
- Open
the implementation file project4xyzViewController.m and change the
resignTextFieldKeyboard method as follows to demonstrate how to access
and change the data:
- (IBAction)resignTextFieldKeyboard:(id)sender {
[myTextField resignFirstResponder];
myTextView.text=myTextField.text;
UIImage *image = [UIImage imageNamed:
myTextField.text];
[myImageView setImage:image];
}
- Note: we could have added a button to
render the image, but adding the code to the resignTextFieldKeyboard
method works, too.
- The
UIImage imageNamed: method should create an autorelease image, so we
should not need to manage its memory. The return value
of the imageNamed method should be the image object for the specified
file, or nil if the image
is not found. On iOS 4, if the screen has a scale of 2.0 (as for
higher resolution screens on newer iPhones), the
method first searches for an image file with the same filename with an @2x suffix appended to it such
as "cltPic2@2x.png."
- Re-run the app
- Try to type "cltPic2.png" and "cltPic2.jpg"
into the text field, and you should now be able to type "return" to
close the keyboard.
- The image should display as follows:
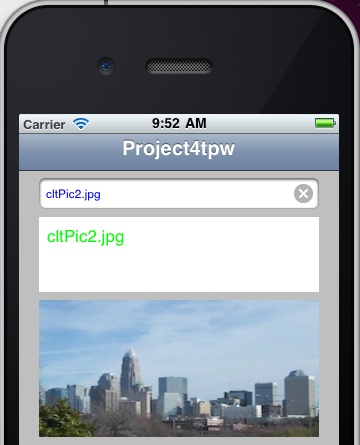
Fig. 12
- Take a snapshot of your app as in Fig. 12
above (make sure
that the ImageView of Charlotte, NavigationBar, "cltPic2.jpg,"
TextView, and TextFields are visible), and paste it into your report as
Fig. P5.
- See the textbook for tips on using multiple
images to render simple animations
Sliders and Switches
- Open the viewControler nib file in the InterfaceBuilder and add
the following items:
- Add a slider and
label shown below
- In the InspectorPane of the UtilityArea select the
AttributeInspector and make sure that the slider UpdateEventsContinuous
option is unchecked, so the slider only updates when released
- Add a switch and
label as shown below
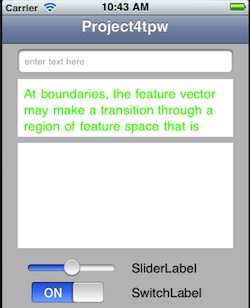
Fig. 13
- As before, add the following outlets:
- IBOutlet UILabel *mySliderLabel
- IBOutlet UILabel *mySwitchLabel
- IBOutlet UISlider *mySlider
- IBOutlet UISwitch *mySwitch
- To
add the outlets, use control-drag from the various
items to the
bottom of project4xyzViewController.h just before @end, as shown in the
green circle below in Fig. 4. In the pop-up that appears, select
the appropriate options as in the yellow circle below, naming the
outlet
appropriately.
- As before, add the following actions:
- IBAction mySliderAction
- IBAction mySwitchAction
- To add the action, use control-drag from
the items to the
bottom of project4xyzViewController.h just before @end, as shown in the
green circle in Fig. 4. In the pop-up that appears, select
the appropriate options as in the yellow circle.
- as illustrated below:
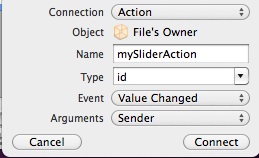
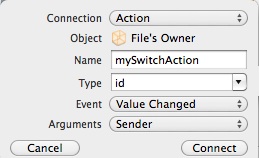
Fig. 14
- Open the implementation file project4xyzViewController.m and
change the new action methods as follows :
-
(IBAction)mySliderAction:(id)sender {
mySliderLabel.text=
[[NSString alloc] initWithFormat:@"slide=%1.2f",
mySlider.value];
}
- (IBAction)mySwitchAction:(id)sender {
mySwitchLabel.text=
[[NSString alloc] initWithFormat:@"switch=%d",
(int)(mySwitch.on)];
}
- Build and run the app. Your slider and switch should update
as below:
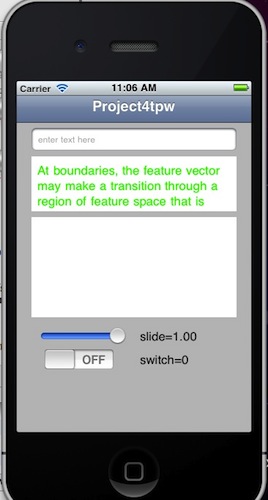
Fig. 15
- Take a snapshot of your app as in Fig. 15 above (make sure
that the ImageView, NavigationBar, "slide=1.00,"
TextView, "switch=0," and TextFields are visible), and paste it into
your report as
Fig. P6.
Web Views
- Replace the switch with a SegmentedControl
as shown below
- Add a WebViewas
shown below
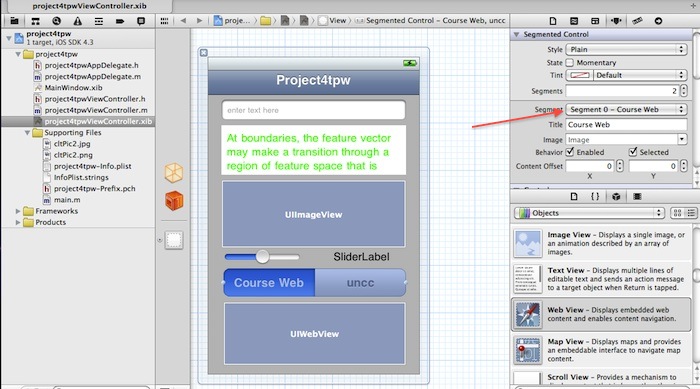
Fig. 16
- Change the names on the selector to "Course Web" and "uncc"
- Note
the segment name of the left-selector, "segment 0 - Course Web" at the
red arrow in AttributesInspector pane of the figure above
- As before, add the following outlets:
- IBOutlet UISegmentedControl
*mySegmentControl
- IBOutlet UIWebView *myWebView
- To
add the outlets, use control-drag from the SegmentedControl
item and the WebView item to the
bottom of project4xyzViewController.h just before @end, as shown in the
green circle below in Fig. 4. In the pop-up that appears, select
the appropriate options as in the yellow circle below, naming the
outlet
appropriately.
- As before, add the following actions:
- IBAction mySegCtrlValueChanged
- To add the action, use control-drag from
the SegmentedControl item to the
bottom of project4xyzViewController.h just before @end, as shown in the
green circle in Fig. 4. In the pop-up that appears, select
the appropriate options as in the yellow circle.
- as illustrated below:
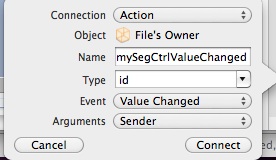
Fig. 17
- Add the following code for your action:
- (IBAction)mySegCtrlValueChanged:(id)sender {
NSURL * courseURL;
NSURL * unccURL;
courseURL=[[NSURL alloc]
initWithString:@"http://coe.uncc.edu/~tpweldon/courses/" ];
unccURL=[[NSURL alloc]
initWithString:@"http://www.uncc.edu/" ];
int kk=0;
kk=(int) (mySegmentControl.selectedSegmentIndex);
switch (kk)
{
case 0:
[myWebView loadRequest:[NSURLRequest requestWithURL:courseURL]];
break;
case 1:
[myWebView loadRequest:[NSURLRequest requestWithURL:unccURL]];
break;
}
[courseURL release];
[unccURL release];
}
- Run your app
- Test the selector buttons to see that the web-pages load
- In the WebView you can scroll
by double-tap dragging,
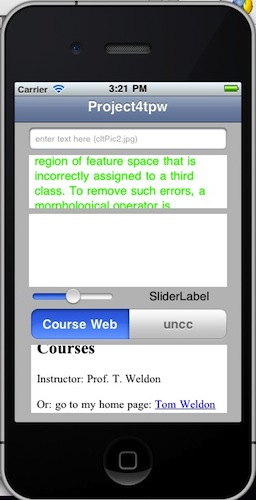
Fig. 17
- Take a snapshot of your app as in Fig. 17 above (make sure
that "Instructor: Prof. T. Weldon," "go to my home page: Tom Weldon,"
the WebView, NavigationBar, slider,
TextView, SelectorButtons and TextFields are visible), and paste it
into your report as
Fig. P7.
- Click through the weblink to "TomWeldon" on the bottom of Fig. 17
in your app
- Scroll down the webpage until the following is visible:
Fig. 18
- Take a snapshot of your app as in Fig. 18 above (make sure
that "New Items," "Fall2011 courses,"
the WebView, NavigationBar, slider,
TextView, SelectorButtons and TextFields are visible), and paste it
into your report as
Fig. P8.
Scroll App Views and Screen Sizes
- The entire app can be converted to a scroll view if you run out
of space on your app's screen
- DO NOT OVERWRITE THE APP YOU
CREATED ABOVE, save it for your demonstration
- Create a new iOS "view-based
application" in Xcode, and call it "project4scroll"
- Open the ViewController nib file and
drag a scrollView onto your new blank app vie. This ScrollView
should occupy the whole screen of your view.
- Add 2 buttons to the ScrollView as
follows.
- Make
sure one button is partially off your screen as below!
This is how we will demonstrate scroll behavior.
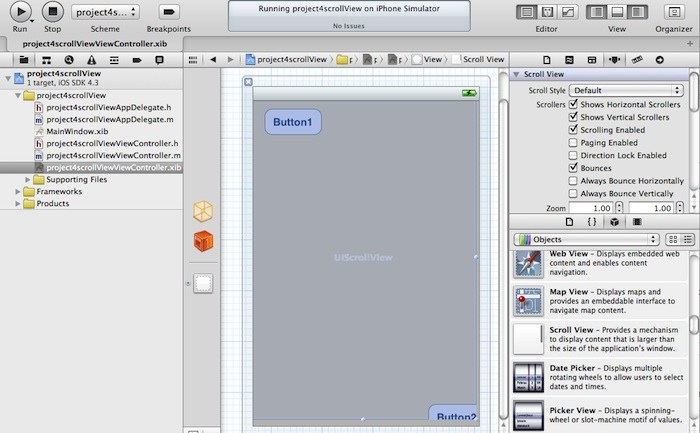
Fig. 19
- As before, add the following outlets:
- IBOutlet UIScrollView *myScrollView
- Uncomment the default viewDidLoad function
in ViewController.m, and add the
following code to enable the scroll:
- (void)viewDidLoad
{
myScrollView.contentSize=CGSizeMake(400.0,600.0);
[super viewDidLoad];
}
- Note the size of the scroll view
- iOS SDK
4.x supports devices with different screen resolutions
(iphone 3GS @ 320x480, iPhone 4 @ 640x960 pixels). Most handling
of
the different types of screens is done by the system frameworks.
CoreGraphics takes the screen scale factor into account. For example, a
drawRect: method automatically adjusts to the screen scale factor for
the underlying device screen. In iOS UIKit you specify coordinate
values in points. The system automatically maps points in the logical
coordinate space to pixels in the device coordinate space, but this
mapping is not always one-to-one. One point is not necessarily equal to
one pixel on the screen.
This is so the content appears to be about the same size on devices
with different resolution screens. Coordinate (0,0) points is
upper left, (160,320) is screen center.
- What is the screen resolution of an iPhone 3? (Q1) Hint: try searching
http://developer.apple.com/search or wiki
- What is the screen resolution of an iPhone 4? (Q2)
- What is the screen resolution of an iPad 2? (Q3)
- What is the screen resolution of an iPod touch (latest
generation)? (Q4)
- Add a new label to center of the screen view of the app and have
it print the screen size in pixels, as shown below
- Consider using something like:
UIScreen *scrn =
[UIScreen mainScreen] ;
myLabel.text=[[NSString alloc]
initWithFormat:
@"Screen %1.2f x %1.2f pixels",
scrn.bounds.size.width*scrn.scale,
scrn.bounds.size.height*scrn.scale];
- Build and run the app, and it should look like the following:
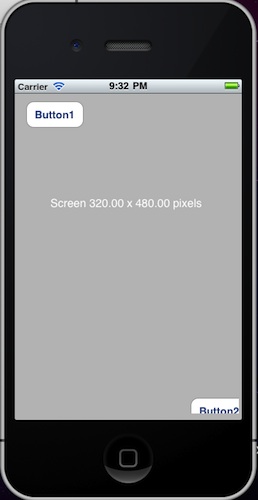
Fig. 20
- In the app you can scroll
by double-tap dragging,
- Take a snapshot of your app as in Fig. 20 above (make sure
that "Button2" is fully visible, "Screen 320x480" is visible, and
"Button1" is partially visible), and paste it into your report as
Fig. P9.
- The IOS simulator can also display in the higher resolution
iPhone 4 mode.
- Change the resolution using iOSimulator::Hardware::Device and
selecting iPhone Retina
- Run the app in the iPhone Retina Mode and you should see the new
resolution as follows:
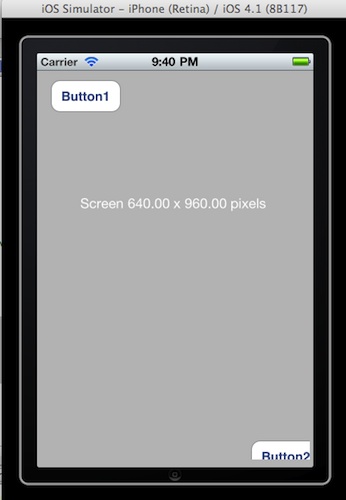
Fig. 21
- Take a snapshot of your app as in Fig. 21 above (make sure that
"Button2" is fully visible, "Screen 640x960" is visible, and "Button1"
is partially visible), and paste it into your report as
Fig. P10.
- What is the screen resolution of your iPod touch when the app is
downloaded and runs on your iPod? (Q5)
Demonstration
- Demonstrate
the complete project (all apps) on your iPod and have the
instructor sign the cover sheet of your report. (Worth 20% of project) (Q)
Report
- Include the plot/picture/snapshot numbers P1, P2, etc. in
captions, along with a short description!
- Place answers to all questions on one or more consecutive sheets
of paper at the front of the report!
- Include the question numbers Q1, Q2, etc in answers, along with
the question!
- Do NOT scatter the question answers throughout the report, keep
them together
- Write a cover sheet + 1 page executive summary ONLY!!!
Describe any unresolved issues.
- Make sure that you include question numbers and plot numbers on
all sheets!
- Instructor will only look on the question answer-sheets for any
discussion.
- All extraneous material WILL BE IGNORED!
- Do not write any discussion, except directly on the question
answer-sheets or 1 page summary.
- Do not add extraneous pages.
- Do not put explanations on plots unless specifically directed to
do so.
- Include any problems or unresolved issues in the summary.
- ONLY turn in the specific snippets of source code as requested
(NOT ANYTHING ELSE!!")
- Include any problems or unresolved issues in the summary.
Copyright 2011 by T.P. Weldon
Apple, iPhone, iPad, and Xcode are registered trademarks of Apple
Inc.