Design with iPhone Project 3
Warning:
Content of this website may change at
any time up until class meeting.
World's Fastest Introduction to Interface Builder and Cocoa Touch
- Remain in the same groups of 2.
- Members of any group must be all
graduate or all undergrad.
- It would be
a good idea to back up your work on a USB drive.
- To access quick help in Xcode,
experiment with option-double-clicking items in the window.
- Text: Chapters 4, 5, 6
Preparation
- Download and open the project template
below, so that you can cut and paste answers into the report as
you complete the project.
Use the application Grab.app in the Application::utility folder, or
search for it in spotlight (the magnifying glass in the upper right of
your screen).
- Create a new directory "Project3" for this project in your
Documents directory, if you have not already done so.
About Cocoa Touch
- Cocoa Touch is collection of
frameworks specialized for the development of iOS apps.
- A framework can be thought of
as a group of useful functions.
- Cocoa Touch is specialized for touch-based interfaces and
optimization for the unique interface of iOS for iPhone/iPad/etc.
- Cocoa Touch is similar to, and derives from, the Cocoa collection of frameworks specialized
for developing Mac apps.
- Cocoa Touch frameworks include:
- UIKit for the basic iPhone graphic user interface
- Foundation for strings,
arrays, etc. as we used in our earlier Objective-C project
- MapKit for mapping
- GameKit for gaming
- CoreGraphics for images
- OpenGLES for 3D animation
- CoreMotion accelerometer input
- and many more frameworks
- Of particular note is the UIKit framework that gives access to
the buttons, multi-touch gestures, and full-screen views on iOS needed
to implement graphical event-driven iPhone applications.
- The frameworks inside Cocoa Touch greatly simplify your code,
since they provide libraries full of useful functions.
- Whenever you need to do some task in an app, first look for an existing framework to greatly
simplify your effort!
- What framework includes the GKSession class? (Q1) Hint: try searching
http://developer.apple.com/search
- What types of peer-to-peer networks are enabled by the GKSession
class: Wi-Fi, bluetooth, both, or neither? (Q2)
Creating a new iOS app in Xcode
- Run Xcode from the /Developer/Applications directory, or search
for it in spotlight and run it as illustrated below.
- Click "Create new Xcode project"
- We
will create a view application that uses a single-view user
interface. Other project type options would include OpenGL for
images/animation, a navigation application that presents data such as a
contacts list, a tab-bar
application that lets a user choose from several screen such as the
clock app, a utility app that implements a main viewand
flip-side view for simple customizations such as the stocks app,
and a window-based app that is the most generic starting point for an
app.
- Select an iOS "view-based application"
as shown below (see green and red arrows below):
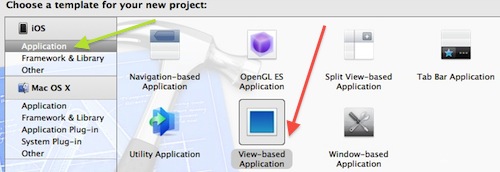
Fig. 1
- In the next pop-up, enter ProductName "helloXyz" where xyz is
your initials. Add company identifier "edu.uncc" (shown in the
red circle below) and device family "iPhone"
- In the next pop-up, select your project directory for your project
- Your new project should appear in the Xcode workspace window as
below:

Fig. 2(a) Xcode Workspace Window
- Take a snapshot of your window as above, and paste it into your
report as Fig. P1. (
Use the application Grab.app in the Applications/Utilities folder)
- The left pane of the workspace window is the Project Navigator in
Fig. 2(a) above, and it shows the files/contents of your project or
workspace. The folder icon (green arrow above) in the navigator
pane menu bar must be selected to see the files in the Project
Navigator.
- The right side of Xcode workspace window in Fig. 2(a) above is
the Editor Area where
parameters are edited or source code is edited. Click the Info
tab (at the blue arrow above) and BuildSettings tab to see other items
that can be edited.
- Select the main.m file in the navigator pane, and click the two
buttons at the yellow arrow above to see the debug
pane and the utility pane, as
illustrated below:
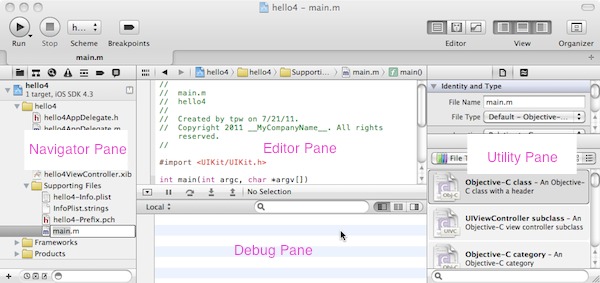
Fig. 2(b) Xcode Panes (Areas)
- Take a snapshot of your main.m Xcode window with all 4 panes
visible as in Fig. 2(b) above, and paste it into your report as
Fig. P2.
- To access quick help in Xcode,
experiment with option-double-clicking items in the window.
- Try right-clicking in the ProjectNavigator pane to bring up help
manual items
- For fast switching between work items, you can add custom tabs to
the view using File::New::NewTab.
- Select the "hello2AppDelegate.h" file shown below (blue arrow),
and the utility button
(red arrow) to see how the workspace window changes to edit the header
file (ending with ".h"). Your window should change as shown below:
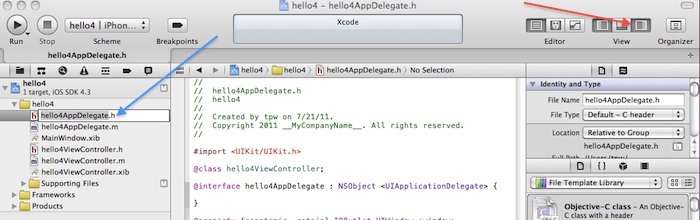
Fig. 3
- Take a snapshot of your helloAppDelegate.h Xcode window as shown
in Fig. 3 above, and paste it into your report as Fig. P3.
- Click
the Xcode Hello fproject as indicated in the green arrow in Fig. 4
below,
to return to the build-menu as shown in Fig. 4 below
- Click the BuildSettings tab as shown below at the yellow arrow,
to make sure that you have the same settings shown in Fig. 4
below.
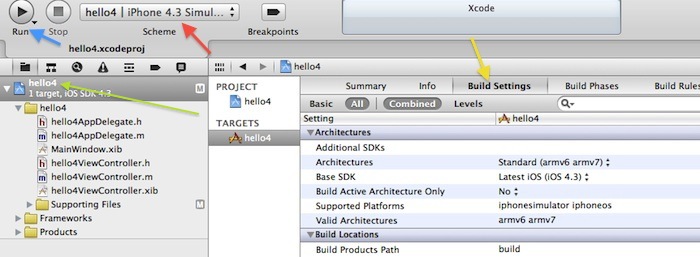
Fig. 4
Building and simulating your app
- Make sure that the "iPhone 4.3 simulator" Scheme is chosen as
shown at the red arrow above in Fig. 4, and click the Run button (blue
arrow in Fig. 4).
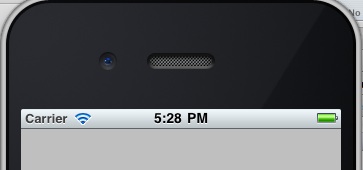
- After the program compiles, it should run on the simulator on the MacBook, and
you should see your application view as shown in Fig. 5(a) below).
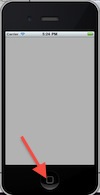
(a)
(b)
(c)
Fig. 5 Blank view running in simulator, and zoom into top of view.
- Take a snapshot of the top of your app as in Fig. 5(b) above, and
paste it into your report as Fig. P4.
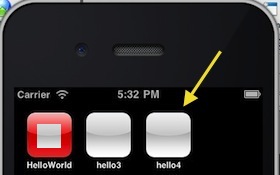
- Click the home button as shown by the red arrow in Fig. 5(a), and
your "hello" app should stop running in the simulator, and you should
see the icon view of your new app in the home screen view of your
iPhone simulator (yellow arrow in Fig. 5(c).
- Take a snapshot of the icon view of your app as in Fig. 5(c)
above, and paste it into your report as Fig. P5.
- Click on the hello icon, and you application should start running
in the simulator again.
- Use the Simulator::Hardware::RotateRight and rotateLeft to rotate
the device
- Quit the simulator as shown below
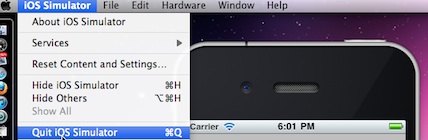
Fig. 6
Schemes
- Investigate the Scheme being used for the iOS simulator,
- Schemes
are Xcode tools to greatly simplify many underlying details of
building your app for specific targets (iPad. iPhone, the simulator,
etc). In a scheme, many details are hidden from the user,
greatly simplifying the task of setting up the compiler.
- First,
make sure that the iPhone 4.3 simulator Scheme is chosen in the
Xcode4::Scheme menu as shown by the checked item in the blue bar
(pointed at by the red arrow below)
- Then use Xcode4::Product::EditScheme (yellow arrow)
in the Product dropdown menu (red arrow) as shown below.
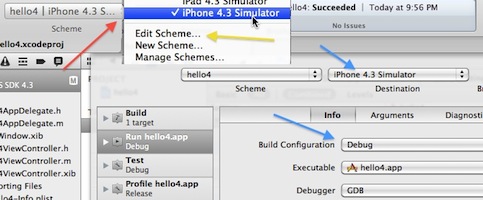
Fig. 7 Schemes
- As shown above by the blue arrows, the Scheme is iPhone iOS 4.3
simulator with Debug build configuration
- Take
a snapshot of your "iPhone iOS 4.3 simulator with Debug" scheme
as in Fig. 7 above, and paste it into your report as Fig. P6.
Investigating the basic structure of
an app
- Next, we inspect our hello app in xcode
- Some terminology in iOS:
- In your app, a window is an
instance of the UIWindow class. Every iOS app has at least one
window and each window fills the entire main screen, is empty, and is
just an empty surface that hosts one or more views.
- In your app, a view is an
instance
of the UIView class and handle user interaction. Views draw
content, manage any subviews, handle resizing behaviors, receive touch
events, and forward events to other objects.
- In your app, a view controller
is an instance
of the UIViewController class and manages views and typically
will include most of your event handlers and variables for data
storage. The view controller typically includes
- instance variables declared as outlets
that are typically used to point at some component of a view, such as a
text field or button label, allowing you to read or change the
component. Outlets are indicated in the view controller header
with the IBOutlet compiler directive.
- instance variables declared as actionsthat
are typically used to point at some method that me be executed when
some button is pressed in a view, such as beeping when a button is
pressed. Actions are indicated in the view controller header with
the IBAction compiler directive.
- instance variables containing any general data used in the
app, such as the result of some computation
- General methods used by your view controller in your app,
such as performing some computation
Execution/launch sequence
- As in C and C++, every program begins
execution with a function called main()
- So, open up the main.m file under the
SupportingFiles directory as shown below (blue arrow)
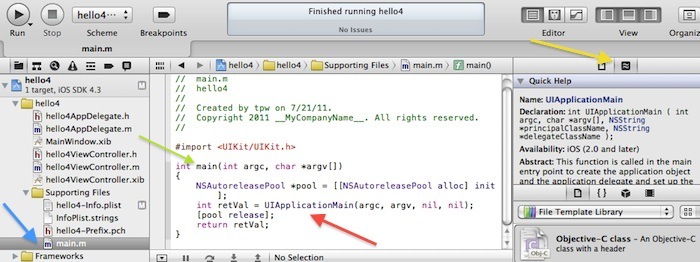
Fig. 8
- The main.m
file contains the main() function (green arrow in Fig. 8 above).
Main() is the first function to be run by all applications, just as in
most C and C++ applications.
- Main()
then calls the UIApplicationMain function (red arrow above), which is
the primary built-in function used to launch and run iOS apps.
- By
the way, the yellow arrow above is the handy QuickHelp tab for source
code, so long as the cursor is clicked in the appropriate point in the
source code pane
- The overall sequence of execution of your
app is then:
- main.m
is first to execute and calls UIApplicationMain
- UIApplicationMain
executes next (red arrow in Fig. 8 above). Since the last 2
arguments of UIApplicationMain are both nil, it defaults to
look into hello-info.plist for the name of NSMainNibFile (or Main nib
file base name) for the next item to execute. Typically, the
MainNibFile is named MainWindow.
- More
generally, the UIApplicationMain
function takes four parameters to initialize the app. You should never
have to change the default arguments automatically generated for
UIApplicationMain. Argc and argv parameters contain any
launch-time arguments parsed by the UIKit and can be ignored, the third
parameter is the name of the app’s principal class (nil causes UIKit to
default to the UIApplication class), the fourth parameter identifies
the class of the application delegate (nil causes UIKit to default to
the application delegate object is located in the app’s main nib file).
- MainWindow.xib
is loaded along with all files and objects it contains, in addition to
the
ApplicationDelegate object and the ViewController defined by
MainWindow.xib.
- MainWindow.xib connectionsInspector
shows that the application delegate
is helloAppDelegate, as in Fig. 9 below. (If you inspect the
method didFinishLaunchingWithOptions in helloAppDelegate.m, you will
see that it sets the window.rootViewController to self.viewController,
and self.viewController is defined as hello4ViewController in the
header helloAppDelegate.m)
- MainWindow.xib connectionsInspector
shows the controller is helloViewController,
as in Fig. 10 below
- The helloViewController
object loads the helloViewController.xib
file and
renders the main app interface/GUI from the view defined in this nib
file. (This nib file also describes which actions/outlets defined
in helloViewController that are connected to each of the
buttons in the main interface view)

Fig. 9 Owner
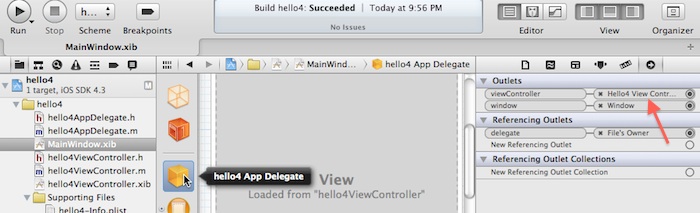
Fig. 10 App delegate
- Files owner in the dock at the margin of the editor area, as
shown in Fig. 9 above, is the nib file’s controller object.
- The
First Responder in the dock at the margin of the editor area, below the
files owner in Fig. 9, is the first object in the responder chain
for events.
Editing the app view in Interface
Builder
- As
shown below, select your helloViewController nib file,
helloViewController.xib, in the
ProjectNavigator (red arrow), and select the "File's owner" green
arrow,
and select the IdentityInspector tab (blue arrow), and note that
hello4VieController is listed as the "files owner" class.
- "File's owner"
indicates the class that loads the nib file at runtime (typically a
controller), and the header file of the "file's owner" will contain the
various IBActions and IBOutlets available for use by Xcode.
Actions and outlets are discussed later.
- The file helloViewController.xib is a "nib file" even though it it ends
with "xib" (Historically they were "NeXT Interface Builder" files)
- The image below shows the app's graphic user interface in the Interface Builder view
of Xcode 4.
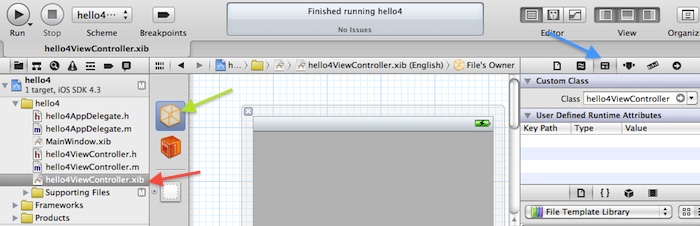
Fig. 11
- What was the name of the person that founded NeXT, Inc. in 1985
to create the NeXT Computer? (Q3)
Hint: use wiki.
- The nib file contains all the graphics
items, etc. that construct the interface.
- Notice that in the IdentityInspector, it
says that the nib file will be owned by your helloViewController class
object.
- Notice the basic file structure of the
files in the hello directory.
- The .xib files are nib files
- The
whatever.h files are Objective-C header (or interface) files for each
class, containing a list of the class methods and data
- The whatever.m files are Objective-C
implementation files for each class, and contain the detailed code to
implement the class
- Each .h file has a corresponding .m file
- As
shown in Fig. 12 below, select the helloViewController.xib
nib file in the ProjectNavigator pane (green arrow), select the view in
the related-files in the dock at the margin of the editor area (yellow
arrow), select the ObjectLibrary in the Utilities pane (red
arrow), and drag 2 buttons and one text field into the InterfaceBuilder
view.
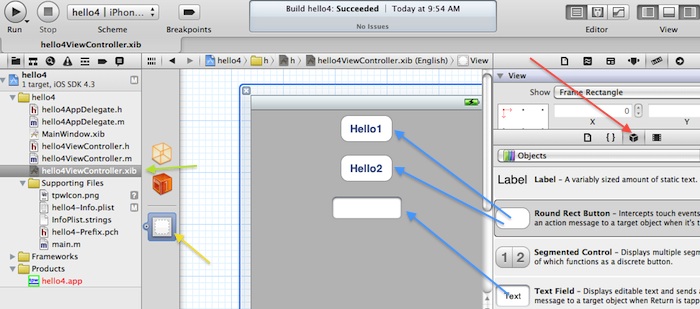
Fig. 12
- Type Hello1 and Hello2 into the buttons as
shown above.
Adding actions and outlets in
Interface Builder
- Next, edit the project in Interface
Builder to add 2 actions and one outlet
- Before reading the detailed instructions,
see the short tutorial video p3-tpw-connections.mov
- Select the assistant
editor as shown at the red arrow below, and use the jump bar (yellow arrow below in Fig. 13) to
select the header file, hello4ViewController.h
- To add the action
for the Hello1 button, control-drag from the hello1 button to the
bottom of hello4ViewController.h just before @end, as shown in the
green circle below in Fig. 13. In the pop-up that appears, select
the options as in the yellow circle below,, naming the action
hello1up. (Use Connection:action, Name:hello1up, Type:UIButton,
Event:TouchUpInside, Argument:Sender+Event)
- Repeat this for the hello2 button.
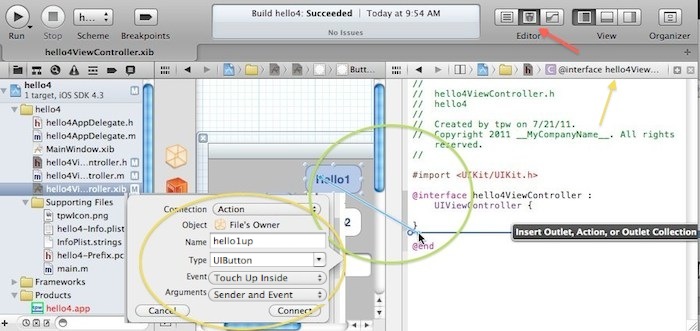
Fig. 13 Adding an action
- To add the outlet for the text
box, control-drag from the textBox to the bottom of
hello4ViewController.h, just as before. (Use
Connection:outlet, Name:textbox, Type:UITextField) as below, in
the pop-up
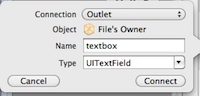
Fig. 14 Adding an outlet
- If you make a mistake, and you need to
delete an action or outlet, rightclick the item on the view, and click
the "x" to the left of the item as illustrated by the yellow arrow
below:

Fig. 15
- When you have added the 2 actions and the
outlet, your header file hello4ViewController.h should be:
#import
<UIKit/UIKit.h>
@interface hello4ViewController : UIViewController {
UITextField *textbox;
}
- (IBAction)hello1up:(id)sender forEvent:(UIEvent *)event;
- (IBAction)hello2up:(id)sender forEvent:(UIEvent *)event;
@property (nonatomic, retain) IBOutlet UITextField *textbox;
@end
- Finally, find and edit the two actions in
your implementation file as follows:
- (IBAction)hello1up:(id)sender
forEvent:(UIEvent *)event {
textbox.text =@"hello1";
}
- (IBAction)hello2up:(id)sender forEvent:(UIEvent *)event {
textbox.text=@"hello2";
}
- Run and test your code, when you press the
buttons the message should toggle from "hello1" to "hello2" as below
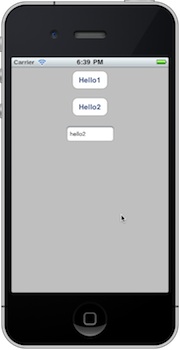
Fig. 16. Hello app
- Build
and run your app in the simulator, take a snapshot of your app in the
simulator as in Fig. 16 above, and paste it into your
report as Fig. P7.
Adding an app icon
- Download the icon image file tpwIcon.png
to your project directory
- Open the hello-info.plist file in the SupportingFiles folder of
your Xcode Navigator Pane
- With
your Xcode window open and a finder window open, drag the tpwIcon.png
file into your Xcode window's SupportingFiles folder, and the following
pop-up will appear:
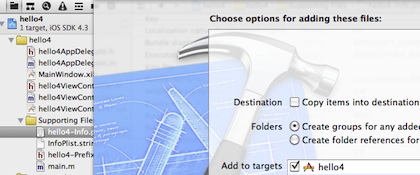
Fig. 17
- Accept the options shown above, and add the icon file to the
folder
- Next, open the "hello-info.plist" file (blue arrow below) in
Xcode 4 as shown below:
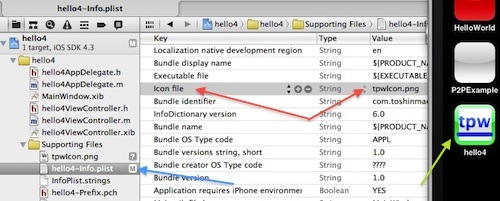
Fig. 18
- Edit the IconFile field to "tpwIcon.png" as shown at the red
arrows in Fig. 18 above.
- Build and run your app in the iPhone simulator.
- Press the "home button" at the bottom of the iphone simulator to
stop the app and see the home screen
- You should see the new icon on the home screen as shown at the
green arrow in Fig. 18 above
- Edit the tpwIcon.png file to replace "tpw" with your
initials. (Double click the icon to open and edit it. FYI,
other editors include http://paintbrush.sourceforge.net/
)
- Rebuild
and rerun your app with your new edited icon, take a snapshot of your
new icon in the simulator as in Fig. 18 above, and paste it into your
report as Fig. P8.
- What company did Armas Clifford Markkula found in 1977? (Q4)
- What component of the Apple 1 computer was invented by Charles
Ingerham Peddle? (Q5)
Other Tips for Future Reference
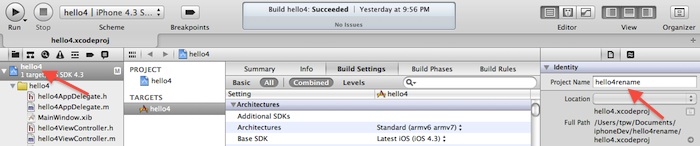
Rename
a project
- You can also rename a project as shown below, where hello4 is
renamed hello4rename
- Dont do this, except on a
second complete copy of your project!!
Add a
framework
- Frameworks are bundles of useful functions (such as the
AudioToolbox) that you may wish to add to a project
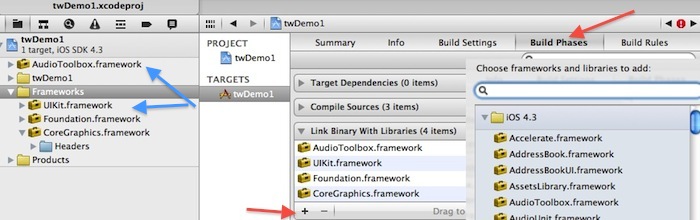
- To
add a framework, select your target in your ProjectNavigator pane and
the BuildPhasesTab (red arrow below) and click the + (red arrow below)
to add a new Framework as shown below
- The framework
initially ends up in the wrong place in your ProjectNavigator pane, so
drag it to your frameworks folder (blue arrows below)
- Dont forget to add "#import <AudioToolbox/AudioToolbox.h>"
to your controller header file, such as tpwDemoViewController.h
- Demonstrate
the complete project on your iPod and have the instructor sign
the cover sheet of your report. (Worth 20% of project) (Q6)
Report
- Include the plot/picture/snapshot numbers P1, P2, etc. in
captions, along with a short description!
- Place answers to all questions on one or more consecutive sheets
of paper at the front of the report!
- Include the question numbers Q1, Q2, etc in answers, along with
the question!
- Do NOT scatter the question answers throughout the report, keep
them together
- Write a cover sheet + 1 page executive summary ONLY!!!
Describe any unresolved issues.
- Make sure that you include question numbers and plot numbers on
all sheets!
- Instructor will only look on the question answer-sheets for any
discussion.
- All extraneous material WILL BE IGNORED!
- Do not write any discussion, except directly on the question
answer-sheets or 1 page summary.
- Do not add extraneous pages.
- Do not put explanations on plots unless specifically directed to
do so.
- Include any problems or unresolved issues in the summary.
- ONLY turn in the specific snippets of source code as requested
(NOT ANYTHING ELSE!!")
- Include any problems or unresolved issues in the summary.
Copyright 2011 by T.P. Weldon
Apple, iPhone, iPad, and Xcode are registered trademarks of Apple
Inc.