Design with
iPhone Project 2
Warning:
Content of this website may change at any time up until class meeting.
World's Fastest Introduction to Xcode and Objective-C
- Remain in the same groups of 2.
- Members of any group must be all graduate or all undergrad.
- It would be a good idea to back up your work on a USB drive
- To access quick help in Xcode, experiment with option-double-clicking items in the window.
- Text: Chapters 2, 3
Preparation
- You will need Xcode and a MacBook Pro.
- Download and open the project template below, so that you can cut and paste answers into the report as you complete the project.
Use the application Grab.app in the Application::utility folder, or
search for it in spotlight (the magnifying glass in the upper right of
your screen).
- Create a new directory "Project2" for this project in your Documents directory, if you have not already done so.
A Simple Mac Application in Xcode
- Launch Xcode (Run Xcode from the /Developer/Applications directory, or search for it in spotlight and run it, as illustrated below):
- In the remainder of the project, make sure that the name of your project begins with your initials, e.g., "tpwProject1"
- Create
a new project of type Platform: Mac OS X, Template family:
Application, Template name: Command Line Tool, Type: Foundation as
shown below (in older Xcode3 use
NewProject::Application::CocoaApp::FoundationTool):

Fig. 1
- Open the main.m file, and add the "my name is" command as illustrated at the blue arrow below:
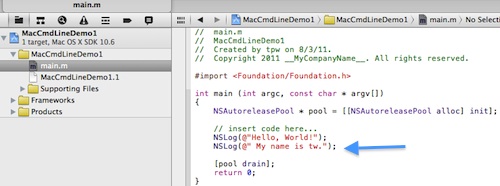
Fig 2
- The C programming language is contained as a subset within
Objective-C, so experienced Java, C, and C++ programmers will quickly
recognize much of the Objective-C language.
- In the foregoing program, any line beginning with // is a comment.
- All program statements terminate with a semicolon
- In Objective C, every program has a subroutine "main" that is the first routine called when the program is run. The
first argument of main is argc, the argument count equals the number
of arguments stored in array argv[]. And argv[] is the array
containing the command line arguments that may be present when a
command is run from the command line in a terminal. By convention,
argv[0] contains the name of the program (MacCmdLineDemo1), andargv[1] contains the first command line argument.
- #import <Foundation/Foundation.h> is a directive to import the system header file Foundation.h containing definitions
of the foundation classes used in your program. The Foundation
framework defines a base layer of Objective-C classes. A
framework can be thought of as a group of useful functions.
- The NSLog statement in the program logs an error message to the
Apple System Log facility, and so you get the messages in the debug
console
- The directive of the form @"whatever" creates an NSString object that will be used when NSLog prints to the error log
- The NSAutoreleasePool statement was automatically included when
Xcode created your program. This function handles memory
management by creating a memory pool, and is particularly important on
portable devices such as iPhone. Whenever you include the
Foundation framework, you must establish this memory management as
shown in the example program of Fig. 2. The "[pool drain]"
statement near the end is used to free the memory pool when the program
exits. An NSAutoreleasePool contains objects, and it sends a
"release" message for each of those objects to free memory when
the pool is "drained."
- Run the program
- You should see the following output with your text (blue arrow
below) in the debug console that should automatically appear at the
bottom of your xcode window:
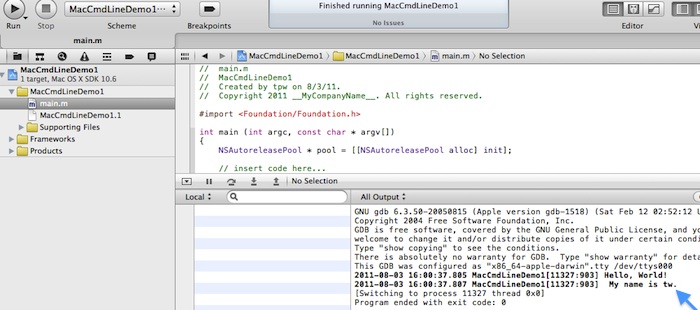
Fig 3
- Take a snapshot of your project as in Fig. 3 above (make sure
that the output at the bottom of the debugger is visible with "Hello
world"and "My name is" visible along with "exit code: 0") and paste it into your
report as Fig. P1. (
Use the application Grab.app in the Applications/Utilities folder)
- At the very end, observe that the program terminate with an exit
code of 0. This is a common unix convention for programs that
complete without any errors in execution. Nonzero results alert
the operating system that errors occurred.
- Note that the exit code 0 at the bottom of Fig. 3 was established
by the "return 0" statement at the end of the program in Fig. 2.
- If you run Applications::Utilities::Console.app you should also
be able to observe the error messages sent to the system log as below
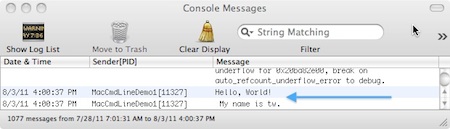
Fig. 4
Variables and Operators
- Add the following lines above the [pool drain] statement in main.m:
int x=11, y=22;
float a=3.0, b=4.0, z;
z= (float)(x/y) + a*b;
NSLog(@" x=%i, z= %f \n",x,z);
- In this, 2 integer and 3 floating-point variables are defined.
- The "(float)" is a cast that converts the integer division "x/y" into floating point.
- Note that x/y = 11/22 = 0 because 11 and 22 are integers (this is a common programming error)
- In the NSlog statement, the %i and %f
are placeholders for printing the integer variable x and floating-point
variable z, respectively. Other formatting placeholders are %e for scientific notation, %o for octal, %x or %X for hexadecimal, %s for a character string, %c for a character, %u for unsigned integer
- In the NSlog statement, "\n" is a newline or linefeed.
- Note that OS X has the underpinnings of a unix-type operating
system. To see this, run a terminal from a finder window as
Applications::Utilities::Terminal.app. In the terminal window
that appears, type the command "man man" to see the manual page
for the "man" command. In the terminal, you should see the output
as below:
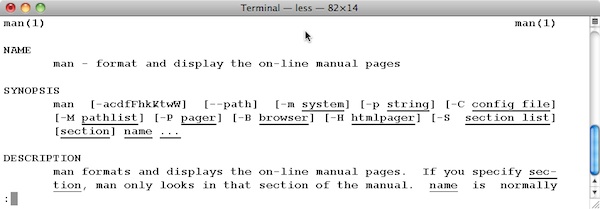
Fig. 5
- In the terminal, type q to exit the manual page for man
- In the terminal, get the manual page for printf by typing "man printf" at the command line
- Take a snapshot of your terminal output for "man printf" as in Fig. 5 above (make sure
that "printf "is visible at the top of the terminal) and paste it into your
report as Fig. P2.
- Use the spacebar to see more pages of the manual for sprintf. Notice that the different
printing formats mentioned above (%i, %f, etc.) are documented in the
man page for the c-language command sprintf.
- Note that unix-type systems typically have documentation for the C programming language accessible through the man command.
- In the command terminal, type "xterm -j -s -sb -sl 500" to open a new xterm.
- Type the commands "cd" and "pwd" consecutively in your xterm as shown below:
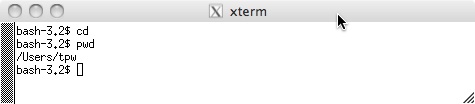
Fig. 6
- Take a snapshot of your xterm terminal output for "cd" and "pwd" as in Fig. 6 above (make sure
that "/Users/yourdirectory "is visible in the output ) and paste it into your
report as Fig. P3.
- Return to the Xcode project as shown in Fig. 3, and rerun your program. You should get the output:
x=11, z= 12.000000
- Take a snapshot of your project as in Fig. 3 above (make surethat
the output at the bottom of the debugger is visible with "x=1, z=
12.000000" output visible along with "exit code: 0") and paste it into your report
as Fig. P4.
- In the NSLog statement, change the %i to %x, run the program, and what is the new printed output for NSLog, x=? (Q1)
- In the NSLog statement, change the %i to %X, run the program, and what is the new printed output for NSLog, x=? (Q2)
- In the NSLog statement, change the %i to %#X, run the program, and what is the new printed output for NSLog, x=? (Q3)
- In the NSLog statement, change the %f to %e, run the program, and
what is the new printed output for NSLog, z=? (Q4)
- The %@ formatting placeholder is a generic type, most useful for printing objects such as NSString, etc.
- Some other operators in order of precedence include:
- ( ) grouping with parentheses
- ! logical negation
- *, / the usual multiply, divide
- +, - the usual addition, subtraction
- & bitwise and
- ^ bitwise xor
- | bitwise or
- && logical and
- || logical or
- What does the "<<" operator do? (Q5) Hint: try wiki Operators in C and C++
- Some other types of variables
- int, short int, long int, unsigned int integer types
- float, double, long
double
floating-point types e.g., 2.32f or 5.67e9
- char,
unsigned char, signed char
character
types
e.g., 'q' (use single quotes for characters)
- _Bool
Boolean types (1 or 0)
- float
_Complex
complex floating point ( use
#include <complex.h> )
- You can declare an array of 4 integers as: int xx[4] = {1,
2, 3, 4}; and you could access the first element of the array
by xx[0]
- In the long run, it is probably better to use the class variable types in iOS (we will discuss objects later):
- NSNumber - is a class that contains/handles numbers
- NSInteger - is not a class, it is a variable type, a typedef, a synonym for the "int" typedef
- NSDecimalNumber - is a subclass of NSNumber
- NSString - is a class that contains/handles an immutable string. Immutable objects are objects whose content cannot be changed.
- directive of the form @"whatever" - creates an immutable NSString object.
- NSMutableString - string object where characters of the string can be changed
- CGFloat -
- NSArray - is a class that contains an immutable array of objects such as NSNumber
- NSMutableArray - muatable object array,
- Array xxample:
NSMutableArray *yesNo = [NSMutableArray arrayWithObjects: @"yes", @"no", nil ];
NSLog( @"array elements = %@,%@\nor:\n%@ ",[yesNo objectAtIndex:0], [yesNo objectAtIndex:1], yesNo);
- Arrays
- Each of the basic types can be used to create an array such as
- int x2[4]={11,22,33,44};
- NSLog(@" x2=%i \n",x2[0]);
- Enter the code above right above [pool drain] in main.m, and take a snapshot of your project as in Fig. 3 above (make surethat
the output at the bottom of the debugger is visible with "x2=11" output
visible along with "exit code: 0") and paste it into your report
as Fig. P5.
- Be careful, remember that the first element in the array is x2[0] not x2[1]
- What is the last element in the array x2[], is it x2[3] or x2[4]? (Q6)
- Technically
x2 is a pointer to the first element of the array, and so the second
element of the array could also be accessed using a dereferenced pointer
as *(x2+1). To see this, try adding the statement:
- NSLog(@" ptr x2=%i \n",*(x2+1));
- If the above line is added, what value is printed out at the "ptr x2" output line? (Q7)
- Going "out of bounds" in an array is perhaps the most common
cause of crashes in programs (and can cause even worse problems when it
doesnt crash)
Objects, instances, and methods
- Most modern software is object-oriented, and Objective-C is an object-oriented programming language.
- An object (also called an instance of a class) is simply a
self-contained chunk of computer code running in memory that contains:
- 1) data stored in instance variables
- 2) procedures to operate on that data called methods
- For example, you could have an employee object containing data
of "name" and "salary" and you could have procedures "change name,"
"change salary."
- A class is the software "recipe" that tells the compiler how to build an object
- For the name/salary example above, you may have declared that the data
storage area for each name was 100 bytes long and called empname, and
the salary field was a floating point number called empsalary.
- If
you then declared two employees in your program, the compiler would
create two objects when the program runs. Each object is just a
runtime copy of whatever you defined in your class.
- Every object (i.e., every instance of a class) has its own
separate copy of the variables you declare, so that each object
controls its own data.
- All Mac OS X classes in the Cocoa programming environment are prefixed
with "NS" to identify them as belonging to the OS X or iOS core. The NS
dates from predecessor of NeXTstep. NSObject can be thought of as the
basic object class (root class), from which most objects should be derived.
- You
should almost always use the NSObject class as the parent class of your
custom classes, since NSObject is the root class of Cocoa and
most classes in iOS and OS X.
- In this project, use Xcode::File::New to create a new class and name it "XyzEmployee.m" where xyz is your initials
as below, choosing the subclass of NSObject (By convention you
should capitalize the first letter of al class names, unlike the
example below!):
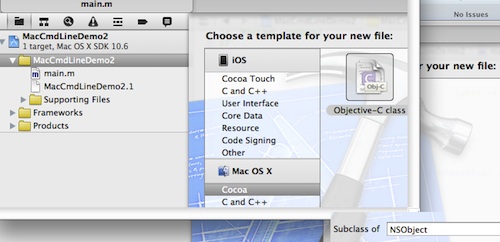
Fig. 7
- This creates two objective-c files in your project in the "SupportingFiles" directory, "xyzEmployee.h" and "xyzEmployee.m"
- File xyzEmployee.h is the header file
(or interface file), and it contains the fundamental template for the
data types and methods included in the class, referred to as a class interface
- File xyzEmployee.m is the implementation file (or methods file), and it includes the actual code that implements the details of the class structure outlined in the template
Class interface defined in header file
- The declaration of a class interface
in a header file begins with the compiler directive "@interface" and
ends with the directive "@end."
- Note: all directives to the compiler begin with “@”.
- Edit the header file xyzEmployee.h, with appropriate changes to "tpw," as follows:
#import <Foundation/Foundation.h>
@interface tpwEmployee : NSObject {
@private
char * empName;
float empSalary;
float empHours;
}
-(void) setsalary: (float)sal andHours: (float)hrs;
-(float) getsalary;
@end
- As shown above, you added three instance variables empName, empSalary, and empHours to your xyzEmployee class
- The
class definition begins at the "@interface tpwEmployee : NSObject"
statement declaring a new class with the name tpwEmployee and
inheriting features from the parent class (or superclass) NSObject.
- A new class that is based on another class in this way inherits methods
and instance variables. The new class can optionally add or
modifiy the inherited traits, but does not necessarily have to do
this. Inheritance can save time, since you can reuse code
from a similar class.
- Three private instance variables empName, empSalary, and empHours
are declared (private variables cannot be accessed by any subclass, see
the directives @protected and @public for other behaviors)
- The types of directives affecting variable access are:
- @private - accessible only within the class that declares it
- @protected - accessible within the class that declares it and within classes that inherit it
- @public
- accessible everywhere (@public defeats the fundamental
principle of data encapsulation in object-oriented programming)
- @package
- has @public scope inside the executable image that implements
the class, but acts like @private outside to linked images
- Note that all variables/data are defined within the braces { }
- Two
methods (or functions) are declared.
- Method setsalary takes two
floating-point arguments sal and hrs, and returns no value, hence
the "(void)."
- Method getsalary has no arguments, and returns a
floating point number.
- Methods are preceded by a "+" or "-" sign
- Methods preceded by a "+" are "class methods" that can be used
by class objects without there necessarily being an instance n
existence. [MyObject alloc] is an example, since there is
no MyObject instance until after alloc runs.
- Methods preceded by a "-" are "instance methods" that can be used by instances of objects
- The proper way to
refer to the setsalary method is as the setsalary:andHours method, thus
fully including the second argument name.
- Edit the header file xyzEmployee.m, with appropriate changes to "tpw," as follows:
#import "tpwEmployee.h"
@implementation tpwEmployee
- (id)init
{
self = [super init];
if (self) {
// Initialization code here.
empName="noname";
empSalary=1.0;
}
return self;
}
- (void)dealloc
{
[super dealloc];
}
-(void) setsalary: (float)sal andHours: (float)hrs{
empSalary=sal;
empHours=hrs;
}
-(float) getsalary{
return empSalary;
}
@end
- The statement "#import "tpwEmployee.h"" includes the local file tpwEmployee.h
- The statement "@implementation tpwEmployee" denotes the beginning of the declaration of the methods for the class
- "id"
is a reserved keyword for a variable type of pointer-to-object, like
"float" and "int" are reserved keywords. An "id" is referred
to as the "object identifier" data type, analogous to integer and
floating-point data types.
- So, the "(id)init"
method returns a pointer to an object, and it is an inherited method
from the parent NSObject class since we did not define init in the
header file.
- Before proceeding, we need to define the square-bracket notation
for invoking functions in Objective-C. To execute a method
associated with some object, you use the bracket notation "[objectx
method2]." This statement causes method2 to be executed as
defined in objectx. The process of calling a method of an object
is called messaging. The
notation is also considered as "[receiver message]" where the
object is considered the receiver of some command or message to be
executed.
- The "(id)init" method initializes the object, and because all objects are different, you must define the initialization. First, the keyword "super" refers to the parent class, so the command "[super init]" calls the init method of the parent class (NSObject). The "self" reserved keyword refers to the current object that is executing commands. ("Self" is analogous to keyword "this" in C++)
- So, the statement "self = [super init]" causes "self" to be set equal to the new NSObject created by "[super init]."
- When defining a new class with a
parent class, any new method with the same name as one defined further
up the hierarchy overrides the higher-up definition. Thus, the
local "init" method overrides any default parent "init" method in
NSObject, unless the parent method is explicitly called using "super."
- Next, the init method must set default values for the data/variables specific to our
tpwEmployee class. So we set a default employee name to "noname"
and set a default salary to 1.0.
- Note that @"Hello World!" in Fig. 2 is an NSString object, whereas empName="noname" above is a normal c-language type of string.
- We must also define our two methods, setsalary and getsalary.
- Finally
in the code above, we just retain the default dealloc, that calls the
parent class dealloc "[super dealloc]" to free up memory when the
object is deallocated. If you had used a retain or alloc method
somewhere in your init, then you should add corresponding release calls
in your dealloc. Generally, use release instead of dealloc on all your objects, with the exception of [super dealloc].
- Next, edit main.m:
- Add #import "tpwEmployee.h" right after #import <Foundation/Foundation.h>
- Add the following code just above [pool drain] in main.m
tpwEmployee * emp1;
emp1 = [tpwEmployee alloc];
emp1 = [emp1 init];
NSLog(@"Employee salary=%f \n",[emp1 getsalary]);
[emp1 setsalary: 123.25 andHours: 40.0];
NSLog(@"Employee salary=%f \n",[emp1 getsalary]);
[emp1 release];
- Re-Run the program
- It takes two steps to create an object in objective-c:
- Allocate memory for the new object using the alloc method
- Initialize the values stored in the allocated memory using the init method
- An object isn’t fully functional until both steps have been
completed. Each step is accomplished by a separate method but typically
in a single line of code:
- The "[emp1 release]" statement above releases the object emp1 from the memory pool after we finish using it.
- Take a snapshot of your project as in Fig. 3 above (make sure that
the output at the bottom of the debugger is visible with "Employee
salary=1.0" and "Employee salary=123.45" output visible along with "exit code: 0") and
paste it into your report
as Fig. P6.
- How many digits of precision are in a floating point number?(Q8) Hint: try [emp1 setsalary: 80000000.0/9.0 andHours: 40.0]
- Note: you
could have merged two lines in the code above by using nested brackets:
"emp1 = [[tpwEmployee alloc] init];" Once you become more
familiar with objective-c, you may become more comfortable with "nested
brackets."
- Also, it would have been better to have checked that the object
was created correctly, since a nil value of emp1 would have indicated
the object was not created correctly. Note the "if (self)"
statement in the xyzEmployee.m
init method for an example of safer coding practice. The "if
(self)" condition will only execute the subsequent commands if the object was successfully
created and "self" is not nil.
- The keyword nil is defined as a null object, an id with a value of 0.
Memory Management
- Memory management is critical on the iPhone
- Objective-C offers two memory management methods:
- Reference counting, where the programmer is responsible for memory allocation and lifetime of objects.
- Garbage collection, where an automatic memory recovery system is responsible for memory allocation and lifetime of objects.
- Garbage collection is not available for iOS
- The reference counting method is as follows:
- In the code above, the code "[tpwEmployee alloc]" allocated memory and created the object by calling the alloc method
- When the object is created by alloc, the object contains a reference count whose value is set to 1.
- Any users of the object may call its retain method to increment the reference count to prevent the object from being deleted
- When users are finished with an object, they call the release method to decrement the reference count
- When the reference count reaches 0, the object's memory is deallocated and freed by the system
- Never call the release method on an object that you have not first called the alloc, copy, or retain methods
- "Memory leaks" refer
to the uncontrolled growth of a program that does not deallocate memory
properly. It looks like a "memory leak" to the rest of the
system, since the amount of memory available to other programs on the
system decreases as the amount of memory used by the poorly written
program grows uncontrollably.
- On portable devices such as iPhone, memory leaks can put significant strain on constrained resources
- In iPhone apps, you must explicitly do the memory management, since there is no automatic garbage collection service.
- See the "[emp1 release]" statement at the end of the code above
for an example of releasing an object to prevent memory leaks.
Since we created the emp1 object by calling the alloc and init methods
earlier in the code, we must release the object to free memory and
prevent memory leaks.
- By the way, you do not have to release NSStrings created by the @"whatever-string" type of compiler directive
- Things can become a bit more complicated when the return type of
a method is an object that
may have been created within the method. In this case, you cannot
release the object at the end of the method execution, since the object
must remain in memory to be returned to the calling program. And
the calling program has no way of knowing what occurred inside the
method. To handle this situation, use the autorelease method
in the return statement the end of the method. For example, use
"return [myNewObject autorelease]" instead of "return myNewObject."
- This autorelease pool of memory is freed up when the "[pool drain]" is executed, as at the bottom of Fig. 2
- Note that the pool was created by the NSAutoreleasePool method invoked near the top of Fig. 2.
- It is best to minimize use of the autorelease pool, since memory use will grow until the pool is drained
- Never call the release method on an autorelease object, since it can only be freed by [pool drain]
- You can create multiple/nested autorelease pools, and drain each
pool. This can be handy in creating local pools within methods
that may be useful in for loops and other areas.
- It is best to think of nested autorelease pools as being on a
stack, with the most recent pool being on top of the stack. Thus,
each new autorelease object is always put in the most recent
autorelease pool at the top of the stack. Thus, all the
autorelease objects created since the creation of the most recent pool
will be released when the most recent pool is drained.
- Warning: If you drain an autorelease pool that is not the top
of the stack, all autorelease pools above it on the stack are drained.
- Warning: If an exception/error occurs, associated pools are drained
and if that pool is not the top pool on the stack then the pools above
are also drained. Because of this, exception handlers do not need
to release autorelease objects.
Loops and Control
- For loops follow the usual C language structure:
for(int nn=0; nn<4; nn++)
{
NSLog(@"nn=%i, nn*nn=%i \n",nn, nn*nn );
}
- The for loop creates an integer variable nn
starting with value 0, continues looping as long as nn<4, and
increments nn by 1 at the end of each iteration
- The loop consists of all commands within the braces { }
- In this example, the values of nn and nn*nn are printed to the error log
- While loops could be used to do the same thing:
int mm=0;
while(mm<4)
{
NSLog(@"mm=%i, mm*mm=%i \n",mm, mm*mm );
mm=mm+1;
}
-
The while loop exits when the condition mm<4 is violated
- The loop consists of all commands within the braces { }
- Switch statement to select from cases:
int kk=1;
switch (kk)
{
case 0:
NSLog(@"case kk=0 \n" );
break;
case 1:
NSLog(@"case kk=1 \n" );
break;
case 2:
NSLog(@"case kk=2 \n" );
break;
}
int aa=1;
if ( aa == 1 )
NSLog(@"aa=1 \n");
int bb=2;
if ( bb == 1 )
NSLog(@"bb = 1 \n");
else
NSLog(@"bb != 1 \n");
- The first example above is a simple if statement that prints the NSLog message aa=1 only if aa=1.
- The second example above includes an else clause that prints the NSLog message bb != 1, if bb != 1.
- Warning: note that the conditions with the if statements use the double-equal "==" not the single-equal "="
- Using "=" instead of "==" is a very common cause of errors in programs.
- Other relational operators
- == equal
- != not equal
- < less than
- <= less than or equal
- > greater than
- >= greater than or equal
- Boolean values
- The results of the conditions in the if() statement can be thought of as boolean values
- Typically we think of "1" and "0"
- However, Objective-C treats any nonzero number as true
- You can declare boolean variables with the type BOOL
- Also, the built-in keywords YES and NO correspond to true and false boolean values
- Nested loops
- Copy and paste the following code into your main.m file of your project, just above [pool drain]:
int count=0;
for(int cc=0; cc<4; cc++)
for(int dd=0; dd<4; dd++)
{
count=count+1;
if(cc == dd)
NSLog(@"at count=%i, cc=%i == dd=%i \n",count,cc,dd);
}
- Take a snapshot of your project as in Fig. 3 above (make sure
that the output at the bottom of the debugger is visible with all of
your "at count= , cc= == dd=" lines visible along with "exit code:
0") and paste it into your
report as Fig. P7.
- How many times was the command count=count+1 executed? (Q9)
Getters, Setters, and Synthesized Accessors
- In the tpwEmployee.h example class above, we included methods getsalary and setsalary to get and set the empSalary variable
- These are known as getter and setter methods, or collectively referred to as accessor methods
- In the most recent versions of Objective-C, you have the option
of having these getter and setter methods being automatically generated
for you
- To have Objective-C automatically create these getter and setter methods in your class:
1. In the header of your class, after your @interface { } section, add an
@property directive for each variable that you want to create automatic getters and setters. For our previous example:
#import <Foundation/Foundation.h>
@interface tpwEmployee : NSObject {
@private
char * empName;
float empSalary;
float empHours;
float empSalary2;
float empHours2;
}
@property(assign) float empSalary2;
@property(assign) float empHours2;
-(void) setsalary: (float)sal andHours: (float)hrs;
-(float) getsalary;
@end
- The possible setter attributes in the @property directive are (think about the memory management behavior you want):
- assign - setter uses simple assignment, typically used for scalar types of variable
- retain - setter invokes retain on the object upon assignment, and invokes release on the old object
- copy - setter uses a copy of the object for assignment, and the previous value is sent a release message.
- readonly - no setter is created
- nonatomic - disables the default atomic locking behavior, atomic locks objects so other threads cant change the object
- (nonatomic, retain) - is perhaps the most common iOS attribute pair, since iOS is not-so-much multi-threaded
2. In the implementation file, of your class, add a corresponding
@synthesize statement right after the @implementation. For our previous example:
#import "tpwEmployee.h"
@implementation tpwEmployee
@synthesize empsalary2, empHours2;
- (id)init
{
... etc.
- Warning: if one
of your synthesized variables was an object, you must remember to add
[myobject release] to your dealloc method to prevent memory
leaks. For our previous example we did not have to do this, since
empSalary and empHours were "floats" and not objects.
3. To use the automatically
synthesized accessor methods:
- To set an instance variable named myVar in an object named myObject to a value of 3, use: [myObject setMyVar: 3]
- To get an instance variable named myVar in an object named myObject, use: [myObject myVar]
- Thus, our previous code example would become:
tpwEmployee * emp1;
emp1 = [tpwEmployee alloc];
emp1 = [emp1 init];
NSLog(@"Employee salary=%f hours =%f \n",[emp1 empSalary2],[emp1 empHours2]);
[emp1 setEmpSalary2: 123.25];
[emp1 setEmpHours2: 40.0];
NSLog(@"Employee salary=%f hours =%f \n",[emp1 empSalary2],[emp1 empHours2]);
[emp1 release];
- Dot syntax
- Objective-C also provides the option of using the dot operator to set and get variables for synthesized accessors, similar to C++ conventions
- To set an instance variable named myVar in an object named myObject to a value of 3, use: myObject.myVar = 3;
- Similarly, you can obtain the value using myObject.myVar
- Thus, the foregoing example code could be rewritten in "dot syntax" as:
tpwEmployee * emp1;
emp1 = [tpwEmployee alloc];
emp1 = [emp1 init];
NSLog(@"Employee salary=%f hours =%f \n",emp1.empSalary2,emp1.empHours2);
emp1.empSalary2 = 123.25;
emp1.empHours2 = 40.0;
NSLog(@"Employee salary=%f hours =%f \n",emp1.empSalary2,emp1.empHours2);
[emp1 release];
- Implement the synthesized accessor methods above (choose either the dot or bracket convention)
- Run the modified code to get output as follows:
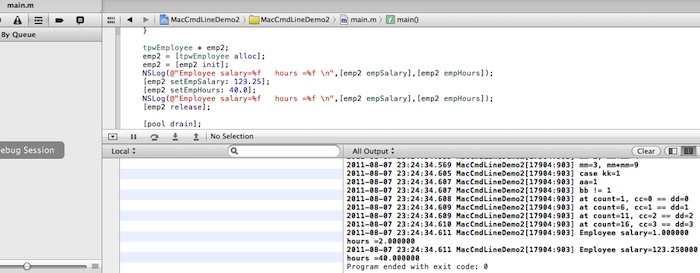
Fig. 8
- Take a snapshot of your project as in Fig. 8 above (make sure that
the main.m code with using the synthesized accessors is visible and
that the output at the bottom of the debugger is visible with all of
your "Employee salary= hours =" lines visible along with "exit code: 0") and paste it into your
report as Fig. P8.
- Brad Cox and Tom Love created what programming language in the 1980's? (Q10)
- Turn in a printout of your class header file xyzEmployee.h. (Q11)
- Turn in a printout of your class implementation file xyzEmployee.m. (Q12)
- Demonstrate the complete project on your macbook and have the instructor sign the cover sheet of your report. (Worth 20% of project) (Q13)
Report
- Include the plot/picture/snapshot numbers P1, P2, etc. in captions, along with a short description!
- Place answers to all questions on one or more consecutive sheets of paper at the front of the report!
- Include the question numbers Q1, Q2, etc in answers, along with the question!
- Do NOT scatter the question answers throughout the report, keep them together
- Write a cover sheet + 1 page executive summary ONLY!!! Describe any unresolved issues.
- Make sure that you include question numbers and plot numbers on all sheets!
- Instructor will only look on the question answer-sheets for any discussion.
- All extraneous material WILL BE IGNORED!
- Do not write any discussion, except directly on the question answer-sheets or 1 page summary.
- Do not add extraneous pages.
- Do not put explanations on plots unless specifically directed to do so.
- Include any problems or unresolved issues in the summary.
- ONLY turn in the specific snippets of source code as requested (NOT ANYTHING ELSE!!")
- Include any problems or unresolved issues in the summary.
Copyright 2011 by T.P. Weldon
Apple, iPhone, iPad, and Xcode are registered trademarks of Apple Inc.