Design with
iPhone Project 1
Warning:
Content of this website may change at any time up until class meeting.
World's Fastest Introduction to OS X and iOS apps
Please note that groups of 2 will share one laptop/setup and must share
the system in alternating weeks, signed out fro the
storeroom. Each student is responsible for replacement cost
or repair for any lost, stolen, or damaged equipment.
Form groups of 2. Members of any group must be all graduate or all undergrad.
Students unfamiliar with Objective-C, java, C, or C++ should join
groups having at least one person familiar with such programming
languages Students not in a group will be randomly assigned
to groups.
Sign up in groups
- Only registered students may sign up in groups
- Once you have formed your group and signed up on the roster, obtain a laptop/setup from the storeroom.
- Remain in the same groups of 2 for the remainder of the semester.
- Members of any group must be all graduate or all undergrad.
- It would be a good idea to back up your work on a USB drive
- To access quick help in Xcode, experiment with option-double-clicking items in the window.
- Text: Chapters 1, 2 (See new Xcode 4 addendum appendix: http://teachyourselfiphone.com/ )
Preparation
- Download and open the project template below, so that you can cut and paste answers into the report as you complete the project.
Use the application Grab.app in the Application::utility folder, or
search for it in spotlight (the magnifying glass in the upper right of
your screen).
- Create a new directory"Project1"
for this project in your Documents directory, if you have not already
done so. (To create this directory, see "Introduction to OS X" below if
you are not familiar with OS X)
Sign up for developer program
- Warning: create a new account for
your UNCC student Apple developer account for this course, even if you
are already registered as an Apple Developer
- Each student must first send an email from your uncc address to the instructor to become registered as an Apple Developer
- Once the instructor has added you to the team, you will receive an email inviting you to join the developer program,.
- Follow the instructions in the email to create a new ID. Do not use an existing developer ID or Apple account, create a new AppleID for this university developer account, even if you already have a developer account or iTunes account.
- The email will be along these lines
You are Invited to Join Apple Developer Program
Dear student,
xyz has invited you to join their team in the iOS Developer Program ...
for your iOS development course.
NOTE: DO NOT USE AN OLD DEVELOPER ACCOUNT!=> If you have
already registered as an Apple Developer and are interested in
accepting this invitation, click the invitation code below:
1234aa234
USE THESE INSTRUCTIONS! => If you
have not registered as an Apple Developer, you will be taken through
the registration process after clicking the invitation code above.
Please contact your Team Administrator, with any questions.
- As you complete the registration of your new Apple Developer student account, you will receive other emails such as:
Please Verify Email Address
Dear student,
To continue the process of registering as an Apple Developer, please click the code below to verify your email address.
1234asd123
This verification code is only valid for 30 days. If you attempt to verify your email after this time, ....
- After the process of registration is complete, your should receive a confirmation email such as:
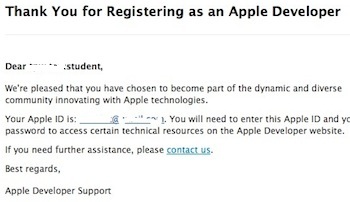
(first email)
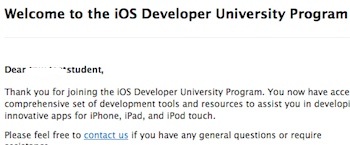
(second email)
Fig. 1
- You should receive a pair of emails as in Fig. 1 above, when you successfully complete your registration and enrollment
- Take a snapshot of your two final registration confirmation emails as above, (make sure that your AppleID is visible as in Fig. 1 above, and paste it into your report as Fig. P1. (
Use the application Grab.app in the Applications/Utilities folder)
- Take a snapshot of your lab partner's two final registration confirmation emails as above, (make sure that your lab partner's AppleID is visible as in Fig. 1 above, and paste it into your report as Fig. P2.
Change your laptop account names and passwords
- Each
group member should log into one of the default accounts on their
group's
laptop, and change their user name and password in
Apple::SystemPreferences::System::Users&Groups (at the upper
left of your screen under the apple icon), and change your name and
passwords in the pop-up.
- Most
likely you will also want to set the trackpad to allow taps and
gestures by Apple::SystemPreferences::Trackpad tap-to-click.
- In Lion, you will probably also want to set drag-lock,
using
Apple::SystemPreferences::UniversalAccess::Mouse&Trackpad::TrackpadOptions::Dragging::withDragLock
Introduction to OS X
- OS X is the operating system on your MacBook Pros
- The current version of OS X on your laptops is Lion (OS X 10.7)
- The main features of the OS X desktop are shown below:
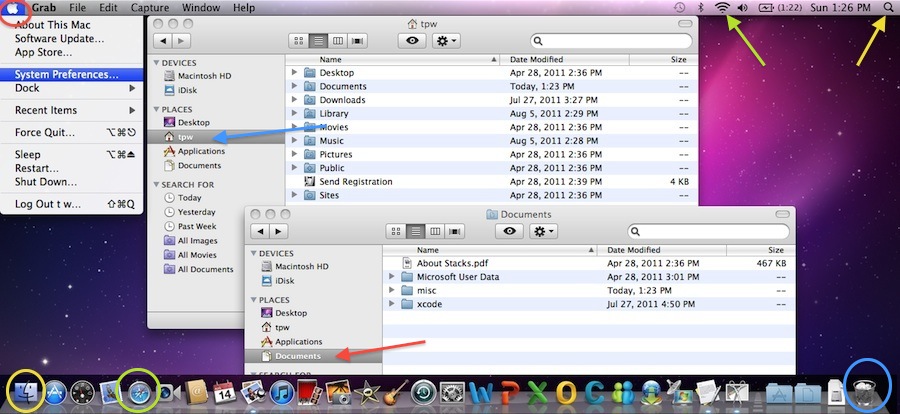
Fig. 2
- When your first login, click the Finder app in the dock at
the bottom of the screen (lower left yellow circle above) to open a
finder window. Finder is the OS X file browser, and typically
opens in your home directory by default as shown at the blue arrow
above.
- Most applications are in the applications directory, right below the blue arrow pointing to you home directory.
- However, you should place most of your documents and project
directories in your Documents folder as shown at the red arrow above.
- Also in the dock are the Safari web browser (green circle above) and the trash bin (blue circle).
- At the top right of the desktop, the spotlight
app (upper right yellow arrow) is accessed with the magnifying glass
icon. This provides an extremely useful tool for finding anything
on your computer.
- At the top green arrow are icons for accessing bluetooth and wi-fi settings
- At the top left is the Apple menu
(red circle above) accessed through the apple icon. The drop-down
menu of the AppleMenu allows setting of system preferences as shown
above.
- In the settings menu, you may wish to set the dock location to the
left, and use magnification to highlight the items in the dock as you
hover over an item:
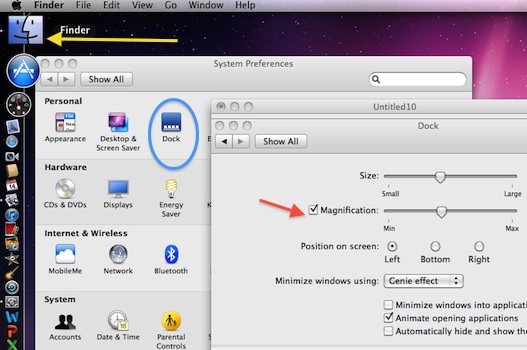
Fig. 3
- As indicated in the blue circle above, select the dock
settings. If you wish to use magnification, adjust the
settings at the red arrow, and observe the magnification as illustrated
at the yellow arrow.
- For this course, it is important to also set the preferences on Finder to include filename suffix as shown below.
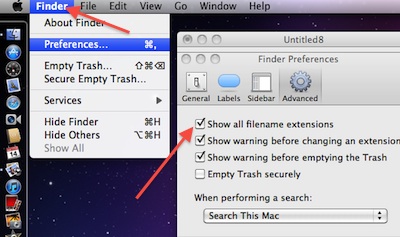
Fig. 4
- To access the Finder preferences, first select a Finder window on
the desktop. Then, the Finder menu should appear at the menu bar
at the top of the desktop (top left red arrow above).
- From the drop-down Finder menu, select preferences, and choose
the "Show all filename extensions" option (lower red arrow in Fig. 4
above)
- Lion
scrolling is "upside down," but you can change it using
Apple::SystemPreferences::Trackpad::Scroll&Zoom::ScrollDirectionNatural::unchecked
- Set the preferences in Finder to Finder::Preferences::Sidebar::Show::downloads
- Also set Finder::View::showPathBar
- Check the status of your firewall Apple::SystemPreferences::Security::Firewall and ask the instructor to modify it if you want changes
- You may wish to click the battery icon at the top of the desktop and choose the "show time' option
- For more information about the basic desktop, see Apples's tutorial Mac 101: The Grand Tour
Command line terminal
- OS X is a unix-like system, and you can also use a command line terminal on your system
- To see this, run the Applications/Utilities/Terminal.app to bring up a terminal as below:
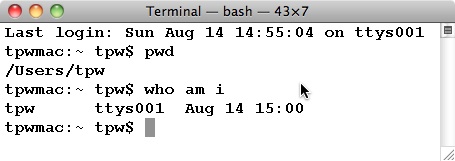
Fig. 5
- Type the commands "pwd" and "who am i" as illustrated above
- Take a snapshot of your terminal window as above, (make sure that all of the lines visible in Fig. 5 above are visible in your figure) and paste it into your report as Fig. P3. (
Use the application Grab.app in the Applications/Utilities folder)
- What directory holds Textedit.app? (Q1) Hint: try using Spotlight to search
- Can Preview.app open and annotate pdf file? (Q2) Hint: try using Spotlight to search for preview, then run it, then access help from the menu bar at the top of the desktop
- Can Preview.app crop and resize images? (Q3)
A Simple Mac Application in Xcode
- Launch Xcode (Run Xcode from the /Developer/Applications directory, or search for it in Spotlight and run it, as illustrated below):

Fig. 6
- You may wish to keep xcode in the dock by right-clicking the Xcode icon in the dock and choosing Option::KeepInDock
- Download the example app twDemo1.zip into your project 1 directory and unzip the file by double-clicking it in Finder
- Double click the twDemo1/twDemo1.xcodeproj file to open it in Xcode
- The project should open as shown below (make sure that the items at the red arrows are selected, and the deployment target version in the red circle should match the iOS version of the iPod):
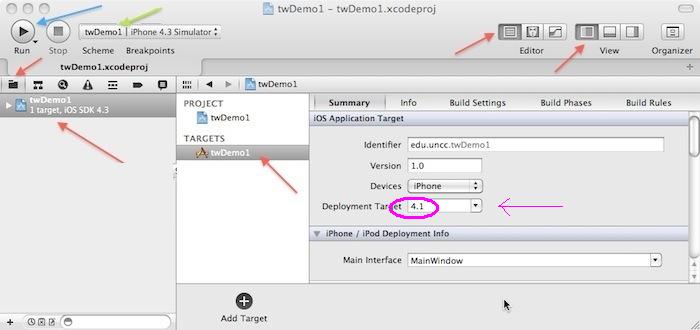
Fig. 7
- Take a snapshot of your Xcode window as above, (make sure that all of the items visible in Fig. 7 above are visible in your figure) and paste it into your report as Fig. P4.
- Select the iPhone 3 simulator as shown at the green arrow above
- Click run, and the following iPhone simulator should appear on your laptop screen:
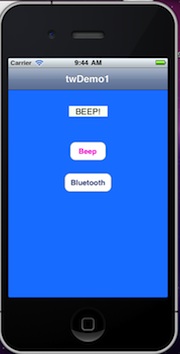
Fig. 8
- If you get the pop-up error window "developer tools access needs
to take control" "provide name/passwd of a user in developer tools
group", then the instructor or admin of your machine will need to run
the following command (note: regardless of loginName, the instructor
may need to use the userID listed when the user command is run):
su "ECE Admin"
users
sudo dscl . append /Groups/_developer GroupMembership <username>
sudo dscl . read /Groups/_developer
exit
- Click the "beep" button, and you should hear a sound (check the volume setting at the top of your desktop)
- Take a snapshot of your simulator window as above, (make sure that the black "BEEP!" and red Beep and all of the items visible in Fig. 8 above are visible in your figure) and paste it into your report as Fig. P5.
- In the simulator click iosSimulator::hardware::rotateRight, and you should see the following:
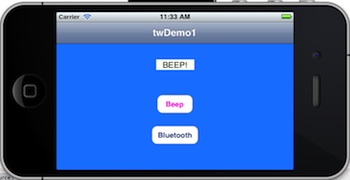
Fig. 9
- Take a snapshot of your rotated window as above, (make sure that the black "BEEP!" and red Beep and all of the items visible in Fig. 9 above are visible in your figure) and paste it into your report as Fig. P6.
Load your app onto your iPod
- Run iTunes
- Plug your iPod into the MacBook
- If the iPod is new, you may need to do some initialization, but do not upgrade the iOS on the device do not register the device, and do not select other optional services or automatic upgrades
- If
not already set, set the name of your ipod in iTunes as
"unccECEipod33" replacing "33" by the number of your ipod as
shown at the arrow below:
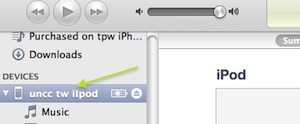
Fig. 10
- Quit iTunes and unplug your iPod
- Open the Xcode Organizer, Xcode::Window::Organizer
- Your iPod should appear in the Organizer as shown below, with the device selected (blue arrow):
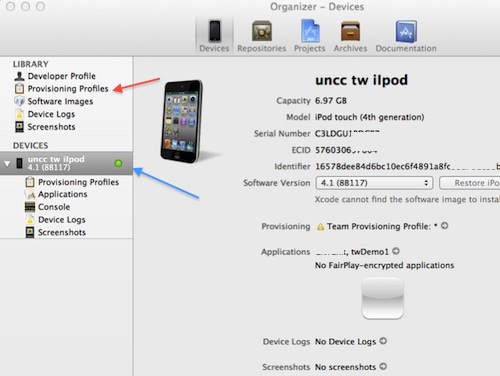
Fig. 11
- Select Organizer::Library::ProvisioningProfiles (red arrow
above) and select "Automatic Device Provisioning" at the bottom of the
window:
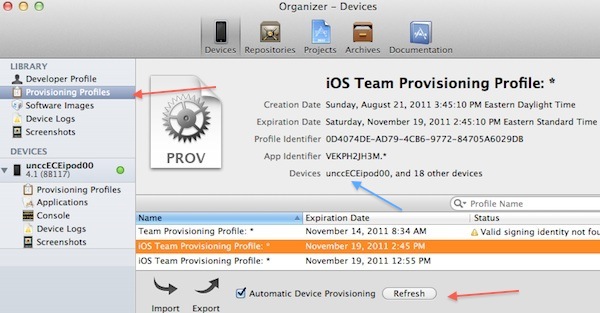
Fig. 12
- Click refresh at the bottom of the window shown at the
bottom red arrow above, and you should see an iPhone provisioning
pop-up.
- Enter your new Apple Developer username and password for the iPhone Dev Center
- Accept the offer to have Xcode request a development certificate created (submit request)
- You may get a message that no development certificate found, awaiting admin approval
- The instructor or admin will approve the certificate at http://developer.apple.com/ios/manage/certificates/team/index.action , and then you will (might?) receive an email from apple confirming approval
- After a few minutes, click refresh in Organizer, and a valid iOS Team Provisioning Profile should appear
- It is critical that you save your private key. This private key
is tied to your user account and cannot be reproduced if lost due to an
OS reinstall.
- Run Applications::Utilities::KeychainAccess and select the ‘Keys’ category
- Control–Click on your private key
and click ‘Export,’ and save your key in the .p12 file
format. You will be prompted to create a password. You can now transfer
this .p12 file between systems if you later double-click on the .p12 to
install it on a system, you will be prompted for the password.
- Save the file in a safe place
- Take a snapshot of your window as in Fig. 12 above, (make sure that your unccECEipodxx device and all of the items visible in Fig. 12 above are visible in your figure) and paste it into your report as Fig. P7.
- Return to Xcode, select and Run the twDemo 1 (blue arrow in Fig. 7 above)
- If you get the pop-up error "a valid provisioning profile for
this executable was not found," then your iPod may be new and may not
have been registered
- If so, give the iPod to the instructor to have it registered at http://developer.apple.com/ios/manage/devices/index.action
- You must click the refresh in Organizer to get a new updated provisioning profile
- Your device should now appear in Organizer as shown at the blue arrow in Fig. 12.
- Return to Xcode, select and Run the twDemo 1 (blue arrow in Fig. 7 above)
- Your app should download to your iPod and be running
- Click the "beep" button to confirm that it is working (adjust the iPod volume)
- Click the bluetooth button and your app may be able to pick up other iPods in the room
- Click the stop button on the iPod
Demonstrate your app
- Demonstrate the twDemo1 app on your iPod and have the instructor sign the cover sheet of your report. (Worth 20% of project) (Q4)
Report
- Include the plot/picture/snapshot numbers P1, P2, etc. in captions, along with a short description!
- Place answers to all questions on one or more consecutive sheets of paper at the front of the report!
- Include the question numbers Q1, Q2, etc in answers, along with the question!
- Do NOT scatter the question answers throughout the report, keep them together
- Write a cover sheet + 1 page executive summary ONLY!!! Describe any unresolved issues.
- Make sure that you include question numbers and plot numbers on all sheets!
- Instructor will only look on the question answer-sheets for any discussion.
- All extraneous material WILL BE IGNORED!
- Do not write any discussion, except directly on the question answer-sheets or 1 page summary.
- Do not add extraneous pages.
- Do not put explanations on plots unless specifically directed to do so.
- Include any problems or unresolved issues in the summary.
- ONLY turn in the specific snippets of source code as requested (NOT ANYTHING ELSE!!")
- Include any problems or unresolved issues in the summary.
Copyright 2011 by T.P. Weldon
Apple, iPhone, iPad, MAcBook, iTunes, and Xcode are registered trademarks of Apple Inc.