M.S. students randomized
groups of two each week, never working with same student.
Ph.D. students have option to choose their groups (all Ph.D. or
mix), with or without randomization.
The objective of this project is to become familiar with:
NOTE: Use the Project Report Template and see below
for minimum required data content
your reports and demos.
IN NO CASE may code or files or data or pictures be exchanged
between student groups, there is to be NO COPYING of group
reports!
Also, each student must be able to independently
answer any questions themselves during demos.
All students are expected to learn all aspects of every project.
Nevertheless, students are encouraged to collaborate (not copy)
during the lab sessions.
Part 1
See below for minimum required data
content for your reports and your demos
In this part, compiling and downloading FRDMK64F code using
mbed.org is investigated.
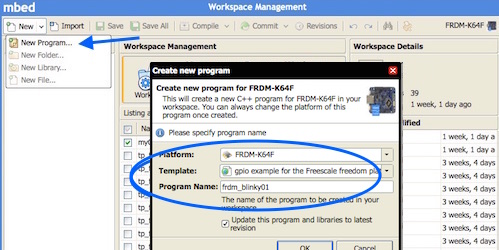
Create a new program using Mbed::MenuBar::NewProgram (blue
arrow below) and selecting the FRDM-K64F platform,
empty-program template, and name frdm_blinky01 (blue circle
below) as shown below
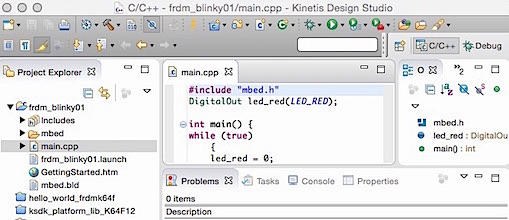
Open the Program Folder and double-click main.cpp (blue
arrow below) to open the main program file as shown below
Inspect the main.cpp program code (use main.cpp tab in blue
circle above)
Click the Mbed::MenuBar::Compile button (red arrow above)
You should observe "success" for the compilation (red circle
above)
Also, note that the file "frdm_blinky01_K64F.bin" should
have been downloaded to your computer (in ~/Download, or
desktop, etc )
frdm_blinky01_K64F.bin is the buinary that would be loaded
to your FRDM-K64F board
Delete the file frdm_blinky01_K64F.bin that was downloaded
to your computer, since we will next replace the default
gpio_example with our own code
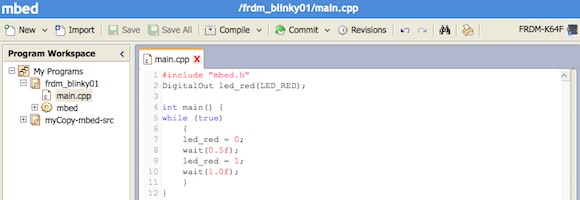
Next: delete all of the code in the main.cpp frame of the
mbed compiler, and insert the following new program code into
main.cpp
#include "mbed.h"
DigitalOut led_red(LED_RED);
int main() {
while (true)
{
led_red = 0;
wait(0.5f);
led_red = 1;
wait(1.0f);
}
}
Your edited main.cpp should look like the following:
Use Mbed::MenuBar::NewProgram to save your new program
Use Mbed::MenuBar::Compile to compile your new program
Make sure that you observe
"success" for the compilation at the bottom of the mbed
window, as before
Also, note that the file "frdm_blinky01_K64F.bin" should
have been downloaded to your computer
MAKE SURE that your FRDM-K64F
board firmware is updated to latest version!
for FRDM-K64F boards check here:
https://developer.mbed.org/handbook/Firmware-FRDM-K64F
and here: https://developer.mbed.org/platforms/FRDM-K64F/
Plug in your FRDM-K64F board
Open two file-browsers, file-managers, file-navigators, or
finders (depending on what your operating system calls them)
One file-browser should be opened to the USB device
corresponding to your FRDM-K64F
The second file-browser should be opened to the directory
containing your dowloaded binary frdm_blinky01_K64F.bin
In the two file-browsers, drag frdm_blinky01_K64F.bin into
your FRDM-K64F
On some Apple/Mac setups, it may be necessary to transfer
the file to the FRDM-K64F board using a command line from a
terminal, try:
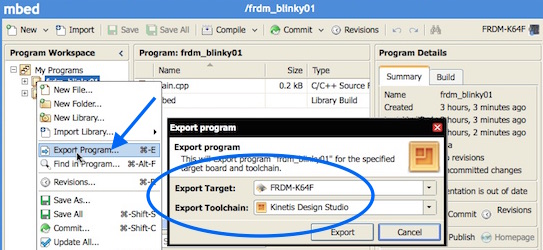
Import your mbed project using MenuBar::File::Import
in popup1 choose general::existingProjectIntoWorkspace and
click next,
and in popup2 push selectArchiveButton,
browse to your frdm_blinky01_kds_k64f.zip file, and
click finish
Open the frdm_blinky01 folder, and double-click main.cpp
to open it
If all goes well, you should see the following
Plug in your FRDM-K64F board
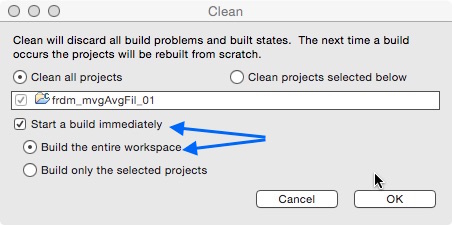
In KDS, run MenuBar::Project::clean
In KDS, run MenuBar::Project::clean again (running clean
twice can often force build on second pass of clean)
Note the options to rebuild immediately at blue arrows below.
In KDS, add 2 breakpoints to main.cpp
open main.cpp and add 2 breakpoints at the “led=1;” and
"led=0;" lines by double-clicking in the bar to the left of
the 2 lines in main.cpp (little buttons wil appear to
indicate the breakpoints)
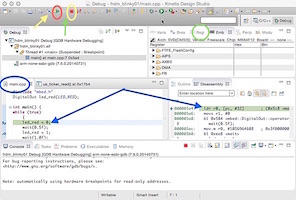
On a Mac-Yosemite-pyOCD
KDS setup, in KDS, create your debug
configuration: MenuBar::Run::debugConfiguration and
double-clcik GDBhardwareDebugging
WARNING: On a PC-based setup, in
KDS, the following steps may vary
and most likely you must create your debug
configuration differently:
MenuBar::Run::debugConfiguration and double-clcik
GDBopenOcdDebugging. See further
details on other setup differences on PC and Linux
KDS Freescale instructions in Section 1.2 and Section 2.5 of
Kinetis
Design Studio V3.0.0- User's Guide
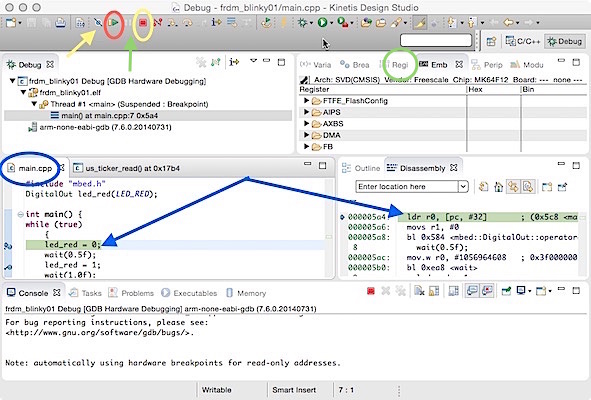
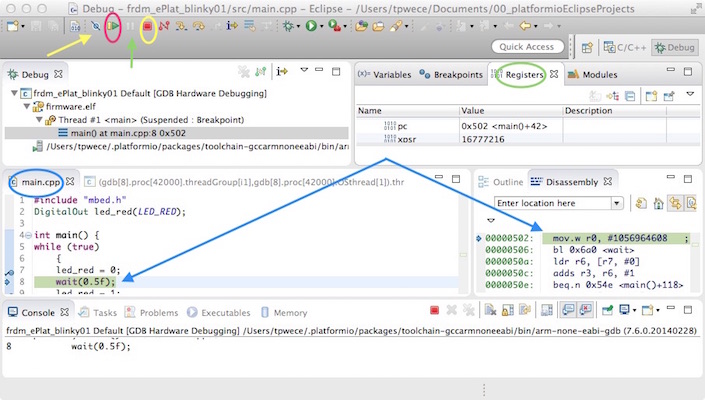
Click the resume button (red circle below) to proceed to the
next breakpoint
The green highlights in main.cpp and disassembly (blue
arrows) show the program stopped at the breakpoint
The "00005a4" hexadecimal in disassembly is the program
counter, and "ldr r0, [pc, #32]" is the assembly language
instruction
Click resumeButton again, and watch the program proceed to
the next breakpoint, "00005b4" in disassembly
Next use skipAllBreakptsButton (yellow arrow below) and
resumeButton
Execution will be uninterrupted until you press the
suspendButton (green arrow below)
After halting, click on the register tab (green circle
below), and scroll down until you see the"pc" the program
counter and see that it agrees with the disassembly window
Continue exploring the debug interface
Click TerminateButton (yellow circle above) to terminate
Make a directory called frdm_ePlat_blinky01 in whatever
directory you have chosen for your Platformio projects (but
NOT the directory for your Eclipse/Platformio projects)
Open a terminal, and change to your new frdm_ePlat_blinky01
directory
Inside this directory, run the command: platformio
init --ide eclipse -b frdm_k64f
and answer no to auto-uploading
and yes to accept the default directory structure
you should see “Project has been successfully
initialized!”
Copy the file main.cpp that was extracted from
frdm_blinky01_kds_k64f.zip into the new src subdirectory
created by platformio in your frdm_ePlat_blinky01 directory
Edit the newly created platformio.ini that was created by
platformio in your frdm_ePlat_blinky01 directory as follows:
Run eclipse and import the newly created platformio
frdm_ePlat_blinky01 project using
MenuBar::File::Import::General::ExistingProjectsintoWorkspace
Import your mbed project using MenuBar::File::Import
in popup1 choose general::existingProjectIntoWorkspace and
click next,
and in popup2 push selectRootDiectoryButton,
browse to your frdm_ePlat_blinky01 directory, and
click finish
check boxes searchForNestedProjects and
CopyProjectIntoWorkspace
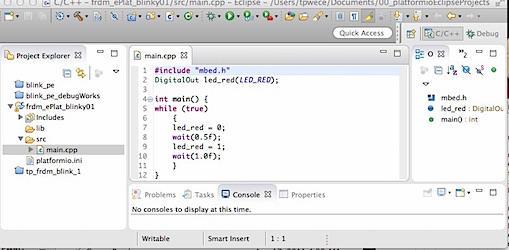
click finish, and you should see ePlat_blinky01 added in
the ProjectExplorer pane on the left side of Eclipse
If needed, go to the workbench view by clicking on the
workbench icon in the upper right of eclipse or by
MenuBar::Window::NewWindow
Open the frdm_blinky01 folder, and double-click main.cpp
to open it
Double-click main.cpp to view it
If all goes well, you should see the following
Update Eclipse $PATH variable.
In Eclipse IDE right click on the created project in the
ProjectExplorerPane (leftmost pane) and select
Properties::C/C++ Build::Environment
then click the selectButton and check the path variable in
the popup, and OK,
then select PATH and edit it to append /usr/local/bin to
enable eclipse to find the platformio command on your system,
then click applyButton
Note: in a command window you can type “which platformio”
in a terminal window to confirm the location
Update the C/C++ Build to upload the binary to the FRDM-K64F
by telling where the USB directory appears in the computer
filesystem,
for example on mac this may be in Properties::C/C++ Build
under the BehaviorTab, then changing the “Build (incremental
build)” line to“--force run --upload-port /Volumes/MBED”
and click applyButton
Plug your FRDM-K64F into the USB port of your computer
Note: when you first use platformio to build your project
under Eclipse, it will usually automatically download and
install a large amount of software for your board,
so it is best to do your first build from a terminal command
line,
so change to your project directory that was just imported
into eclipse,
and run the command “platformio —force run”
and it may take a while to download the needed additional
software to platformio
Build and download a non_Debug (release, more or less) default
version of your code
build the project by clicking the hammer-button in the
menuBar
or build it by right-clicking the blink_pe in the
ProjectExplorerPane (leftmost pane)
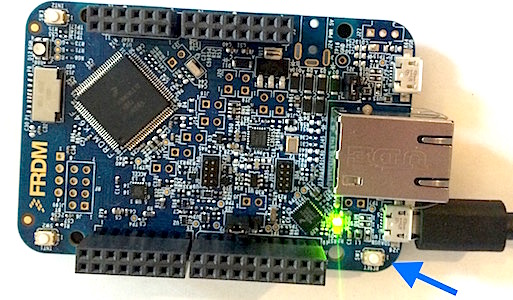
When you build the project, it should automatically download
to your FRDM-K64F
(you should see the green LED blink as the code is
downloaded)
NOTE: at the bottom of the window after building, you
will likely get a warning about an Invalid project path such
as
/Users/tpw/.platformio/packages/framework-mbed/variant/K64F/env
. The easiest workaround is to simply create a dummy
directory from the command line of a terminal by typing
The red LED at the opposite end of the board should
blink per your “blink_pe/src/main.cpp” program code
Once you have the basic software running, create your debug configuration:
MenuBar::Run::debugConfiguration and double-clcik
GDBhardwareDebugging
a) in MainTab:
C/C++Application browse to your firmware.elf location,
such as
/Users/tpwece/Documents/00_platformioEclipseProjects/frdm_ePlat_blinky01/.pioenvs/frdm_k64f/firmware.elf
Note: you may not be able to use shortcuts and need full
path (not ./.pioenvs )
Assumes your Eclipse projects are in
/Users/tpwece/Documents/00_platformioEclipseProjects
BuildConfig selectAutomatic UseWorkspaceSettings
click applyButton
b) in debuggerTab,
check "use remote target"
Set Jtag GenericTcpIp localhost:3333 (same port as
printed from pyocd-gdbserver)
set full ARM GDBCommand path
such as:
/Users/tpwece/.platformio/packages/toolchain-gccarmnoneeabi/bin/arm-none-eabi-gdb
Assumes your Eclipse projects are in
/Users/tpwece/Documents/00_platformioEclipseProjects
click applyButton
c) in startupTab
uncheck initilizationCommandResetDelay
uncheck initilizationCommandHalt
check LoadImage and loadSymbols
check useProjectBinary, and make sure useProjectBinary
points to firmware.elf
check runtimeOptionSetBreakpointAt and enter "setup" in
the box
check runtimeOptionsResume
click applyButton
d) in commonTab
check saveAsSharedFile
check displayFavoritesDebug
check allocateConsole
click applyButton
click closeButton
In Eclipse, add 2 breakpoints to main.cpp
open main.cpp and add 2 breakpoints at the “led=1;” and
"led=0;" lines by double-clicking in the bar to the left of
the 2 lines in main.cpp (little buttons wil appear to indicate
the breakpoints)
On a PC/linux, you might be
abe to skip the next 2 pyocd server steps
in a command terminal test your pyocd by running the
command: pyocd-gdbserver -l
Then run the pyocd sever by using the command:
pyocd-gdbserver
Run debug in the mainEclipse window,
by clicking the dropdown arrow of the debug icon and run
frdm_ePlat_blimky01 Default,
or MenuBar::Run::DebugConfigurations
the green LED should flicker as it uploads to the FRDM-K64F
And a popup should appear asking to confirm switch to debug
perspective, and click OK
Note: if you get “problem occurred” details: localhost3333
timeout, go back to the terminal and make sure pyocd-gdbserver
ran on port 3333
Click the main.cpp tab to hide any "ticker tab," or "0x20000"
tab, if either is present
Click the resume button (red circle below) to proceed to the
next breakpoint
The green highlights in main.cpp and disassembly (blue arrows)
show the program stopped at the breakpoint
The "0000502" hexadecimal in disassembly is the program
counter, and "mov w R0 ..." is the assembly language
instruction
Click resumeButton again, and watch the program proceed to the
next breakpoint, "0000530" in disassembly
Next use skipAllBreakptsButton (yellow arrow below) and
resumeButton
Execution will be uninterrupted until you press the
suspendButton (green arrow below)
After halting, click on the register tab (green circle below),
and scroll down until you see the"pc" the program counter and
see that it agrees with the disassembly window
Continue exploring the debug interface
Click TerminateButton (yellow circle above) to terminate
Report Data
Minimum required data content for
your report and demos
Required theory content:
Not applicable
Required software code excerpt content:
Main.cpp code to turn the blue LED on
Required tabular data content:
Arduino pin "D2" corresponds to what port pin (PT???)
Arduino pin "A0" corresponds to what port pin (PT???)
Required pictures/photos content:
Legible picture (if pdf of your report is
"zoomed/magnified") of mbed window showing main.cpp for
flashing blue LED (as roughly illustrated illegibly below on
left)
Legible picture (if pdf of your report is
"zoomed/magnified") of KDS or Eclipse/Platformio debug
showing halted program (as roughly illustrated illegibly
below on right)
Project Demos
Be prepared to demonstrate and discuss items such as:
Demonstrate an mbed compile and download
Flash the blue LED after mbed download
Debug in KDS or Eclipse/Platformio
Debug compile
Debug run/suspend/etc
Be prepared to answer questions such as:
Demonstrate a full clean/build/debug
What port number is the blue LED (PT???)
Which line of code turns the LED on?
Wait (2.0f) waits for how long?
What is the program counter
Where is assembly language?
What is a breakpoint?
How are breakpoints set?
What is Arduino?
Who is Nolan Bushnell?
Who is Federico Faggin?
What is a header file?
Report:
See above project description for required
report data content.
One pdf-format must be emailed to the instructor at the
beginning of the class meeting of the demo.
One hardcopy per student, plus
one extra hardcopy for the instructor, should be brought to
class for the demo.
Do not add extraneous pages or put explanations on separate
pages unless specifically directed to do so. The instructor will
not read extraneous pages!
YOU MUST ADD CAPTIONS AND FIGURE NUMBERS TO ALL FIGURES!!
Copyright 2015 T. Weldon
Freescale, Kinetis are registered trademarks of Freescale
Semiconductor, Inc. Texas Instruments, TI, C2000, and
Code Composer Studio are a registered trademarks of Texas
Instruments Incorporated. Adafruit is a registered
TradeMark of Limor Fried. ARM, Cortex and Keil are
registered trademarks of ARM Limited (or its subsidiaries).
Apple, Yosemite, Mac OS, iPhone, iPad, MacBook, Mac, iTunes, and
Xcode are trademarks of Apple inc. All other product or service
names are the property of their respective owners. Arduino
is a registered trademark of Arduino.