Project 3: Building and exploring graphics levels using WED
Reference for this project:
Chapter 3 (Link to page of draft book
chapter.)
- Make a directory ~/video/project3 in your home directory
- Copy the xhero.mdl file to your
directory and use it for your player. (You may need to press the
control or shift key on your browser when clicking the link, to force
the file to download.)
- Run the level editor (or world editor, WED) from the MOSAIC menu:
- 3dGamestudio->LevelEditor
- From the menu bar begin a new level (or world):
- Save the file at this point (otherwise the next step may not work)
- File->Save ~/video/project3/game3/game3.wmd
- Create a new script for your new level
- File->MapProperties->Script
- And select the A6TemplateProject
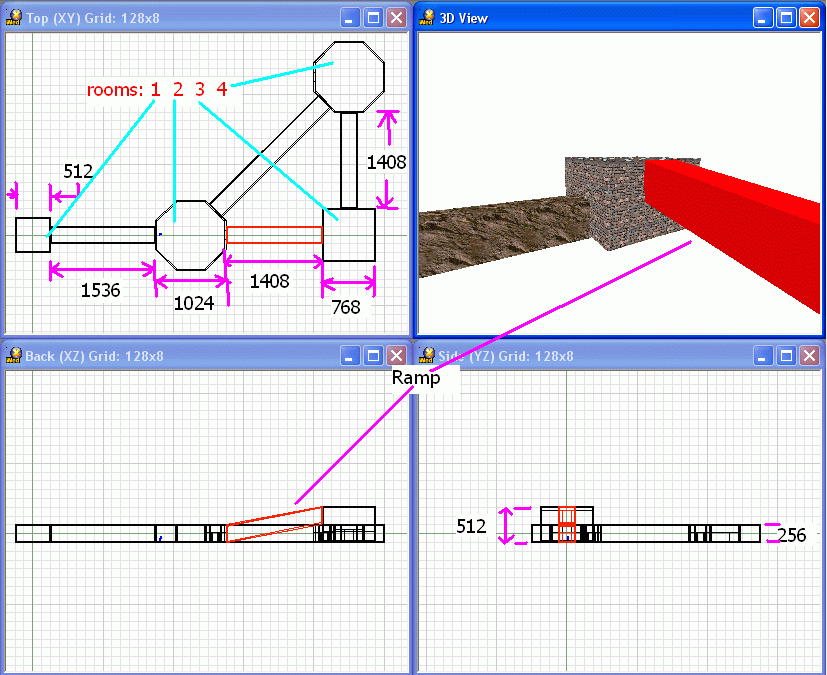
Level Design: Design the level
shown below:
Figure
1. WED level views.
- The level contains four rooms as numbered above.
- Dimensions are approximate.
- Each room must have:
- A separate floor texture
- A separate ceiling texture with lights
- An appropriate wall texture (i.e., stone block, wood, etc.)
- The hallway connecting rooms 1 and 2 must have a sky texture such
as skywhite
so that shadows are cast at the doorways
- The hallway connecting rooms 2 and 3 is a ramp that should climb
at least 200 quants before connecting to room 3. The ramp
doorway will then be above the floor of room 3, so that the
viewpoint from room 3 looking up toward the hallway will look like the
left of the figure below, and the viewpoint from the hallway
looking down into room 3 will look like the right of the figure below.
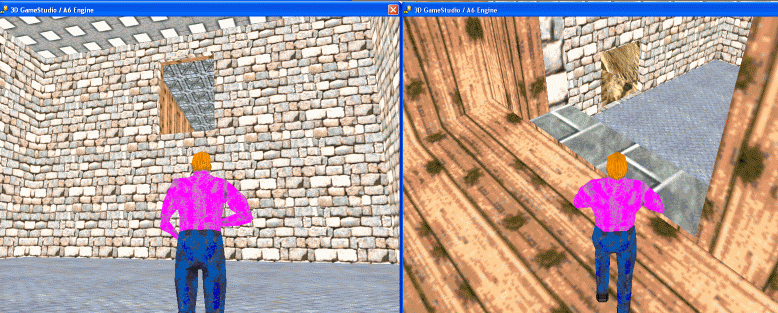 Figure 2. Ramp doorway views.
- Doorway cuts should use medium cube objects as the
cookie-cutters (MenuBar::Object::AddCube::medium).
- Set the sun level to (128, 128, 128), and set the ambient
lighting level for the game to (128, 128, 128). The azimuth
and elevation of the sun should
remain the default values of 0 and 60 degrees. These
settings should create shadows at the doorway between rooms 1 and 2
similar to the shadow on the ground in front of the player in the
figure below.
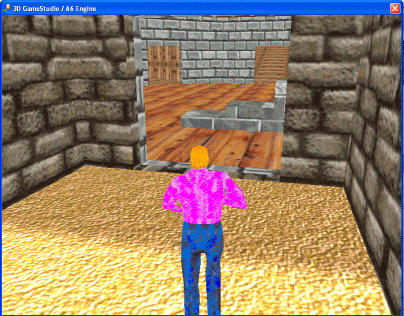 Figure 3. Shadow cast on ground.
- To see the key-bindings, go to the Project
Window in WED and select the Resources Tab. Then
open the script files folder, and
right-click the plBipedInput01.wdl script. Select
customize in the pop-up, and the
key-bindings will be shown in a new pop-up. Do
NOT change these key-bindings.
- When you are finished building the level, add the player "hero"
with plBiped01 behavior and add camera3rd01 to test the level.
- Build, run, and test the level.
- Q1 How long does it
take for the player to walk (using the "w" key on the keyboard) from
room 1 to room 4 along the diagonal hallway?
- Q2 What happens
when the player walks into room 3 from the ramp doorway?
- Q3 Can the player
run clockwise (from room 2, to room 4, to room3) around the game?
- When
the game runs, experiment with the “w,” “a”, “s,” and
“d” keys along with the mouse to move around the level.
Obstacles and stairs:
- Next, add several cubes of different sizes to see what happens
when the player is presented with obstacles and stairs.
- Place three small cubes (MenuBar::Object::AddCube::Small) of
heights 16, 32, and 64 quants in front of the player as shown
below. Use the MenuBar::ScaleButton to adjust the heights.
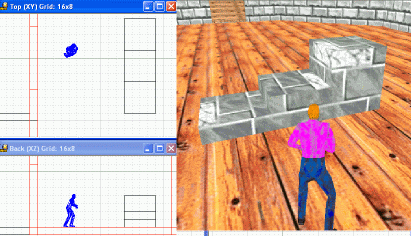 Figure 4. Three cubes of
increasing height 16, 32, 64 quants.
Figure 4. Three cubes of
increasing height 16, 32, 64 quants.
- Rebuild and rerun the level.
- Q4 What is the
largest height cube that the player can step over directly?
- Q5 Can the player
climb all 3 of the blocks sequentially as a staircase, without jumping?
- Experiment with a cube to see where WED complains about a concave
object.
- Experiment with a cube to see the effect of various settings of
texture x-scale and y-scale.
- Experiment with adding a sound source (such as "rain" from the
work directory that contains vecdemo).
Report and demonstration:
- Prepare a 9-page report exactly in the following format;
- Cover sheet with names
- 1 Page summary of project
- 1 Page Printout from WED showing the level in all 4 views, as
in Figure 1 above.
- 1 Page Printout from the running game showing the view looking
up at the ramp doorway from inside room 3, as on the left side of
Figure 2 above.
- 1 Page Printout from the running game showing the view looking
down at room 3 from the ramp doorway, as on the right side of
Figure 2 above.
- 1 Page Printout from the running game showing the hallway
shadow as in Figure 3 above.
- 1 Page Printout from the running game showing the three cubes
of different height during gameplay, as in Figure 4.
- 1 Page Printout from SED showing the first page of your game's
C-script wdl file.
- 1 Page Short answers to the following questions:
- Q1 above
- Q2 above
- Q3 above
- Q4 above
- Q5 above
- Q6 What is the unit of time in 3D GameStudio, and how many
seconds does the unit correspond to?
- Q7 What is the unit of distance in 3D GameStudio?
- Q8 If the player turns and walks to his left, would
this correspond to a change in pan, roll, or tilt? - Q9 What color
would correspond to ( 255,255,0)?
- Q10 Would setting the x-scale to 2.00 and y-scale to 2.00
for a brick wall texture cause the bricks to appear smaller or larger
on the surface?
- Demonstration
- Show your final game running, and the player "walking up a
2-block
staircase"
- show your level in WED
- Show your game1.wdl code
Copyright © 2005-2007 by Thomas Paul
Weldon
ACKNEX,
WED, MED, and 3D GameStudio are trademarks of Conitec Corporation.
Microsoft, DOS, MS-Dos, Windows, DirectX,
Halo, and
Direct3D are trademarks of Microsoft, Inc.
PAC-MAN trademarks or registered trademarks of Namco Limited
Nintendo, Mario, are trademarks of Nintendo
Atari, Pong, are trademarks of Atari
Intel, 8086, are trademarks of Intel Corporation
id, DOOM, and Quake are trademarks or registered trademarks of Id
Software, Inc.
Autodesk, 3D Studio, and 3ds Max are trademarks or registered
trademarks of Autodesk, Inc.
Alias and Maya are trademarks or registered trademarks of Alias Systems
Corp.