DSP for
Java/NetBeans 5.5 Beta 2 Tutorial (with some 8.0 updates)
T. Weldon, 2007
Note: Java is not to be confused with
JavaScript. They are not the same!
Warning: the beta
releases can be a bit buggy and may crash, so backup your projects
frequently to save your work.
Comments on installations on your home PC for 2019:
- it would be safest to install "java 8 update 171" and netbeans 8.2, if you choose later versions,
- if it does not build , or has problems, or you chose later versions
Overview
The following tutorial will introduce Java/NetBeans tools for
use in digital signal processing course projects. In the
course, audio sound files are used as the source of signals that
will be digitally processed. This has the added benefit of
allowing the results of digital filtering operations to be
heard. In addition, the graphic user interface
provides display of the time and frequency domain for the
signals. Finally, the user can easily add DSP functionality to
buttons on the interface by editing/adding Java code.
The advantage of Java and NetBeans is that it is readily available
and portable across many machines/platforms. The Java
programming language is quite similar to C++, and C++ users will
quickly adapt to Java. Notable differences are that Java does
not support overloaded operators, and "this" in Java is equivalent
to "*this" in C++.
Start NetBeans
The NetBeans IDE is a tool for building applications and allows the
user to quickly add buttons and widgets to a custom GUI
(Graphical User Interface). Downloads and documentation for
NetBeans are available on www.netBeans.org
. WARNING: if you decide
to download NetBeans to your home computer, make sure that you get
the same version as being used on campus.
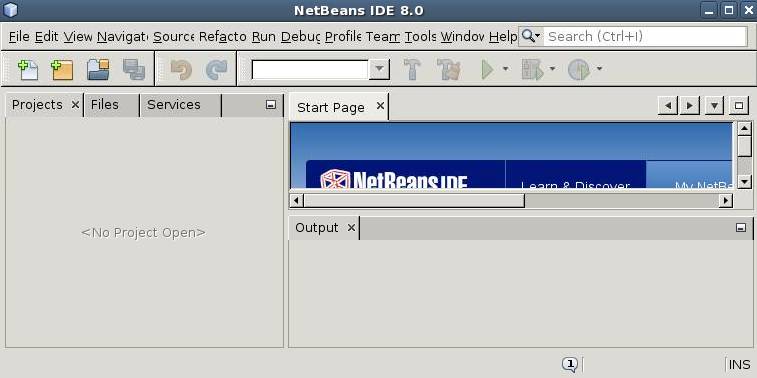
When you first run NetBeans, you should see something similar to the
window shown below. NetBeans has many different views and
window panes. A typical layout of NetBeans is shown below.
Above: Typical layout.
Load the DSPsoundv55a GUI for the class
- Create a new directory for the course, i.e., "ee4124," using
FileExplorer or other program
- Download the DSPsoundv55a GUI using DSPsoundv55a2014.zip and
extract the contents of the zip to a new directory named
e4124.
- When you have downloaded the DSPsoundv55a project interface,
run the NetBeans 5.5 program, or a later version
(Start>AllPrograms>MosaicXp>Programming>Netbeans>NetBeans55) You may skip the "JUnit
Library" install if it pops up when you run NetBeans.
- In Netbeans, use the menu-bar command File->OpenProject as
shown below to navigate and open the DSPsoundv55a project in
your new folder (NetBeans>File>OpenProject ) (In
some versions of NetBeans, the "open as main project" field
should be highlighted when you select DSPsoundv55a)
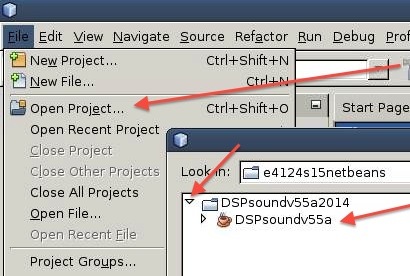
Above: OpenProject dialog. Notice "Project
name" field indicating a valid project folder.
NetBeans should have opened the project directory. This directory
contains all of the project's files, including its Ant
script, directories for storing sources and tests, and a directory
for project-specific metadata. To view the project hierarchy, use
NetBeans' Projects window pane as illustrated in the image on the
left below. Click on the DSPsoundv55a icon to expand the
hierarchy. To view the directory hierarchy, use NetBeans' Files
window. Both views are shown below..
Above:
Projects
view on left, files view on right. Use tabs to select each
view.
Open the DSPsoundv55a GUI (Graphical User Interface)
- In the ProjectsPane, navigate down through the hierarchy
to
DSPsoundv55a>SourcePackages>tpw.DSPsoundv55a>DSPsoundv55aUI.java
as
shown on the left below
- Right-click on DSPsoundv55aUI.java and select "Open" to open
the interface
- The GUI should appear in the center of the NetBeans window, as
shown below. You may toggle between the graphical
view shown below and the corresponding source code using the
"Source" and "Design" buttons.
- Although you will not need to add any buttons to your
interface, you can just drag a jButton from the palette of
widgets and drop it wherever you want it (try droppining it to
the left of the "output filename" on the interface. You
can use the "NetBeans>Edit>Undo" command from the
top menu bar to undo it.
- To preview your GUI design, click the "Design Preview" icon:
 .
.
The DSPsoundv55aUI GUI shown below contains all of the buttons and
graphical display areas that will be used in the course.
Some of the buttons are functional, but you will need to add the
remaining functionality throughout the projects in the course.
Above:
Opening
DSPsoundv55aUI.java from project pane.
Saving Backup Copies of a Project
Now would be a good time to save a
backup copy of your work. This is easily done in the
ProjectPane. Make sure the ProjectsTab is selected so that
the ProjectPane is visible in NetBeans. Then, right-click
your top-level project (DSPsoundv55a) in the ProjectPane, and
select CopyProject. The default name of the backup
copy, DSPsoundv55a_1, should appear.
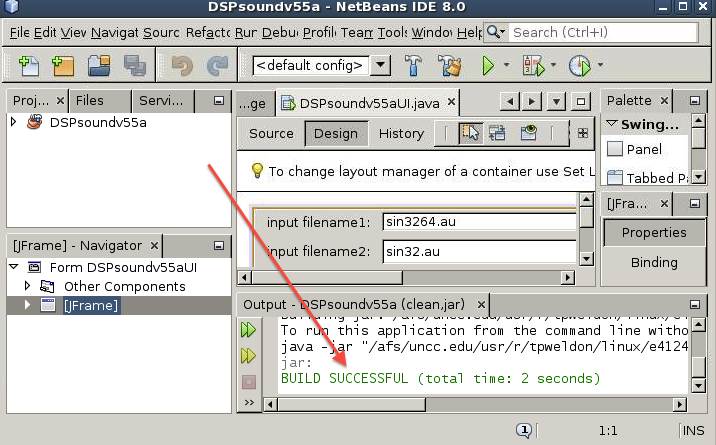
Building and Running a Project
At this point try to build the
project
- Run
"NetBeans>Run>CleanAndBuildMainProject" to build
the program, At the bottom of the NetBeans window in the
OutputPane, you should see the message "BUILD
SUCCESSFUL" as shown below.
- Then use "NetBeans>Run>RunProject" to run the
program (this option may be blanked out, if you already
are running a copy of the project). The project window
should appear similar to the example below.
Above:
Running
project window.
If the program was correctly
downloaded, the default audio input files sin3264.au and sin32.au
should already be in the project directory, available to
load. So, try the following tests to make sure everything is
working.
- Click the Read1 and Read2 buttons to see if two different
signals of peak amplitude 0.929 with length 2048
(0-2047) appear in the window.
- Click the Play button to hear the audio.
- Click Zoom2 and Zoom 4 to toggle zoom on the beginning of
the signal.
- Click WritePng to write the graphics to an output file
that you can view later or import into your reports.
- Click Read2 and then 2lnFFT to show a somewhat unusually
displayed frequency domain (not in dB!!), as shown in the
figure below.
Above:
Running
project window.
Adding Actions to Buttons(Event
Handlers) :
The window has many other buttons,
but nothing happens when the other buttons are pressed (except for
a printout at the bottom of the window). To make something
happen, we need to add code to the event handlers.
For example, suppose we wish to change the message for the "A"
key. To do this:
1. Close any running versions of
DSPsoundv55a
2. In NetBeans, right-click the "A" button in the
GUIbuilder pane as shown below, and select
Events>Mouse>mouseClicked[jButtonAMouseClicked]
Above:
Accessing
mouseClicked event function from GUIbuilder by right-clicking
"A" button.
3. The source code for the
function associated with the "A" button, jButtonMouseClicked(),
should appear as shown below. This function is called
anytime the "A" button is pressed. The
jEditorPaneBottom.setText() function sets the message at the
bottom of the window. The refreshDisplay() function
is supplied for your convenience, so that you do not have to
worry about redrawing the display. You should call the
refreshDisplay() function at the end of every buttonFunction
that you implement, so the display is always updated after any
button is pressed. Every time refreshDisplay() runs, it
plots the real part (not imaginary) of the signal stored in the
variable dispData. So, to change the plot, just change the
contents of dispData (more on that later).
Above: Source code view of the
jButtonAMouseClicked() function associated with the "A"
button.
4. To see what happens, change the first line from "String fkey
= new String("A");" to "String fkey = new String("A hello");"
and Rebuild and Run the program. When the "A" key is
pressed, you should see ""A hello clicked" print at the bottom
of the window.
5. Finally, note that you can access the "MouseClicked" action
functions from the source code view by simply clicking on the
function in the NavigatorPane at the lower left of the NetBeans
window (also shown above). Alternatively, you can scroll
through the source code view.
Using the Myclass Java Class
While simple functions may be
directly coded in Java, it is often much easier to create a new
Java class to encapsulate functions and data. Such a
Java class enables quick re-use of common functions such as
addition, multiplication, Fourier, convolution, etc.
In the DSPsoundv55a program, a Java class called "Myclass" is
included. This class includes arrays of real and imaginary
data, and provides functions for Fourier, addition,
etc. To view the class, right-click the Myclass.java file in
the ProjectPane and open the file. As shown below, the
Myclass functions are listed in the NavigatorPane in the lower
left. Click on the plus(int x) in the NavigatorPane to jump
to the plus(int x) function in Myclass.java, as shown below.
Above:
Source
code view of plus(int x) function in Myclass.java class.
In the source code above, plus(int x) uses a for-loop to
add the integer value stored in variable x to all the elements in
the array of real parts of the data, (this.re)[nn]. Notice
that there is no return value (hence the declaration of "public
void"), and the operation is done on the original copy of the
data. Further, note that there is a different plus function
defined for adding two Myclass arrays together, plus(Myclass
x). Finally, note that there is an equals(Myclass x)
function to implement "=" that would normally be implemented as
operator= in C++. (Recall that Java does not support
overloaded operators.)
Data Structure of Myclass Java
Class
The basic data structure of the "Myclass" Java class is declared
at the top of Myclass.java:
public class Myclass {
private byte
data[]; //byte-data
(data) array
private float re[];
//real data array
private float im[];
//imaginary data array
private int n;
From this, it can be seen that the class consists of an
array of bytes called data[], two arrays of floating point called
re[] and im[], and an integer n. In use, the integer n holds
the size of the arrays, and arrays re[] and im[] hold the real and
imaginary data, as "floats" (floating point arrays). (In
Java, the array indices range from 0 to n-1.) Hence, a
Myclass object can hold the sequence of sound samples in the
real part of the array. For example, a 2048-sample sound
clip could be stored in the array re[] from re[0] to
re[2047]. Similarly, the complex values of a Fourier
transform of the sound clip could be stored with the real parts in
re[] and imaginary parts in im[]. The byte array is only
used for internal use in reading audio files and playing sound, so
do not use the byte array and assume
that any operation such as addition, division, etc. is
NOT performed on the byte
array.
Constructors, Equals, and Functions of Myclass Java Class
As in C++, a constructor is used to create/instantiate a new
instance of a Myclass object. For example:
Myclass a = new Myclass();
Myclass b = new Myclass(1024);
a.equals(b);
a.equals(b.fft());
a.plus(b);
In the above, the first statement creates a new Myclass object
using the default
constructor.
The default constructor is defined by the function Myclass() in
Myclass.java, and creates a
default-sized
array of size n=10. In the second statement above,
the constructor used is Myclass(int nn), since the second
invocation has an int argument, i.e., 1024. Therefore, the
second constructor creates a Myclass object "b" with arrays of
size 1024, and loads "n" with the value n=1024. Next, recall
that
Java
methods (Java functions) are invoked by the syntax
"object.method." So, on the left side of the period must be
a Myclass object, and the right side must be a valid Myclass
method. The statement "a.equals(b);" would set the contents
of "a" equal to "b." The statement
"a.equals(b.fft());" sets "a" equal to the FFT of "b."
Note that the function fft() is a somewhat unique function that it
returns a Myclass result on the
stack,
and can therefore be used as the argument of the equals()
function. In addition, because the result is returned on the
stack, you
MUST use the equals
operator to immediately fetch the result off the stack. This
Myclass return value is evident in the declaration of the FFT
function as "public Myclass fft()" whereas a declaration "public
void whatever()" would return no value on the stack, and is the
more typical behavior.
The final statement above, "a.plus(b)," would add the contents of
b to the contents of "a" and place the result in "a." The
following Java code is a simple implementation of a function
"public void plus(Myclass x)" that would implement the above
function to
add two Myclass arrays
together. In the example below, a for-loop adds the
corresponding byte-data, real, and imaginary arrays. As in
C++, the value of n in "xx < n" below would refer to "this.n",
the value of n associated with the Myclass that invoked the
function. More specifically, the value of n would correspond
to "a.n" for the invocation "a.plus(b)". Also note that it
would be better to add some code at the beginning of the function
to check that the two arrays were the same size and that they were
not null arrays (uninitialized).
public void plus(Myclass x)
{
for (int xx = 0; xx < n;
xx++)
{
(this.re)[xx] = (this.re)[xx] + (x.re)[xx];
(this.im)[xx] = (this.im)[xx] + (x.im)[xx];
}
}
In the code above, an extremely important concept is the
keyword "this,"
where "this" is a handle/pointer that refers to the invoking
object. The invoking object is the object to the left of the
period, so "a: is the invoking object in the "a.plus(b)"
example.
Another important feature in Java is the concept of overloaded
methods, where the particular function/methofd that is
invoked depends on the types of arguments used. For example,
there can be another declaration of the "plus" method that adds an
integer "c" to the Myclass variable "a" that would be called by
writing the comand a.plus(c). In essence, the method
"plus" is overloaded, meaning that it has different algorithms
that may be called, depending on the types of variables
involved. The new example of an integer "plus" command would
be declared in the class perhaps as follows:
public void plus(int yy)
{
for (int xx = 0; xx < n;
xx++)
{
(this.re)[xx] = (this.re)[xx] + yy;
(this.im)[xx] = (this.im)[xx] + yy;
}
}
Example of the Power of Java
Classes
A good example of the power of Java classes is the implementation
of the 2lnFFT button. The code to implement taking the FFT
and log-magnitude of a soundfile using the 2lnFFT button is
essentially only two lines long:
private void
jButton2lnFFTClicked(java.awt.event.MouseEvent evt)
{
// TODO add your handling code
here:
dispData.equals(dispData.fft());
dispData.lnmag();
refreshDisplay();
}
Note the simplicity of the above code, and the readability of the
code.
So, encapsulate all of your complex code into powerful functions
in the Java class Myclass. This efficient use of your Java
class will make the high-level code much easier to read and will
make it easy to re-use your functions.
Data Storage in dispData, inData1,
inData2 in DSPsoundv55aUI.java
Returning to the GUI
program DSPsoundv55aUI.java, three Myclass variables are used to
store/access data. These variables are defined near the
bottom of theDSPsoundv55aUI.java file, and are accessible to all
of the functions in DSPsoundv55aUI.java. Variables
inData1 and inData2 are used to store the contents of sound files
read in by the "Read1" and "Read2" buttons. Variable
dispData is used to hold the contents of the data displayed
on-screen. Anything stored in dispData will be plotted
on-screen at the next invocation of the refreshDisplay()
function.
For example, consider the implementation of the "Read1" button
in "private void Read1Clicked(...)." as illustrated
below.
private void
Read1Clicked(java.awt.event.MouseEvent evt)
{
// TODO add your handling code
here:
inFileName1 =
jTextFieldInfilename1.getText();
inData1.readau(inFileName1);
dispData.equals(inData1);
refreshDisplay();
}
The first statement fetches the filename from the window text
field and stores it in the global String variable
inFileName1. The second statement uses the global Myclass
variable inData1 to invoke the readau() function to read the
file. This readau() function resizes the arrays in inData1
and stores the audio data in the real array re[] contained in
inData1. Finally, the contents of inData1 are stored in
dispData, so that the newly read sound file will be displayed
after refreshDisplay() is called in the final statement.
(Recall that the refreshdisplay() function always refreshes the
display using the current contents of dispData.)
File Output in DSPsoundv55aUI.java
As part of the function refreshDisplay() in DSPsoundv55aUI.java,
three ASCII text files are written every time the display is
refreshed. Files F1.txt and F2.txt are written with
the contents of global variables inData1 and inData2 (typically
the soundfile data read in by buttons "Read1" and
"Read2."). File disp.txt is written with the contents
of global variable dispData, the data currently displayed
on-screen. These files allow the user to see the raw data
associated with the plots on-screen.
In addition, the "Write png" button allows the user to save the
current display as a ".png" image file for easy inclusion of data
in project reports.
More Java Resources
If learning Java, try not to become bogged down in details of
window design, widgets, graphics, pop-ups, and so
forth. NetBeans takes care of most of the user
interface issues. Also, do not study applets, these are not
required. Your time will be best spent of 1) what is a
Java class, 2) for-loops, 3) arrays, 4) constructors, 5)
variables.
java
tutorials 1
java
tutorials 2
java tutorials 3
NetBeans :
http://www.netBeans.org/
Some Differences between Java and
C++
- java - no overloaded operators (operators such as +, *
/ can only work for primitive types such as int and
float)
- java - no overloaded equal
- Java - no pointers
- C++ "*this" is equivalent to "this" in Java
- Java - no prototypes
- java - no headers
- java - no destructor
- java - uses "new" but not "delete" - java garbage collector
frees memory
- java array declaration would be "Myclass w0 = new Myclass(
10 );" instead of C++ syntax "Myclass w0(10);"
Other Tutorials
Execution Problems when Running
Outside NetBeans
Note: if the windows-click-and-run
is installed incorrectly, you will need to open a command-prompt
window and type "java -jar myjarfile.jar"
to run myjarfile.jar. The jar files are most commonly in
the "dist" subdirectories of NetBeans projects. Or, you may
just run your application from within NetBeans.
Some Error Problems
On occasion, the project may not run on a machine that is
running an older version of Java. You may get error messages
such as "Unsupported major.minor version 49.0." You can
check the version of Java on the machine with the "java -version"
command. This tutorial used version 1.5 of Java. You
may need to upgrade the version of Java on the machine to get your
code to run properly.
Other References:
NetBeans/Java Installation notes:
The above tutorial was originally
written for NetBeans 5.5 Beta 2, and tested on a system with the
following installed items :
NetBeans IDE 5.5 Beta 2 Installer:
netBeans-5_5-beta2-windows.exe (42.1 MB)
NetBeans Mobility 5.5 Beta 2 Installer:
netBeans_mobility-5_5-beta2-win.exe (22.49 MB)
NetBeans Profiler 5.5 Beta 2 Installer:
profiler-5_5-beta2-win.exe (9.06 MB)
NetBeans C/C++ Pack 5.5 EA Installer: cnd-060615-windows.exe
(7.49 MB)
Oracle and Java are registered trademarks of
Oracle and/or its affiliates.
NetBeans is a trademark or
registered trademark of Oracle America, Inc.